Fill out the following information to give us details about your project. Please include any plans, drawings or images that will help us get you an accurate estimate.
Post frame vs stick frame construction differs mainly in how each system carries structural loads. For Oregon and Washington property owners, post frame often suits wide, open shops, barns, arenas, and garages, while stick frame often suits homes and room-heavy finished spaces.
Post-frame buildings use large, widely spaced columns connected by roof trusses, girts, and purlins. Stick-frame buildings use closely spaced wall studs that sit on a continuous foundation. Neither method is always better. The best choice depends on span, site conditions, desired finishes, local code, budget, and the team designing the structure.
Post frame vs stick frame construction: the core difference
Bottom line: Post frame concentrates loads through widely spaced columns, while stick frame distributes loads through closely spaced stud walls and a continuous foundation.
Post-frame and stick-frame systems use different load paths and support spacing.
Both methods create durable wood-framed buildings, but they send roof and wall loads to the ground in different ways. That structural path affects the foundation, interior layout, construction sequence, and future options.
How post frame carries loads
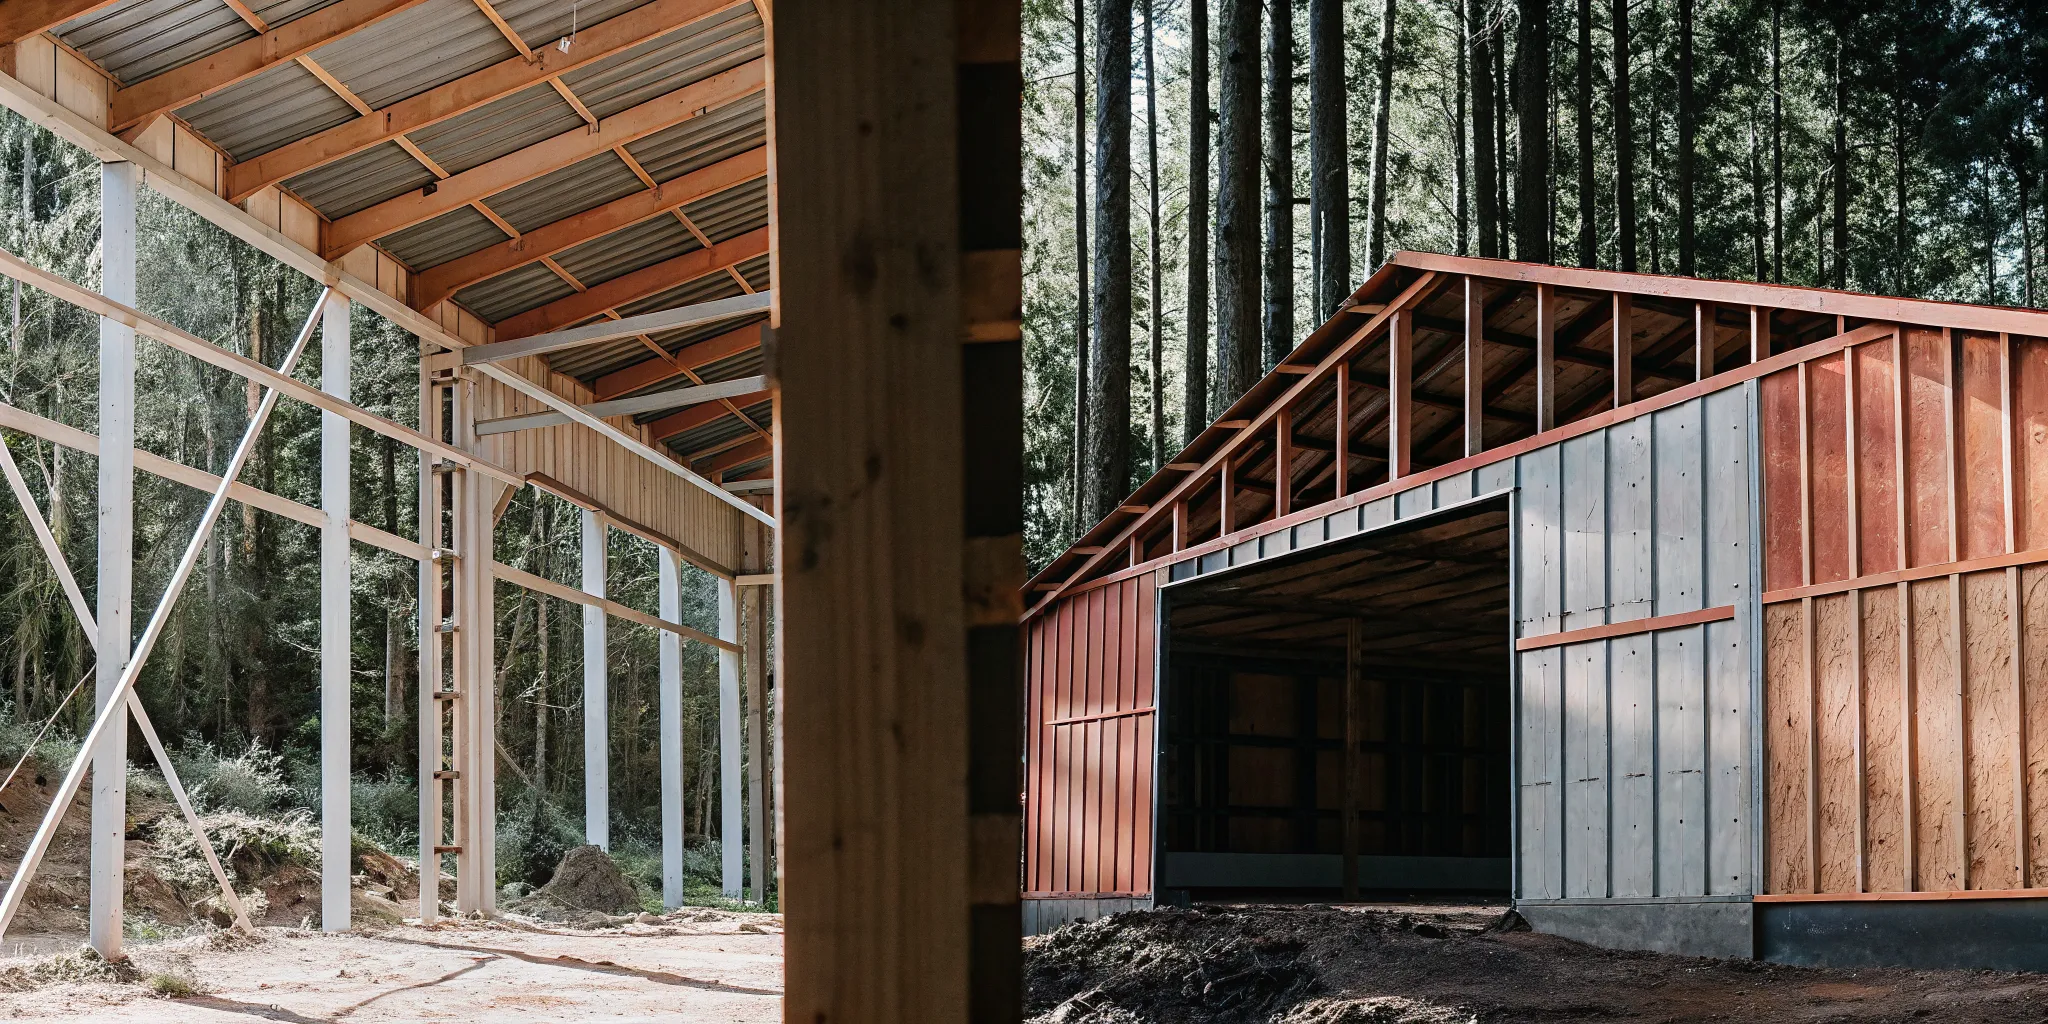
A post-frame building uses large wood columns set at wider intervals. Those columns support engineered roof trusses and transfer loads toward the foundation system. Horizontal girts support the wall cladding, while roof purlins support the roof material.
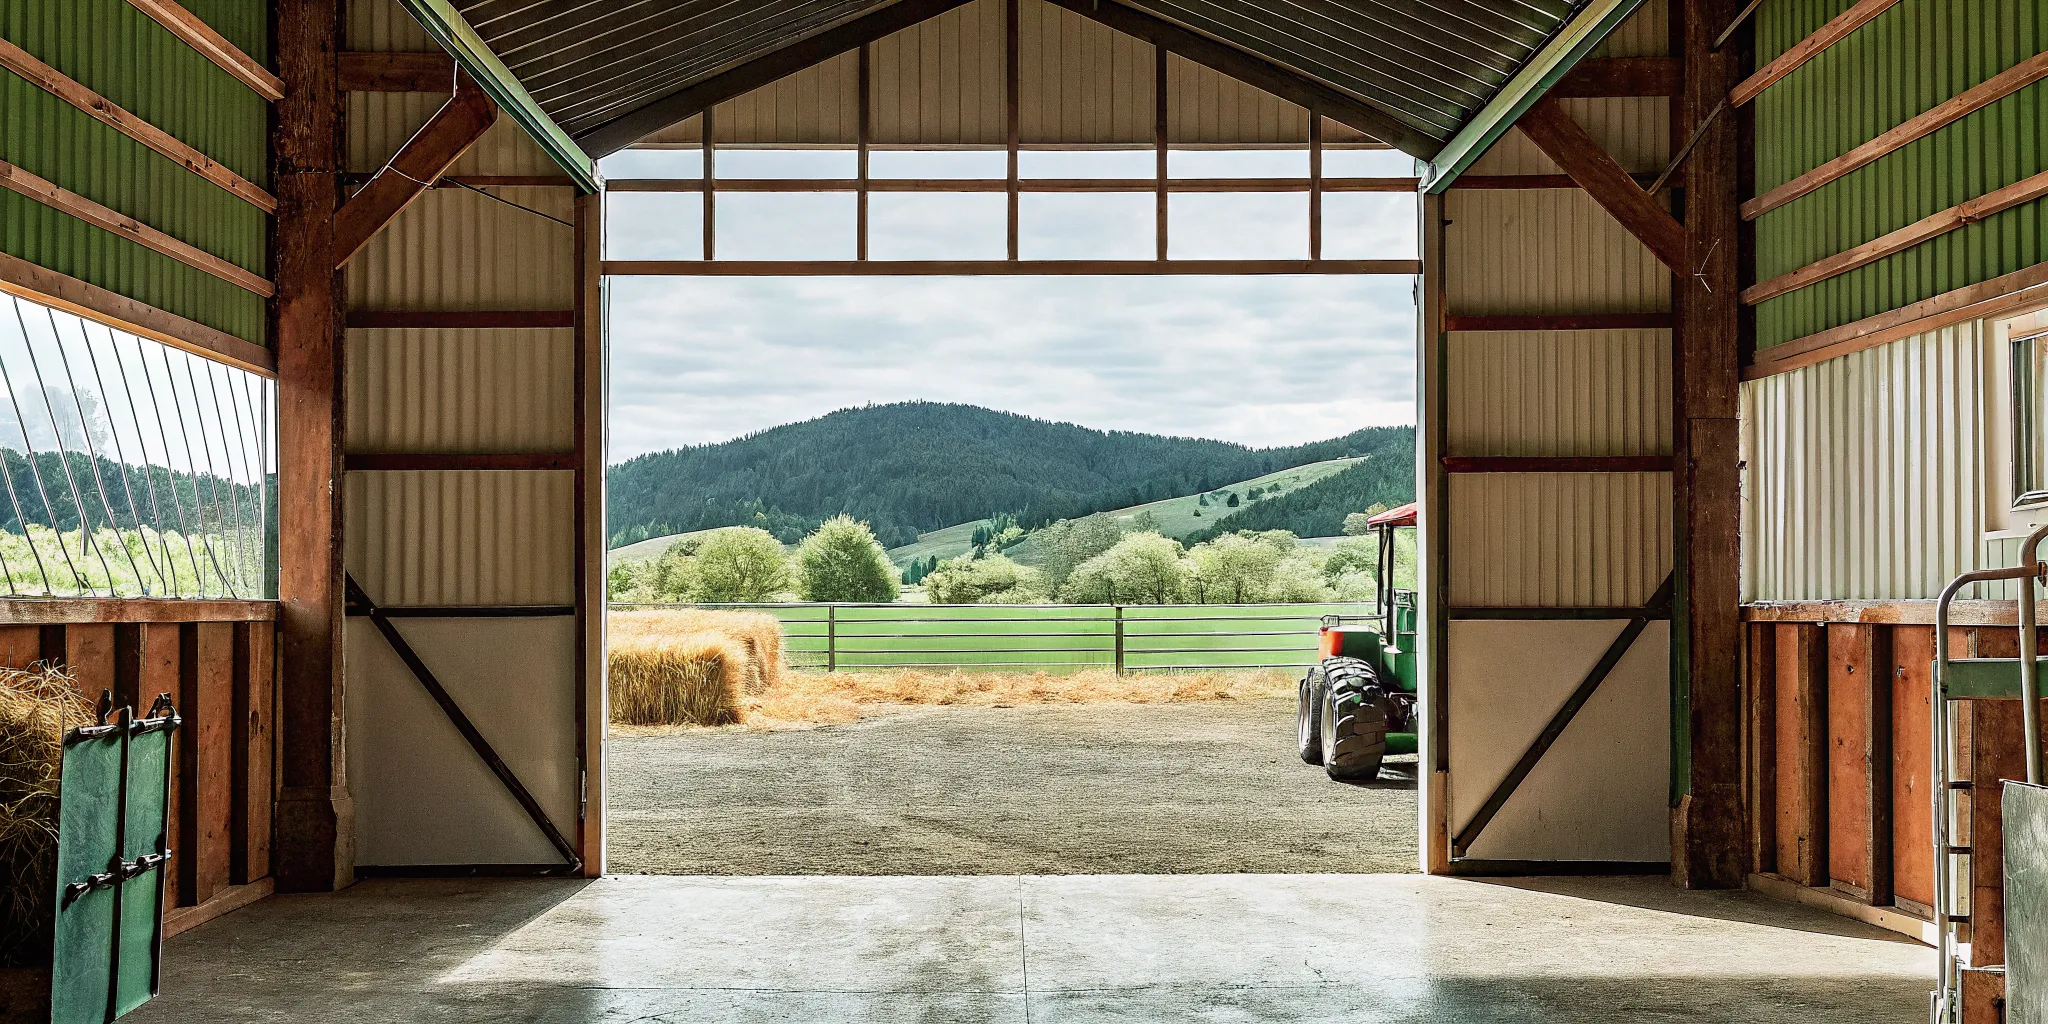
Because the main columns can be spaced farther apart, post frame can create broad clear-span areas with few interior supports. That is useful when a shop needs room for vehicles, a barn needs flexible stalls, or an arena needs an open floor.
How stick frame carries loads
Stick framing uses many smaller studs placed close together. The framed walls support the roof and typically sit on a continuous foundation or slab edge designed for the project. The method is familiar to many residential trades and works naturally with conventional room layouts.
Closely spaced studs create many ready-made wall cavities for insulation, plumbing, and wiring. That can simplify planning for a home or another building with many finished interior rooms.
Decision factor
Post frame
Stick frame
Main supports
Large, widely spaced columns
Closely spaced wall studs
Foundation approach
Column-based system designed for the site
Usually a continuous foundation system
Open interior space
Well suited to broad clear spans
May use interior bearing walls or added framing
Common fit
Shops, barns, arenas, garages, storage, commercial space
Homes, additions, and room-heavy finished space
Why the difference matters
The frame does not decide every finish. A post-frame building can have an attractive exterior and a fully finished interior. A stick-frame building can also create open areas when it is engineered for them. The real question is which structural system reaches the desired result with less complexity.
Before choosing, define door sizes, ceiling height, clear-span needs, equipment paths, rooms, and future expansion. Those choices give a designer better information than square footage alone. Locke’s pole building construction basics can help owners prepare for that first planning conversation.
Cost comparison: which is cheaper to build?
Bottom line: Post frame can reduce structural and foundation complexity for large open buildings, but total cost depends on the complete scope, site, and finishes.
Post frame can be a cost-effective option, especially for a large, open building, but no framing method is automatically cheaper on every property. A useful comparison looks at the full project rather than the framing package alone.
Foundation and framing costs
A post-frame design may reduce the amount of continuous foundation work required because its primary loads move through widely spaced columns. It may also use fewer framing pieces for a broad open shell. Those advantages can reduce labor and material complexity on a suitable site.
Stick framing uses many studs and often pairs with a continuous foundation. That can add work for a large utility building. Yet it may be efficient for a small finished structure when local crews and trades regularly use that system.
Costs beyond the structural shell
The shell is only one part of a usable building. Site access, grading, drainage, excavation, concrete floors, insulation, doors, windows, utilities, interior finishes, and permit needs can change the total sharply. A low shell price can become a poor comparison if it leaves out key work.
Large overhead doors may require added engineering and framing.
A sloped or wet site may need more preparation and drainage work.
Finished offices, bathrooms, or living areas add mechanical and interior costs.
Long spans and high snow loads can change structural requirements.
Material delivery and construction access affect both schedules and labor.
Compare equivalent scopes
Ask each builder or supplier to price the same size, use, finish level, openings, and site assumptions. Confirm whether the proposal includes engineering, permits, site work, concrete, labor, and installation. Locke’s published pole barn cost guide for Oregon and post-frame building cost guide explain common cost drivers.
Locke Buildings offers full-service design-build work, DIY pole building kits, and contractor supply options. Kit prices cover material-package examples and do not include site preparation, concrete, labor, or installation. Turnkey pricing depends on the actual project, so a detailed quote is the soundest way to compare options.
How do strength and durability compare?
Bottom line: Both methods can provide long service life when engineering, connections, drainage, materials, and maintenance match the site.
Post-frame performance depends on the complete engineered system, from foundation connections to roof trusses.
Both post-frame and stick-frame buildings can be strong, durable, and code compliant when they are designed for the site and built correctly. Framing type alone does not determine performance. Engineering, materials, drainage, workmanship, and upkeep matter more than broad claims that one system always wins.
Loads must match the property
Oregon and Washington properties can face very different wind, snow, soil, seismic, and exposure conditions. A building near the coast has different concerns than one in a mountain snow zone. The plans must account for the actual location, building dimensions, openings, and intended use.
Post-frame columns, trusses, girts, purlins, bracing, and cladding work as a system to move loads. Stick-frame studs, sheathing, roof framing, connectors, and foundation also work together. In either method, changing a door opening or removing a wall without reviewing the structure can affect performance.
Moisture control protects the frame
Long service life starts with keeping water where it belongs. Good grading directs runoff away from the building. Correct flashing protects doors, windows, roof edges, and other transitions. Ventilation and insulation details also help manage condensation inside the building.
For post-frame projects, the column and foundation detail must suit the plans and site. For stick-frame projects, the continuous foundation and framed walls need the same care around drainage and water entry. Durable materials cannot compensate for poor site drainage or an unsealed opening.
Maintenance remains essential
Owners should inspect roof and wall panels, fasteners, sealants, gutters, drainage paths, doors, and any signs of moisture. Small repairs are easier to manage before water reaches structural parts. The best maintenance plan reflects the cladding, exposure, and use of the building.
Clear spans are a practical strength of post frame for barns, shops, and arenas because the layout can reduce interior supports. Stick framing can be engineered for open space as well, but it may need other structural components. A qualified designer can explain which approach meets the goal without adding needless complexity.
Permitting and code compliance in Oregon and Washington
Bottom line: Both framing systems require project-specific review by the local jurisdiction, and neither label creates an automatic permit exemption.
Permits and code requirements apply to both framing methods. A post-frame building is not exempt simply because it is called a pole barn, and a stick-frame design is not automatically approved because it resembles a house. The local authority having jurisdiction makes the final determination.
Start with the local jurisdiction
Requirements can vary by city, county, zoning district, use, and property. Before final design, confirm setbacks, height limits, lot coverage, access, utility rules, and whether the proposed use is allowed. Ask what plans, calculations, and site information the permit office expects.
Define the building’s use, size, height, openings, and planned utilities.
Confirm zoning, setbacks, access, and land-use constraints with the local office.
Gather site details, including slope, drainage, soil concerns, and exposure.
Have the structure designed for local wind, snow, seismic, and other loads.
Submit the required plans and respond to review questions before construction.
Engineered plans reduce uncertainty
A complete plan set helps reviewers understand how loads move through the building and into the ground. It should also show key connections, openings, bracing, and foundation details. The same principle applies whether the structure uses posts or stud walls.
Large doors, tall walls, attached lean-tos, mezzanines, and future solar panels can change structural needs. Share those plans early. Locke’s post-frame building permit guide can help you prepare questions for the local office. Adding features after design or construction starts can lead to revisions, delays, and extra cost.
Regional knowledge helps planning
A builder familiar with Oregon and Washington can help identify questions to raise before the design is locked. That does not guarantee permit approval, but it can produce a more complete submission and reduce avoidable surprises.
Locke Buildings concentrates full construction service from Centralia, Washington, to Salem, Oregon. DIY kits can be delivered throughout Oregon and Washington. Property owners outside the full-service area can still discuss a kit or contractor supply path that fits their location and permitting needs.
Which building method fits your intended use?
Bottom line: Choose the system that supports the building’s daily activities, required openings, room layout, and future expansion plans.
The strongest reason to choose a framing system is that it supports how the building will work every day. Start with the activities, vehicles, equipment, storage, rooms, and future changes the structure must handle.
Wide open working space
Post frame is often a strong fit for agricultural buildings, equipment storage, riding arenas, workshops, large garages, and commercial spaces. Explore Locke’s pole building options and post-frame pole building services to compare common project paths. Its widely spaced main supports can make it easier to plan broad, open interiors. Owners gain room to move trailers, tractors, lifts, or materials without working around many columns.
Large openings and tall ceilings can also suit post frame, but they still need to be designed into the structure. Door placement, eave height, truss layout, and equipment clearance should be decided together. A few early measurements can prevent an expensive mismatch later.
Finished and room-heavy space
Stick framing is familiar for homes and additions because closely spaced studs align naturally with conventional interior walls and finishes. It can be a practical choice when a project contains many smaller rooms, complex tie-ins to an existing house, or details that local residential trades use every day.
Post-frame buildings can also include finished offices, hobby rooms, bathrooms, or living areas. Those spaces require thoughtful insulation, air sealing, moisture control, utilities, and interior framing. The exterior structural system does not remove the need for good building-envelope design.
Plan for change
A building that fits today but blocks tomorrow’s needs can be costly. Consider whether you may add storage, change a shop layout, install a lift, enclose an office, or expand the building. Discuss those possibilities while the structural and site plans are still flexible.
For agricultural property owners, Locke’s guide to the benefits of post-frame construction offers more context. The best plan connects the frame, site, openings, and finish level to a clear use case.
Which should you choose for your project?
Bottom line: Post frame usually earns closer consideration for large open utility buildings, while stick frame often fits room-heavy residential layouts.
Choose post frame when the project benefits from wide clear spans, a flexible open layout. Large doors, and an efficient path to a shop, barn, arena, storage building, garage, or commercial space. Choose stick frame when the project closely matches conventional residential construction or needs many smaller finished rooms.
Use a decision checklist
What will happen inside the building each day?
How much open span and ceiling height are needed?
Which doors, vehicles, or equipment must fit?
What does the site require for access, drainage, and foundation design?
How finished must the interior be?
Which future changes should the design allow?
What scope is included in each quote?
If these answers point toward a large, open, flexible building, post frame deserves close consideration. If they point toward a compact room-heavy structure tied to a home, stick framing may be the simpler fit. Some projects can use elements of both, subject to a coordinated design.
Match the delivery method to your needs
Locke Buildings supports several ways to complete a pole building project. Full-service design-build construction can help owners who want one team to coordinate the project. DIY kits suit capable owners who plan to manage labor and construction. Review Locke’s pole building kits when comparing that path. Contractor supply options help builders source a planned material package.
Compare those paths as carefully as the framing methods. A lower material quote is not the same as a lower completed-project cost. Confirm responsibilities for plans, permits, delivery, site work, concrete, labor, and installation before committing.
Turn the idea into a workable concept
A visual design makes the next conversation more useful. Try Locke Buildings’ 3D Building Designer to explore dimensions, doors, colors, and layout, then submit the design for a quote. The Locke team can help discuss how a post-frame concept fits your property, intended use, and regional conditions.
Frequently asked questions
Quick answer: The right framing choice depends on the complete project, not one universal rule about cost, strength, or permits.
Is post-frame construction cheaper than stick framing?
It can be, especially for a large open building, because the structural and foundation approach may reduce complexity. Total cost still depends on the site, size, doors, concrete, insulation, utilities, finishes, engineering, permits, and labor. Compare complete scopes rather than shell prices.
Can a post-frame building be fully finished inside?
Yes. A post-frame building can include insulation, interior walls, utilities, offices, bathrooms, and other finished areas when those features are planned correctly. The building envelope, moisture control, code requirements, and intended use all need to be addressed in the design.
Is post frame as strong as stick frame?
Both systems can be strong and durable when engineered for the site and built correctly. Performance depends on the complete structural system, local loads, materials, connections, foundation details, drainage, and workmanship, not the framing label alone.
Do post-frame buildings need permits in Oregon and Washington?
Many do, but exact requirements depend on the local jurisdiction, property, size, and use. Contact the appropriate city or county office early and ask what zoning checks, plans, calculations, and permits are required before construction.
Can post frame be used for a garage or workshop?
Yes. Post frame often works well for garages and workshops because it can provide wide open areas, tall ceilings, and large doors. Plan vehicle paths, lift height, work zones, storage, utilities, and future needs before finalizing the layout.
Start planning your post-frame building
Next step: Turn your intended use, dimensions, doors, and finish goals into a visual design that Locke Buildings can review.
The best framing choice starts with a clear picture of your property, use, layout, and finish goals. Locke Buildings has helped Oregon and Washington owners plan pole buildings since 1981. With full-service construction, DIY kit, and contractor supply options available based on the project and location.
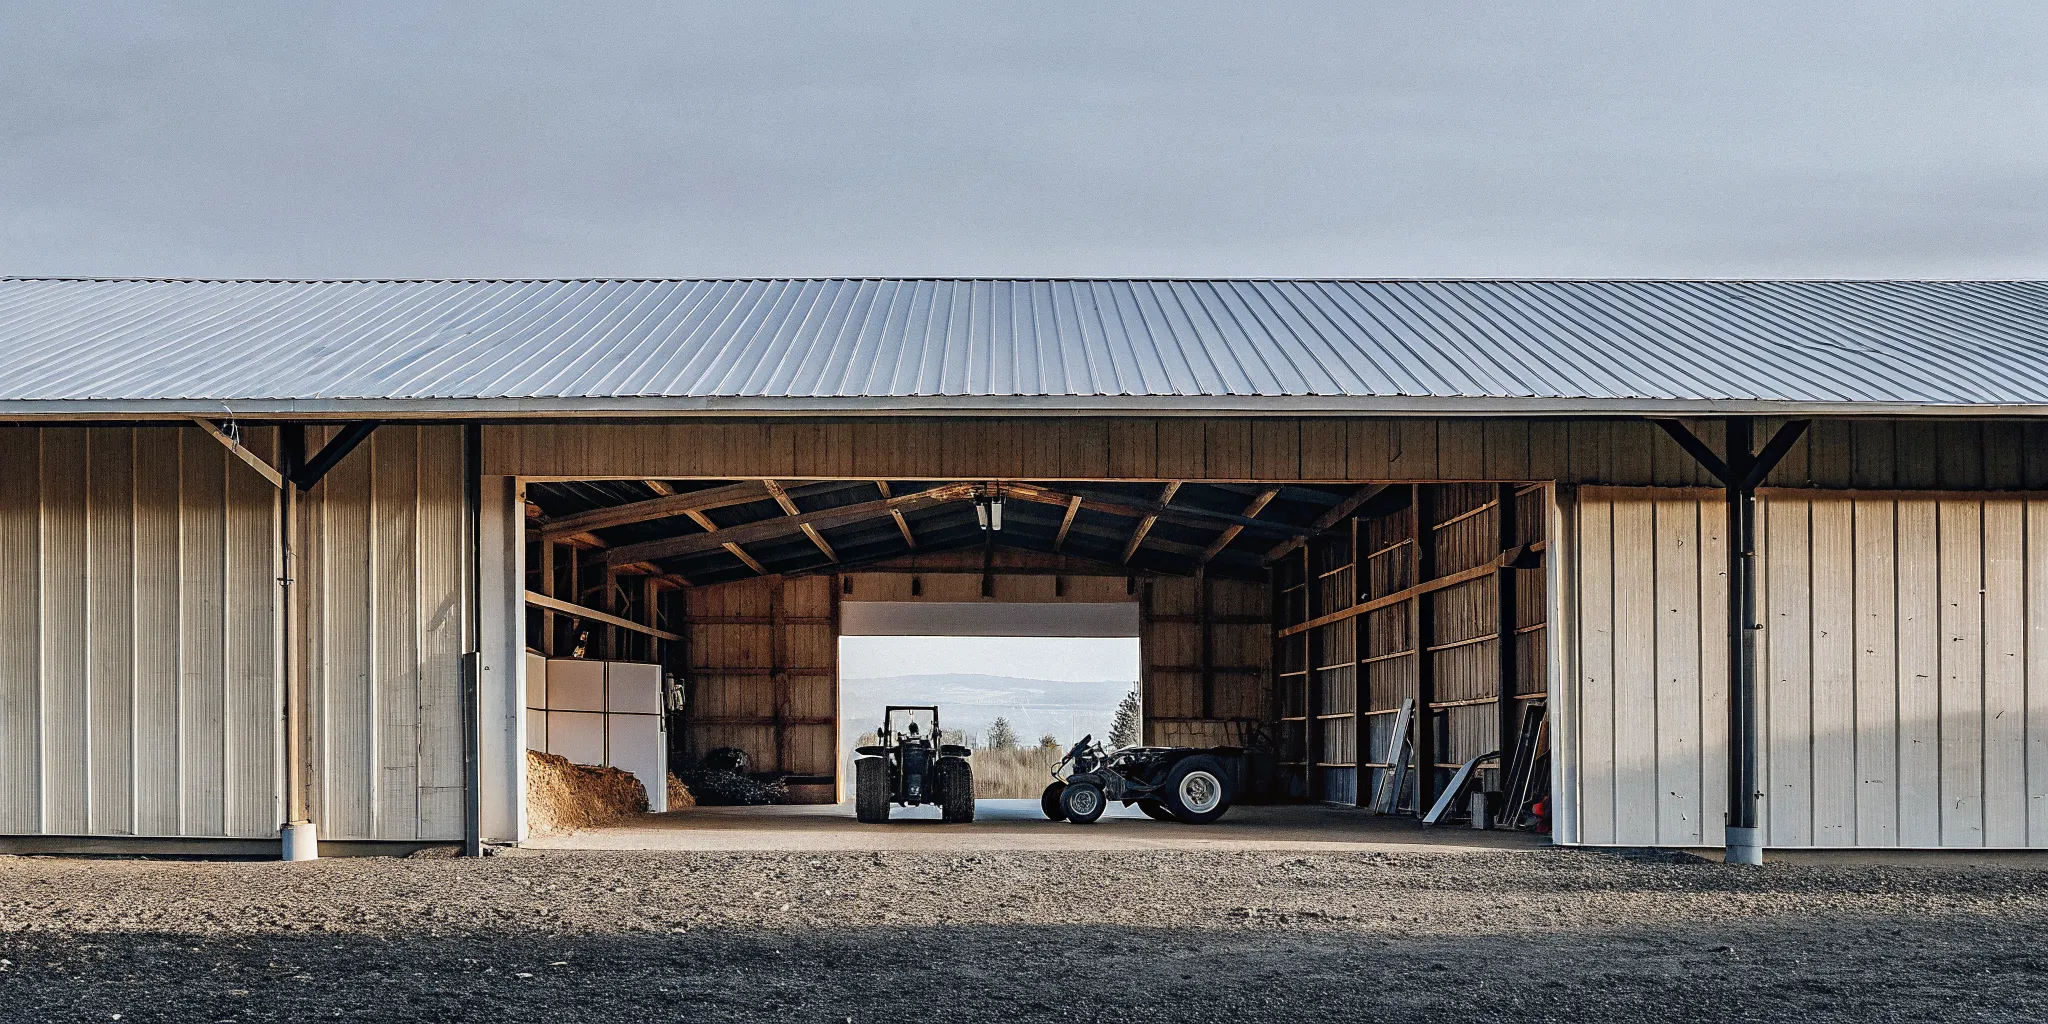
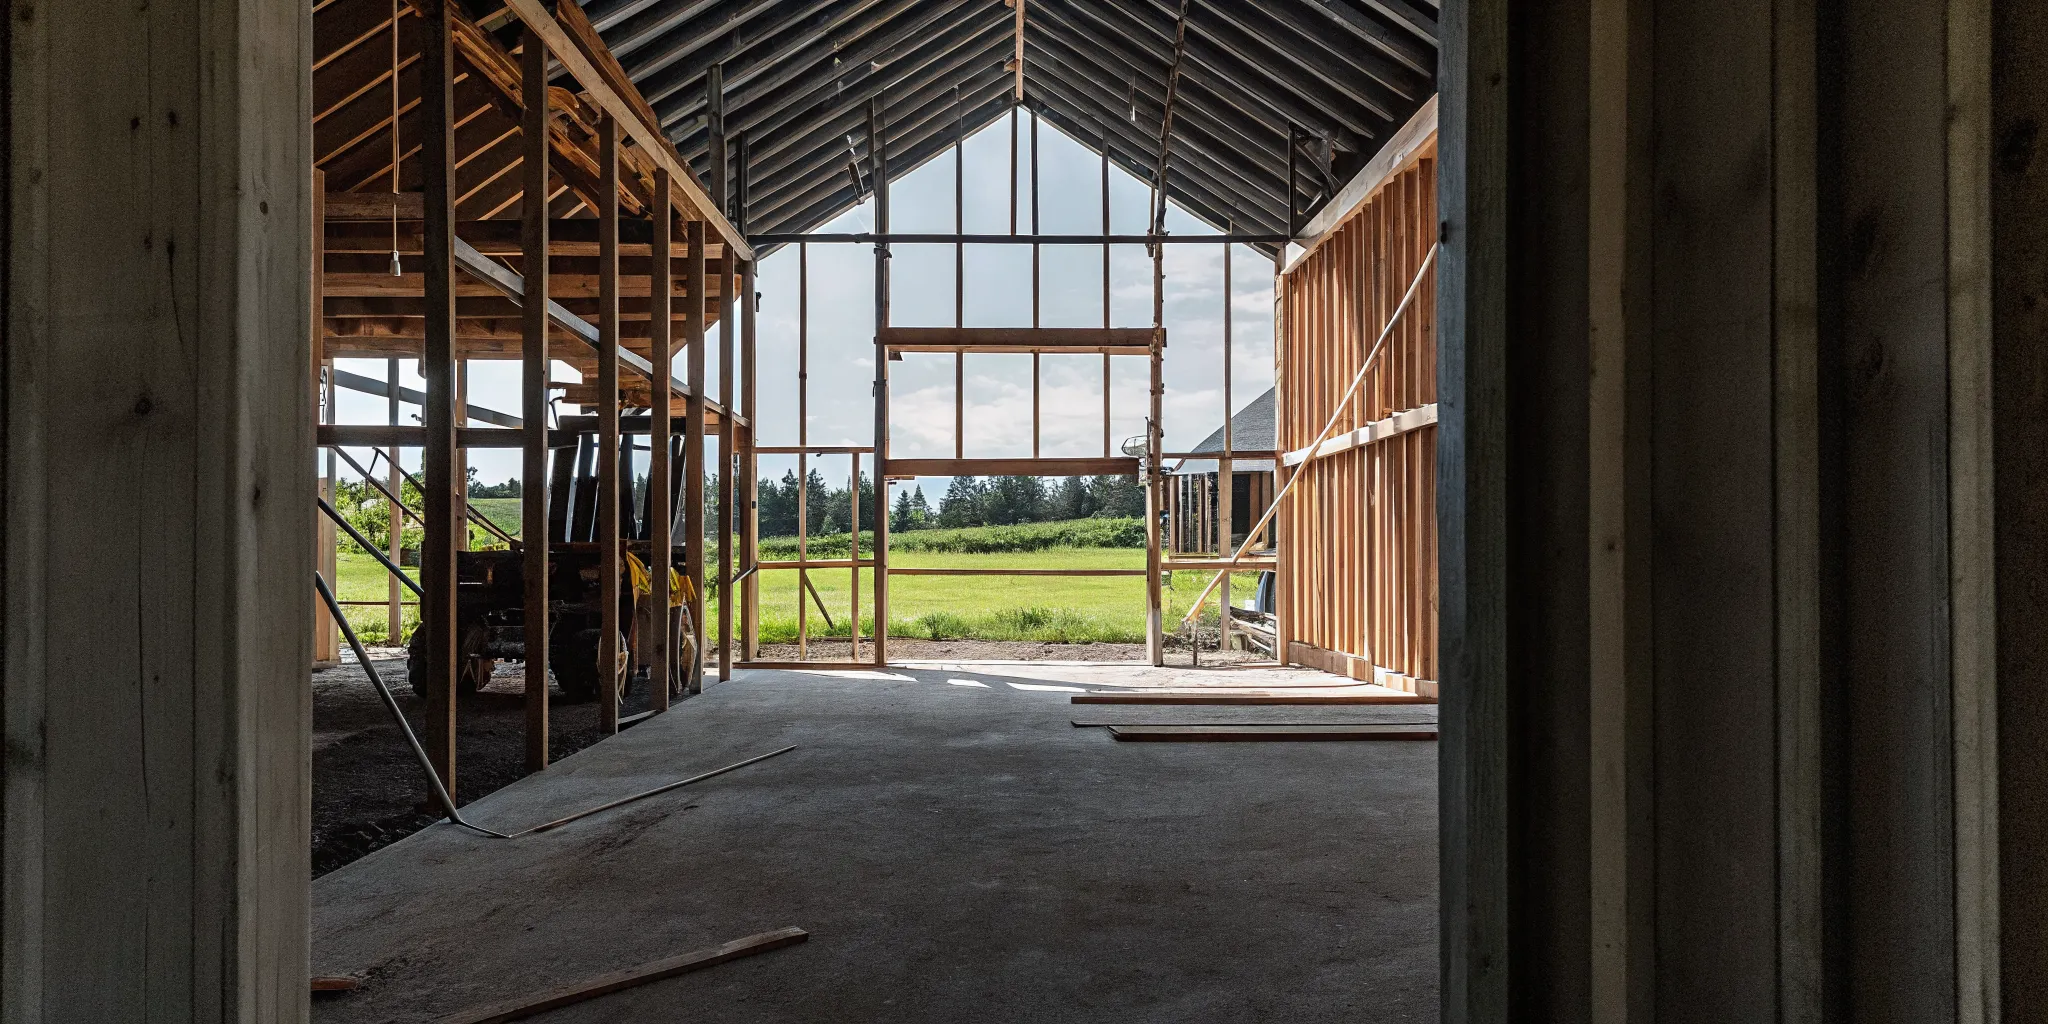
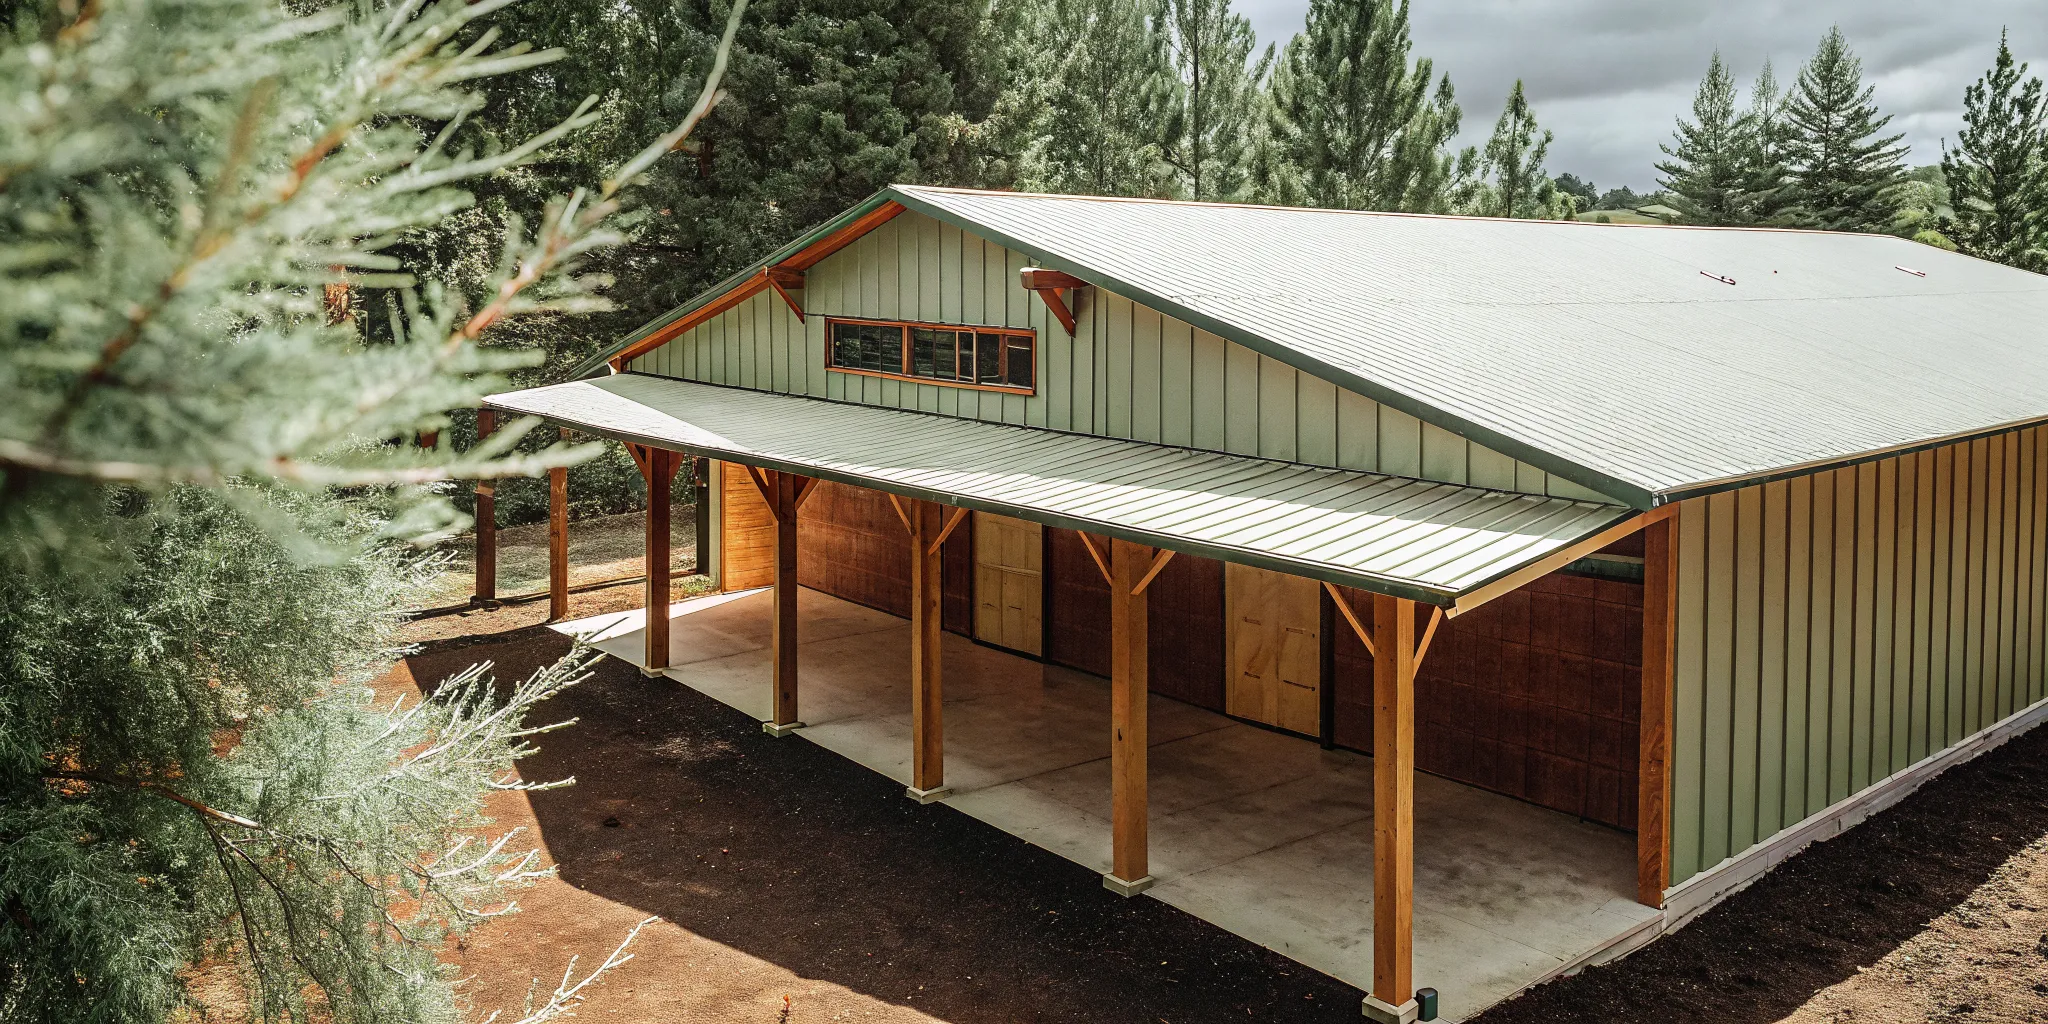
Post-frame construction is an engineered building method that uses widely spaced wood posts and roof trusses to carry loads into the ground. For a property owner, that means a strong structural system that can create broad, useful space without rows of interior supports. It is why the method works so well for barns, shops, garages, arenas, and commercial buildings.
If you are asking what is post frame construction, you may also be deciding whether it fits your land, budget, and plans. This guide explains the system in plain English, compares it with other building methods, and shows what Oregon and Washington owners should consider. For broader planning guidance, read Locke Buildings’ complete Pole Buildings 101 guide.
What is post frame construction?
Post-frame construction gets its name from its structural frame. Large vertical posts support engineered roof trusses. Horizontal members connect the posts and give the roof and wall panels a secure place to attach. Together, these parts create a strong structural system with fewer interior supports.
The main structural parts
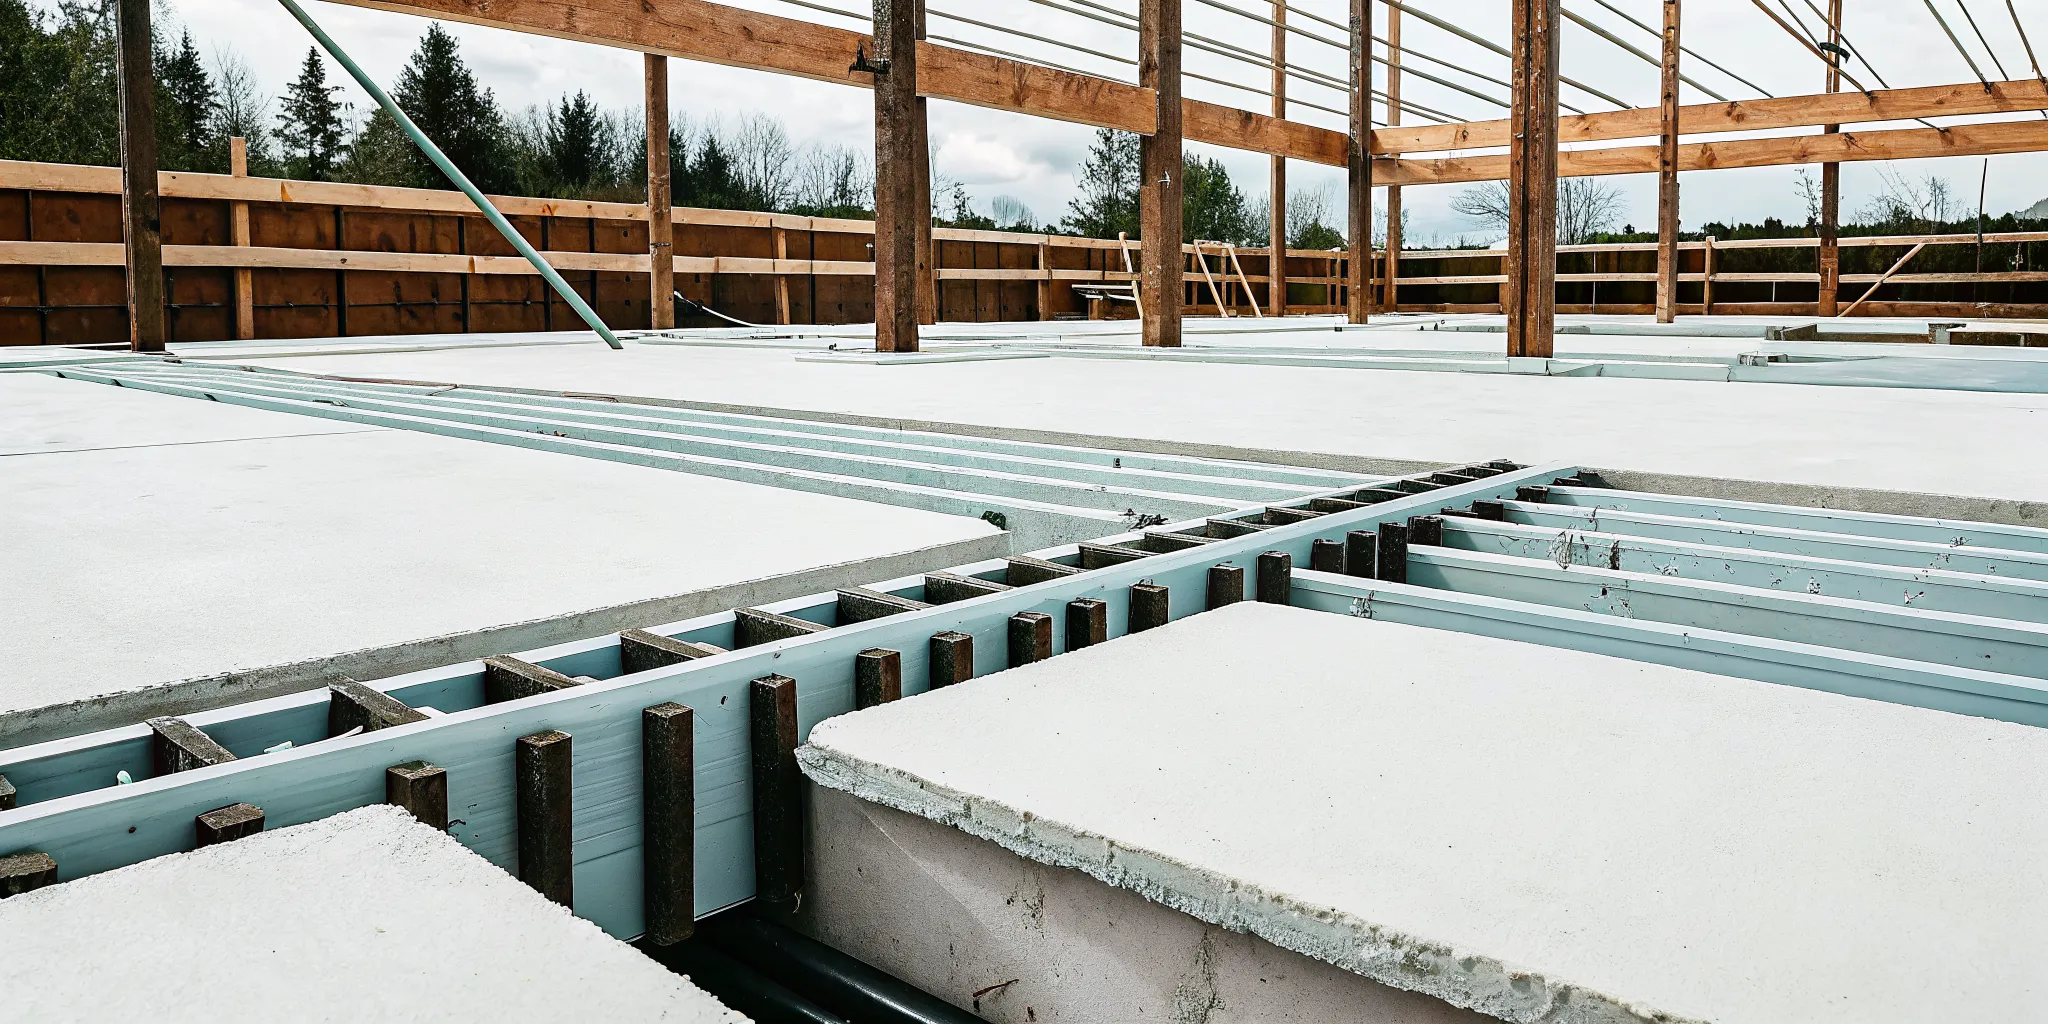
A post-frame building starts with columns, which may be solid-sawn wood or laminated members selected for the project. The columns are set in the ground or attached to engineered concrete supports. The right approach depends on the site, building design, local code, and engineer’s plan.
Posts or columns carry the main loads from the roof and walls.
Roof trusses span between columns and shape the roof.
Girts run across the walls and support exterior cladding.
Purlins run across the roof and support roofing panels.
Bracing helps the frame resist wind and other side forces.
How the load path works
Every building needs a safe path for weight and weather forces to reach the ground. In post-frame construction, roof loads move through the trusses and into the posts. The posts then transfer those loads into engineered footings or foundation supports. Wall panels and bracing also help the completed system resist side forces.
This is why post-frame is more than a row of poles with metal siding. A sound building must be designed as one connected system. Post size, truss design, connection details, bracing, footings, openings, and local loads all matter. An engineer or qualified building team matches those parts to the planned use and site.
Why the interior can stay open
Because the primary frame carries loads at wider intervals, many post-frame plans need fewer load-bearing interior walls. That can create wide, open areas for equipment, vehicles, stalls, storage, work bays, or retail space. Owners can also plan large doors and flexible interior layouts when those features are included in the structural design.
How post-frame differs from stick-frame and steel buildings
Post-frame, stick-frame, and steel-frame methods can all produce useful, code-compliant buildings. The best choice depends on the building’s size, use, finish level, site, and local rules. The key difference is how each system carries loads.
Feature
Post-frame
Stick-frame
Steel-frame
Main support
Widely spaced wood posts and trusses
Closely spaced wood studs and joists
Steel columns and beams
Interior layout
Often supports wide open areas
May use more load-bearing walls
Can support very wide spans
Foundation approach
Engineered posts, piers, or other supports
Often a continuous foundation
Engineered foundation matched to frame
Common uses
Barns, shops, garages, arenas, commercial spaces
Homes and smaller finished buildings
Large commercial and industrial projects
Post-frame versus stick-frame
Stick-frame construction uses many smaller studs set close together. Those framed walls support the floors and roof, often over a continuous foundation. This method is common for houses and gives trades a familiar wall cavity for wiring, plumbing, and insulation.
Post-frame uses larger structural members placed farther apart. That can reduce the number of framing pieces and create more open space. It may also simplify the shell for a large shop or agricultural building. Yet the project still needs careful planning for insulation, interior finishes, utilities, and moisture control.
Post-frame versus steel-frame
A steel-frame building uses steel columns and beams as its primary structure. It may be the right answer for some large or specialized projects. Post-frame instead uses engineered wood posts and trusses, often paired with metal roofing and siding. The exterior can look similar even though the structure is different.
Do not choose based only on a picture or broad price claim. Compare complete scopes, including site work, engineering, permits, foundation needs, doors, insulation, interior finishes, and labor. A low shell price does not describe the full cost of a finished building.
Why post-frame is popular in Oregon and Washington
Property owners across the Pacific Northwest need buildings that fit varied sites and uses. Farms, rural homes, small businesses, and equestrian properties often need large sheltered areas without many interior walls. Post-frame construction can meet those needs while allowing the design team to account for local conditions.
Design for the actual site
Weather and ground conditions vary widely across Oregon and Washington. Coastal rain, inland snow, wind exposure, soil, drainage, and elevation can all affect a design. A post-frame plan should be engineered for the building location rather than copied from a generic plan meant for another region.
Good early planning starts with the proposed building location and intended use. The team can then review setbacks, access, drainage, utilities, and local permit needs. This work helps prevent a beautiful concept from becoming difficult to build on the chosen site.
Useful space for rural and commercial needs
Wide interior areas suit equipment storage, riding arenas, workshops, and flexible business space. Large door openings can help owners move vehicles, tractors, trailers, or materials. Clear space also makes it easier to adjust the interior as needs change, as long as changes respect the engineered structure.
A flexible path from kit to full service
Some owners want a material package and plan to manage construction themselves. Others want a team to handle design and construction. Locke Buildings supports both DIY kits and full-service design-build projects. Full construction service is concentrated from Centralia, Washington to Salem, Oregon, while kits can be delivered throughout Oregon and Washington.
A kit price covers a defined material package, not the whole finished project. Site preparation, concrete, labor, installation, utilities, permits, and finishes may be separate. Ask for a clear scope so you can compare options fairly and budget for the complete result.
Typical post-frame building types
Post-frame construction began as a practical answer for agricultural buildings, but it now serves many property types. The frame can support simple working buildings or polished spaces with windows, porches, insulation, and finished interiors. The right details depend on how people will use the building.
Agricultural buildings, barns, and arenas
Farm owners often need dry space for equipment, feed, hay, livestock, or maintenance work. Post-frame layouts can provide large doors and broad floor areas. Equestrian owners may use the method for barns, covered riding arenas, tack areas, and storage.
Each use brings its own needs. Animals call for ventilation, safe circulation, and durable surfaces. Hay and equipment storage may need different fire, access, or moisture plans. An arena needs a clear span, suitable height, and a floor system planned for its use.
Garages, shops, and workshops
A post-frame garage can give homeowners room for vehicles, tools, hobbies, and seasonal gear. A workshop may need taller walls, overhead doors, good task lighting, power, heating, or a finished office. Planning those features at the design stage helps the frame and openings work together.
Think beyond the equipment you own today. Door height, turning room, wall storage, work zones, and future vehicles can shape the plan. A little extra thought before construction is often easier than changing a structural opening later.
Commercial buildings and barndominiums
Businesses may use post-frame for storage, light industrial work, retail, offices, or mixed-use space. Commercial projects often have added code needs for access, fire safety, parking, utilities, and occupancy. The building team should understand the intended use before design begins.
Barndominiums combine living space with a barn-inspired or post-frame form. They require careful residential planning for energy use, moisture, windows, plumbing, and life safety. A structure that works well as an unheated shop is not automatically ready to become a comfortable home.
Post-frame may be a strong fit when you need open space, flexible dimensions, and a building designed around a clear use. It is not the automatic answer for every site. Use the following process to decide with better information.
Define the daily use. List what will happen inside, who will use it, and what must move through the doors.
Study the site. Review access, slope, drainage, utilities, setbacks, and the best building location.
Check local requirements. Ask the local authority about permits, zoning, snow and wind loads, and intended occupancy.
Set practical dimensions. Plan width, length, wall height, door sizes, and clearances around real vehicles or equipment.
Choose a finish level. Decide whether the building will be cold storage, a heated shop, animal space, commercial space, or living space.
Compare service options. Decide whether a DIY kit, contractor supply path, or full design-build service fits your skill, schedule, and location.
Build a complete budget. Include site work, materials, concrete, labor, permits, utilities, and finishes, not just the shell.
Questions to answer before design
Start with the largest item that must enter the building and the work that needs to happen around it. Then consider future use. Will you add equipment, stalls, a lift, storage loft, office, or finished room? Will the building need heat, plumbing, or three-phase power?
These answers affect the frame, doors, insulation, ventilation, and utility plan. They also give the designer a better basis for a useful quote. A clear brief is far more valuable than choosing a building size from a generic package list.
What a reliable proposal should clarify
A proposal should state what is included and excluded. Ask about design, engineering, permits, site work, excavation, concrete, delivery, labor, doors, windows, roofing, siding, insulation, and interior work. Confirm who is responsible for each part and what assumptions affect pricing.
For complex or turnkey work, expect pricing to depend on the site and project details. Fixed claims without those details can hide major scope gaps. Use comparable scopes when reviewing bids, and ask questions when one price looks far lower than the others.
How does a post-frame project come together?
A successful project moves from needs and site facts into a buildable design. The exact sequence varies by location and scope, but most projects share several stages. Knowing them helps owners make decisions at the right time.
Planning and design
The owner first defines the building use, dimensions, openings, and finish level. The team reviews the site and local requirements, then develops a design that fits those facts. Locke Buildings uses 3D design technology to help owners explore layout and appearance before requesting a project-specific quote.
Engineering turns the concept into a structural plan. The design must account for loads, connections, foundations, and large openings. Permit review may lead to questions or changes, so allow room for that process rather than treating it as a last step.
Site work and structural frame
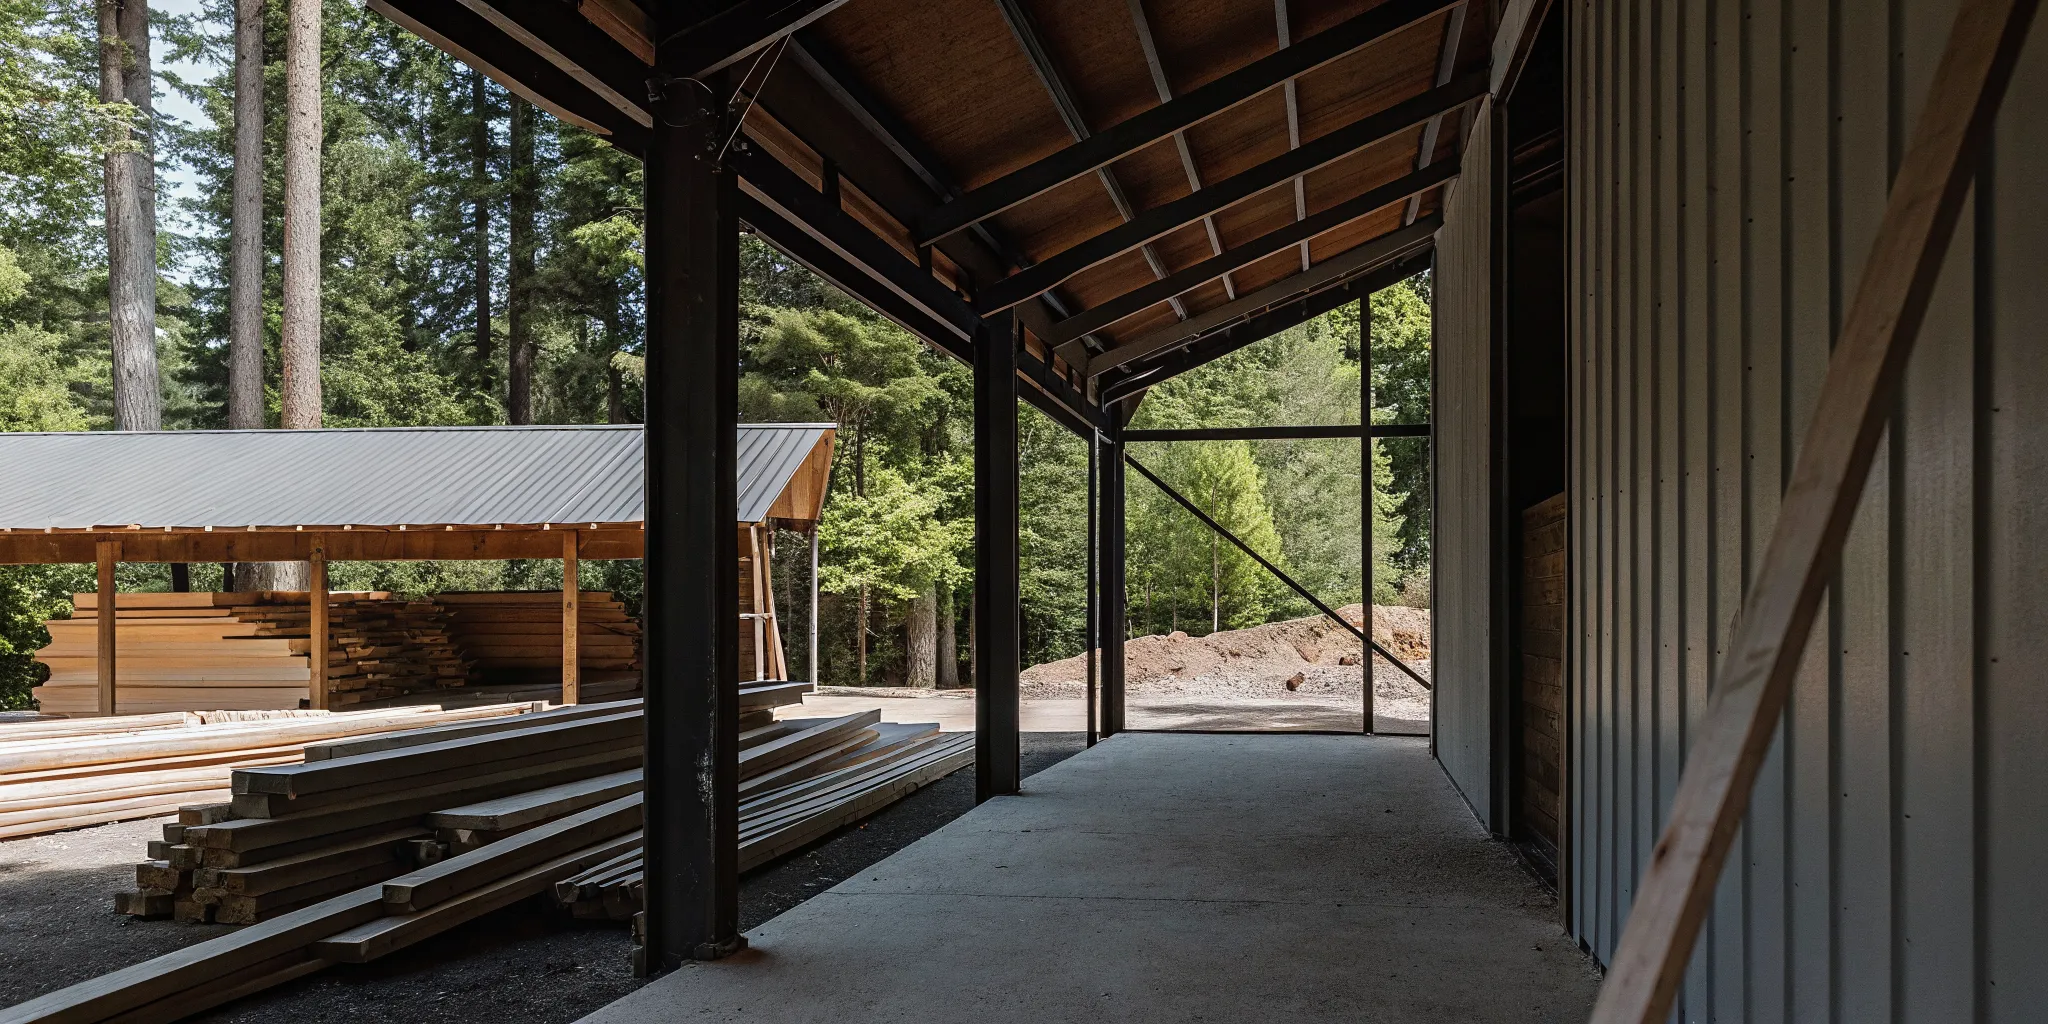
Before framing begins, the site needs suitable access, grading, drainage, and preparation. Crews then lay out the building and install the engineered post or foundation system. Posts, trusses, bracing, girts, and purlins create the main structure.
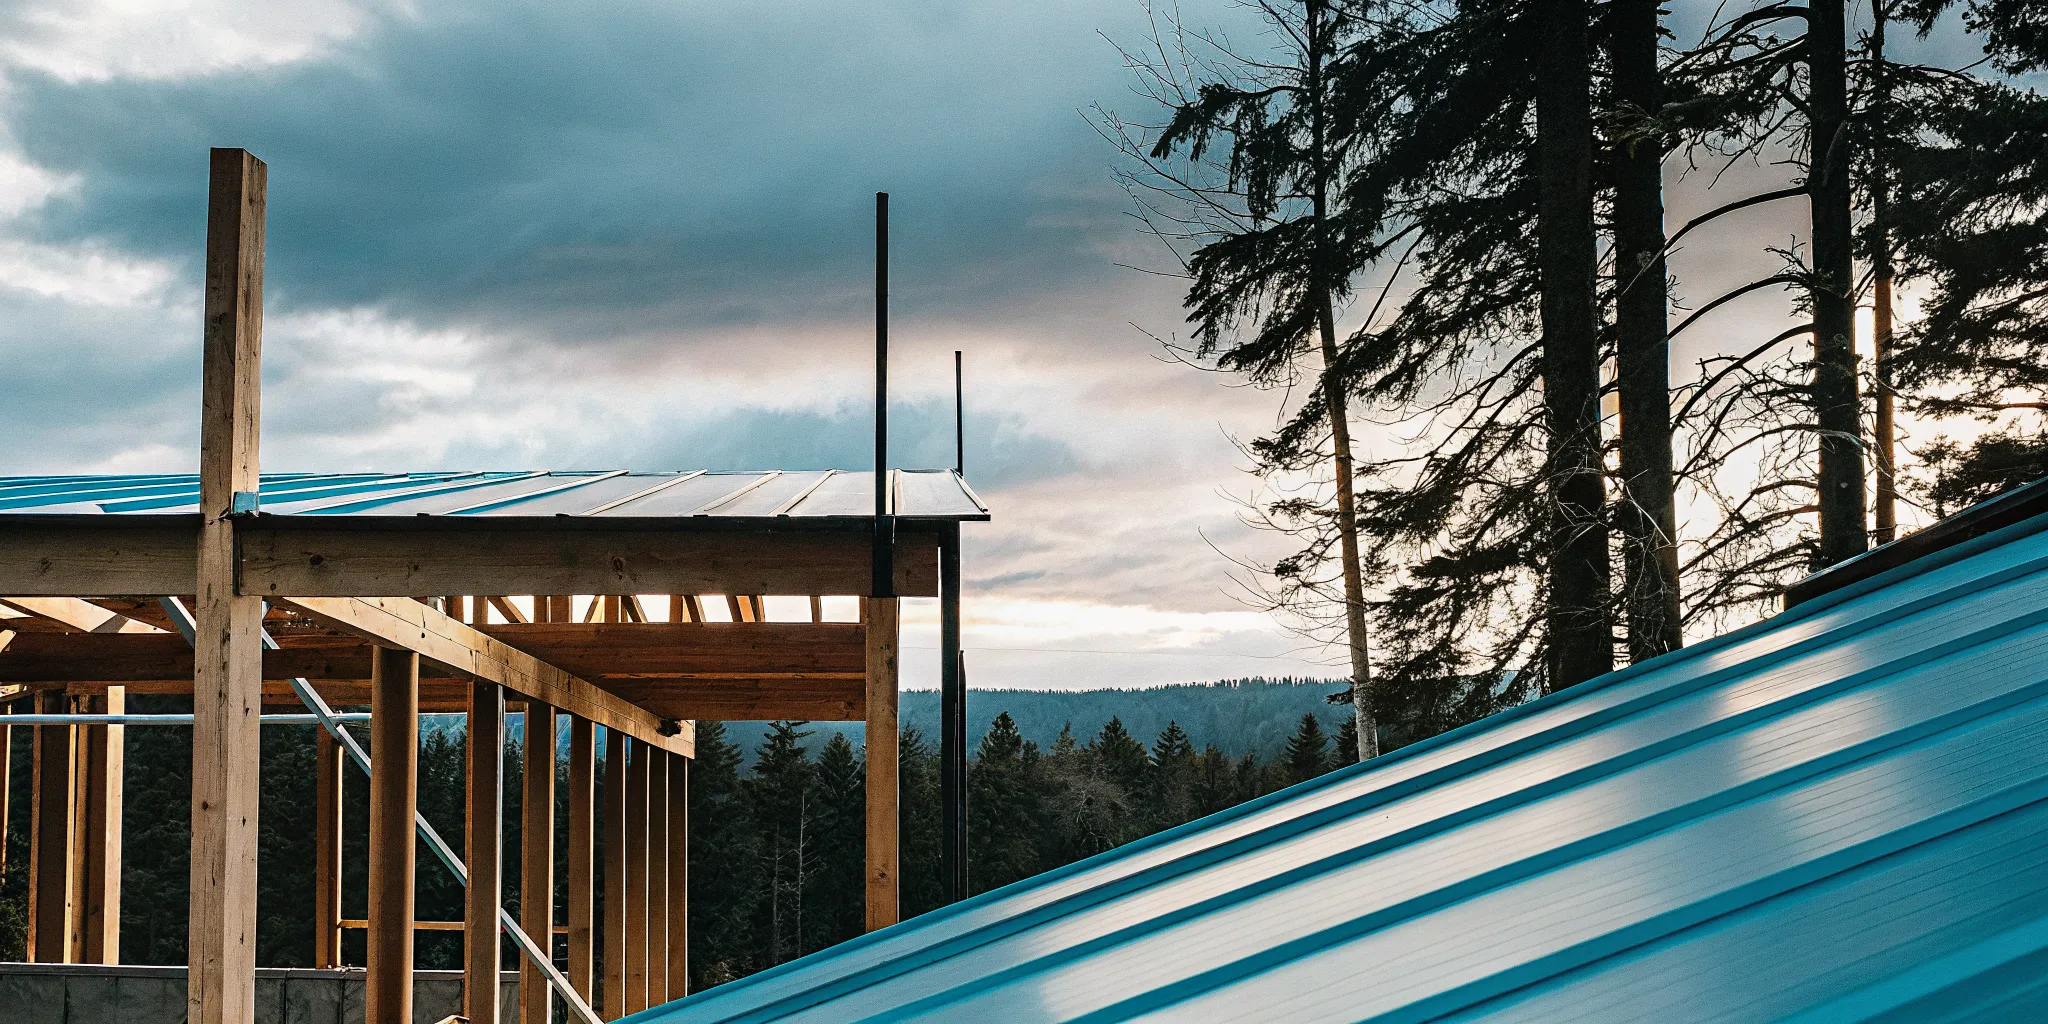
Roofing, siding, doors, and windows enclose the shell. The order can change based on the design, weather, crew, and project scope. Quality depends on following the plans and connection details, not simply assembling the parts quickly.
Systems and finishes
A basic storage building may need few interior systems. A heated shop, commercial space, or home needs much more planning. Concrete floors, power, plumbing, insulation, ventilation, fire protection, and interior finishes should work with the structure and intended use.
Owners should confirm responsibilities before work starts. A kit buyer may coordinate these trades and tasks. A full-service customer may have a broader construction scope, but exclusions still need to be clear. Good communication keeps the finished building aligned with the original plan.
Frequently asked questions
Is a pole barn the same as a post-frame building?
The terms are often used together, but post-frame construction is the broader and more accurate name for the engineered method. A modern post-frame building can be a barn, shop, garage, arena, commercial building, or other structure.
Does a post-frame building need a concrete slab?
Not always. The structural posts can use engineered footings or supports without relying on a slab as the main foundation. Many shops and garages still use concrete floors because the planned use benefits from them.
Can a post-frame building be insulated and finished?
Yes, a properly planned post-frame building can include insulation and interior finishes. The wall and roof assemblies must be designed for the building use, local climate, moisture control, utilities, and code requirements.
How long does a post-frame building last?
Service life depends on design, materials, site drainage, installation, exposure, and maintenance. A qualified team should select details that fit the site and use. Owners should also maintain roofing, siding, drainage, sealants, and other building parts over time.
Is post-frame cheaper than stick-frame construction?
It can be cost-effective for many large, open buildings, but there is no universal answer. Compare complete project scopes and the same finish level. Site work, concrete, labor, insulation, utilities, permits, and finishes can change the total greatly.
Turn your post-frame idea into a clear design
Now that you know what post-frame construction is, the next step is to shape a building around your property and goals. Locke Buildings has served Oregon and Washington since 1981 with regional knowledge, flexible kit and construction paths, and 3D design tools.
Pole Building Contractors Oregon and Washington Guide
Finding the right pole building contractors Oregon and Washington property owners can trust starts with regional experience. Your builder or kit supplier must account for Pacific Northwest rain, wind, snow, seismic forces, local permits, and the way you plan to use the building.
Pole building contractors Oregon and Washington provide custom design and building services for farm, home, and business clients across the Northwest. These expert builders help owners follow local codes for snow, wind, and seismic forces from the Willamette Valley to the Puget Sound. While many crews offer full-service turnkey building within a set area, others ship DIY kits to any spot in both states. Working with a team like Locke Buildings ensures your shop or barn meets safety rules and stands up to the wet climate for many years. This mix of local building and kit shipping lets owners pick the best path for their budget and site. Choosing the right crew means finding a partner who knows the soil and weather of the Pacific Northwest.
Knowing local boundaries is key for planning your building timeline and budget. You need to know exactly which counties get full-service support versus simple kit delivery. Where pole building contractors Oregon and Washington serve mostly centers around major regional hubs and transit roads. The path begins with a look at these specific service zones.
Where pole building contractors Oregon and Washington serve
Finding a solid team in the Northwest can be hard. Most pole building contractors serving Oregon and Washington only work in a small area. Locke Buildings is different because we offer two ways to get your project done. We provide full-service builds in our core zone and deliver kits to both states. This helps us reach more land owners who need tough, lasting buildings.
Our roots are deep in the local soil. We started in 1981 as a family-owned business in Estacada, Oregon. Since then, we have finished more than 5,000 buildings. We focus on the unique needs of our region. Our work handles the heavy snow and high winds found in the Pacific Northwest. We are a trusted name for anyone looking for the right pole building contractor.
Full construction from Centralia to Salem
Our main construction area follows the I-5 corridor. We build from Centralia, Washington in the north down to Salem, Oregon in the south. In this zone, we manage the whole project for you. Our crew handles the site prep, framing, and roofing. We take the stress out of the job. You do not have to find your own labor or rent big tools.
We use modern tech to make sure our sites are safe and precise. Research shows that BIM tools improve safety by finding risks before work starts. We apply this level of expert care to every job we take. Our team knows the local permit rules for every city in this zone. We help you work through the paperwork so your build stays on track.
Many of our clients in this area need large shops or farm buildings. We focus on buildings that last for decades. We use thick wood posts and strong steel panels. These parts are perfect for the wet weather we see every year. Our expert pole building services ensure your building is both strong and useful.
Kit delivery for the entire Northwest
Not everyone needs a full crew to build for them. If you live in a rural spot or want to build yourself, we have an answer. We deliver our pole building kits to any address in Oregon or Washington. This means you can get Locke-quality parts even if you are far from our home base. These kits are great for DIY builders and local contractors alike.
Our kits come with full plans and all the hardware you need. We source the best wood to make sure your frame is straight and true. These wood systems are a smart choice for many reasons. They can even help improve building energy efficiency when you use the right insulation. This makes them a good pick for shops that you plan to heat or cool.
Shipping a kit can save you a lot of money on labor. You can work at your own pace or hire a local team you trust. We make sure the delivery goes smoothly. Our drivers know the backroads of the Northwest. We can get your building parts to remote farms or mountain lands. This makes us one of the most top pole building contractors in the region.
Expert knowledge of local building codes
Every county in our region has its own rules for building. A shop in the Columbia Gorge needs different engineering than a barn in the Willamette Valley. We have over 45 years of skill with these local codes. We know exactly what seismic and wind loads your building needs. This local skill keeps your project safe and legal. It also protects your value over time.
We focus on building structures that can stand up to anything. Our designs meet the tough standards for snow loads in the Cascades. We also plan for the high winds along the coast. Working with a local expert means you do not have to guess. We provide the peace of mind that comes from decades of success. We are ready to help you plan your next project today.
Choose full-service construction, a DIY kit, or contractor supply
Finding the right path for your project depends on your skills, tools, and time. Most people look for pole building contractors serving Oregon and Washington to handle the hard work from start to finish. This full-service path is ideal for those who want a turnkey result with less stress. If you enjoy building things yourself, a kit might be the best fit for your needs.
Full-service construction for total support
Working with professional pole building services means the team manages the entire build. This covers design, getting permits, and the actual construction of the frame. In the Pacific Northwest, builders must know local rules for wind, snow, and seismic loads. Expert contractors help ensure your structure meets energy efficiency and safety codes for the region.
This path is best if you live between Centralia, Washington, and Salem, Oregon. The team brings the tools and labor to your site, so you do not have to lift a finger. You get a finished building that is ready for use as a shop, barn, or garage.
DIY building kits and wholesale supply
For those who want to save on labor, building kits are a great choice. These kits come with all the materials you need for your post-frame project. You can get kit delivery anywhere in Oregon or Washington. While kits save money, they do not include site work, concrete, or the labor to put it all together. You will need to handle the site prep and build it yourself or hire a separate crew.
Contractors and skilled owners often choose the wholesale supply path. This option gives you the same high-quality materials used in full-service builds but with more control. It is a solid choice for people who already have a crew or the tools to get the job done right.
Compare your building options
Service Feature
Full-Service Build
DIY Building Kit
Contractor Supply
Design and Permits
Handled by team
Owner’s job
Owner’s job
Site Prep & Concrete
Available
Not included
Not included
Construction Labor
Full crew provided
Done by owner
Done by owner
Delivery Area
Salem to Centralia
All OR and WA
All OR and WA
Primary Benefit
Turnkey and easy
Lower material cost
Maximum control
Whether you need a hay shed to protect crops from rain damage or spoilage, or a new home shop, picking the right service model is the first step. Each path offers a different balance of cost and convenience. Talk to a specialist to see which choice fits your budget and timeline best.
Oregon pole building service areas and local planning
Finding pole building contractors serving Oregon and Washington starts with knowing where they work. In Oregon, local teams serve many counties. This includes spots near the coast and the high desert. Each place has its own rules for how to build. It is smart to work with a team that knows your local laws well.
Building zones and planning
Oregon has many rules for land use. These rules change based on if you live in a city or on a farm. You must check with your local county office before you start. They will tell you about set-back lines and how big your barn can be. This step helps you avoid fines. A pro team can help you look at these rules before you buy any wood.
Locke Buildings helps clients plan their space. They use tools like building information modeling to keep a job safe. This kind of planning is key for large shops or horse barns. It helps you see how the build will fit on your land. Good planning makes the whole job go much faster.
Full-service and kit delivery
There are two ways to get your new building. You can choose full-service build or a kit. Full-service means the team does all the work for you. In Oregon, this service goes from Salem up to the Washington border. This is great for people who want a turn-key shop. It saves you time and stress on the job site.
If you live outside that area, you can still get a building. DIY kits are a top choice for many folks. These kits can go to any spot in the state of Oregon. Each kit has the wood and metal you need. You can use a pole building kit to build your own barn or shop. This is a good way to save money if you have the skills to build it.
Weather and code needs
Oregon weather can be hard on a building. You may face heavy snow in the hills or high winds by the sea. This means your barn must be strong. Picking a team with deep knowledge of seismic and wind codes is vital. They make sure your building can stand up to the local weather. This keeps your gear and animals safe all year long.
Most local codes are based on how you will use the building. A farm shed may have different rules than a shop. It is best to get a free talk to find the best path. You can also use a 3D Building Designer to start your plan. This helps you see what you need for your plot of land.
Regional experience helps a post-frame project account for local weather, site conditions, and code requirements.
Washington pole building service areas and local planning
Picking the right team for your new project is a key first step. Locke Buildings has worked as pole building contractors serving Oregon and Washington for over 45 years. In Washington, they provide two main ways to build. These are full-service construction and DIY kits. Where you live in the state will help you decide which choice is best for your goals. The family-owned team uses their past to help every client find the right path for their land.
Full service construction in southwest Washington
For clients who want a hands-off build, Locke offers turnkey services in set zones. This service area runs from Centralia, Washington, down to the border. It includes major counties like Clark, Cowlitz, Lewis, and Thurston. As expert teams, they handle the work from start to finish, with site prep and concrete. You do not have to find your own crew to get the job done right.
This turnkey model is great for those who want a large shop or a new home. It allows the local team to manage every detail on the job site. Building in this part of the state means knowing the local rules for each town. The team knows the local permit offices and what they need to see in a plan. They use 3D tools to show you how the building will look so you can get the style just right.
Having a single team lead the project from design to finish saves time. It also helps keep the project on budget. Turnkey builds are based on the job, so it is best to ask for a custom quote. The team will look at your site and your needs to give you a clear price. This way, you know what to expect before the first post goes in the ground. Their goal is to make the process as easy as possible for every land owner.
DIY building kits for all Washington counties
If you live outside the turnkey zone, you can still get a custom building. Locke ships Pole Building Kits to every county in Washington. This includes areas in the north like Whatcom County or over in the east like Yakima. These kits include all the wood and metal needed to frame and finish your structure. They are a top choice for farmers who need hay storage or equipment sheds on their land.
Storage for hay is a smart move for any farm owner who wants to save money. A good shed protects hay from rain to stop rot and loss of value. Wood building systems like post-frame also help improve the energy efficiency of the structure. This makes them a good pick for both farm use and for those who want a heated shop. Kits are a low cost way to get a high-quality building on your own time.
Many people choose to build the kits themselves or hire a local crew. You can choose the colors and features that fit your style. Whether you are in a rainy coastal town or a dry desert area, the parts are made to last. The team ensures that every piece in the kit meets their high standards for quality. This gives you a strong building that can handle the local weather.
Navigating local permits and building codes
Washington has strict rules for how buildings are made to keep people safe. Each county has its own rules for snow loads, wind speeds, and seismic safety. Choosing a pro builder is the best way to meet these local building codes. They know how to talk to local offices to keep your project on track. This knowledge is vital for making sure your building stays strong for many years.
Modern tools also help make construction sites safer and more careful. Some projects use building info modeling to find risks before work starts. The Centers for Disease Control (CDC) notes that these tools can improve safety. This tech helps ensure your building lasts for decades. This approach helps avoid costly mistakes and keeps the crew safe during the build.
Planning your project involves more than just picking a design. You must think about site prep and how the building fits on your land. An expert team can help you look at your property and find the best spot. They will check for things like drainage and soil strength. Doing this work early saves you from big problems later on. It ensures that your new pole building is a solid asset for your property.
How do you choose a qualified regional pole building contractor?
Finding the right builder is the most vital step for your new project. You need a team that knows the local land and the local weather. The region has unique needs for snow and wind loads. Top pole building contractors serving Oregon and Washington will have a long history of local work. They should know how to build structures that last in damp or cold areas. A local crew will also be easy to reach when you have a quick question or a new idea.
Check for local code knowledge
The rules for building change from one county to the next. A good builder must know the local codes for earth stress and wind speed. This ensures your barn or shop stays safe and legal for many years. Some wood building systems help improve the energy use of a shed while keeping it strong. You want a partner who can handle these small points for you. They should know how to get the right permits for your own site and use.
Climate is also a big factor in the area. Heavy rain and high winds can put a lot of strain on a roof and walls. A builder with deep roots in the area will know which parts are best for our wet winters. They can help you pick the right steel or wood to stop rust and rot. This local skill saves you money by avoiding repairs in the future.
Use a clear vetting process
Do not rush when choosing a qualified pole building contractor for your land. You should look at their past work and talk to their past clients. A firm with 45 years of skill, like Locke Buildings, brings a high level of trust. They have finished over 5,000 projects since 1981. This depth of work shows they can handle any surprise that might come up during the build. It also means they have a strong net of local crews and supply shops.
A good vetting process starts with a simple list of steps. Following a plan helps you compare different teams on the same points. It keeps the project on track from the first call to the final nail. Here are the five key steps to take before you hire any crew for your shop or barn:
Define your building goals. Write down the size and use of the shop or barn before you call. This helps the builder give you a better price. Tell them if you need a full build or just a parts kit.
Ask about design tools. Look for teams that use 3D tools to show you the project. This helps you see the building before the crew starts. You can change the doors or windows on the screen to get the look just right.
Check cards and cover. Make sure the crew is legal to work in your state. This protects you if there is a mishap on your land. Ask to see proof of their license and their bond.
Review past work. Look for top scores from other owners in the area. A good name is a sign of high care and work. Ask for a list of local projects you can see in person.
Get a full written quote. The price should list all costs for the kit or the build. Do not sign a deal that is not clear about the final cost. Make sure the quote lists the site prep and the cleanup.
A good quote will help you stay on budget. It should tell you what is in the deal, such as site prep or local permits. Ask if the team handles the full build or just the parts kit. Many firms offer a dual model to fit your budget and your skill level. Knowing the scope of work helps avoid extra fees later. Make sure they can finish the work on a time plan that fits your needs.
Lastly, meet with the builder in person or via a video call. You should feel good about how they talk and answer your questions. Clear talk is key to a smooth project. A local partner will care about their town and the high level of their work. They will want to build a shop or barn that you can use for many years. Trust your gut when you pick a team to work on your home or farm.
What local conditions shape a Pacific Northwest pole building?
Building in the Pacific Northwest means you must plan for diverse land and weather. From the wet coast to the snowy mountains, every piece of land has unique needs. Good pole building contractors serving Oregon and Washington will check these local factors before they start. They know how to match a design to your own site. Factors like wind, snow, and soil type all play a role in the final plan.
Weather and safety codes
Weather is a top factor for any new build. The region has high wind zones and heavy snow loads that change by the mile. Buildings must meet strict rules for safety from shakes and quakes as well. These codes ensure your shop or barn can stand up to storms over time. In some areas, you may need a roof that can hold tons of ice and snow without bending.
Expert builders use math and data to meet these rules. As one way, some crews use safety tools and 3D models to plan for job site risks. This step is vital to keep the build safe and strong. Without the right data, a heavy snow year could put too much stress on your roof. This is why local knowledge is a must for any team you hire.
Site features and drainage
Your land itself shapes how the build goes. You need a flat, dry spot for the base. Many parts of Oregon and Washington get heavy rain, so drainage is key. If water pools around the posts, it can cause issues over time. Proper site prep helps keep your storage area dry and safe. You may need to add gravel or move dirt to create a level area that sheds water well.
Rain also affects how you use the building. In wet climates, storing hay in a shed is a smart way to prevent damage from rain or spoilage. Good drainage and a tight roof protect your goods from damp air. You should also think about how trucks will get to the site. Muddy paths can block access during the long winter months. Make sure your driveways can handle heavy loads in the rain.
Common site factors include:
Soil stability and drainage
Slope and grade of the land
Access for large trucks and trailers
Distance from power and water lines
Local permit processes
Every county has its own rules for permits. The steps often depend on how big the building is and what you use it for. Some areas have tight rules about where you can build on your land. Working through these laws is a big part of the project. A small shed might not need a permit, but a large shop or horse arena mostly does.
You should talk to your local office early in the planning phase. They can tell you about set-back rules and land use. These rules say how close you can build to a creek or a fence line. While a contractor can help, the owner mostly holds the final duty for meeting local rules. Checking these details early saves you from costly delays later on. It is also wise to check for any buried power or water lines before you dig.
Post-frame buildings give farms, rural properties, and businesses flexible clear-span space.
Common pole building projects across Oregon and Washington
Pole buildings serve many needs across the Pacific Northwest. Property owners often work with pole building contractors serving Oregon and Washington to create custom spaces for work, storage, and home life. These flexible structures use post-frame methods that are strong and cost-effective. Choosing the right design depends on your goals and your local weather.
Agricultural barns and arenas
Farming is a big part of life in the region. Many owners build hay sheds to protect crops from rain. This keeps hay from rotting so it does not lose its value. You can find more facts on this in work from Washington State University. Horse owners also build large arenas and stalls. These give animals a safe, dry place to stay all year.
These buildings must handle heavy snow and wind. Top specialized pole building contractors know how to meet local codes for these large spans. Whether you need to store gear or house livestock, post-frame design offers the open space you need.
Shops and home garages
Rural property owners often need extra space for tools and cars. A shop or garage is a top choice for a pole building project. These buildings offer great use for hobbies like wood work or car repair. You can add seals and heat to make the space good in every season. Modern wood building systems can even help improve the energy use of these finished shops.
When planning a shop, think about your power and light needs. Working with a pro helps you set up the right plan before you build. They can guide you on floor plans and door sizes that fit your trucks or gear. This planning makes sure your building serves you well for many years.
Business spaces and barndominiums
More people now use pole buildings for shops and homes. Business clients use them for warehouses, stores, and work shops. These projects often need extra steps to meet strict building codes. Because these buildings go up fast, they are a smart choice for growing local firms.
Barndominiums are also very popular in Oregon and Washington. These buildings combine a home with a shop or barn under one roof. They offer a unique, open feel that old homes cannot match. You can start your own plan using a 3D Building Designer to see how your new home or office might look.
How do you start planning and request a useful quote?
Planning your project starts with a clear view of your space. You can use a 3D building tool to see your ideas come to life. This helps you pick the right size and style for your needs. Top pole building contractors serving Oregon and Washington use these tools to make a plan that meets local codes.
Use the 3D building designer
The best way to start is with a 3D designer. This tool lets you change the width, length, and height of your shop or barn. You can add doors and windows to see how they look on the frame. Once your design is ready, you can send it in to get a custom quote. This ensures the price you get matches the building you want.
Good planning must account for local weather and rules. Every city has its own needs for snow loads and wind speeds. Choosing a qualified pole building contractor helps you follow these building codes. These pros know how to design a structure that stays strong in the Pacific Northwest.
Gather your project details
Before you ask for a price, know your goals. Think about what you will store in the building. A hay shed needs to protect crops from rain to avoid spoilage, as noted by Washington State University. If you want a shop, think about the tools and power you need. Having these facts ready makes your quote more accurate.
You should also decide between a kit or a full build. Kits are great for DIY work and can ship across Oregon and Washington. Full builds cover everything from the ground up but have a smaller service area. Knowing your plan helps the team give you the right price.
Why turnkey quotes need a talk
Turnkey prices cover the whole project from start to finish. This includes site work, concrete, and labor. Since every site is different, these prices are not fixed. Things like slope, soil, and permit costs change from one lot to the next. A talk with a pro ensures your quote is fair and full.
Permit rules also vary based on the size and use of your building. Experts help you manage these steps so your project stays on track. By working with local pros, you ensure your new structure meets all regional codes for safety and strength.
Frequently Asked Questions
Are there licensed pole building contractors serving both Oregon and Washington?
Yes, several expert pole building contractors are licensed to work in both Oregon and Washington. These firms know the exact building codes and permit needs for each state. For example, Locke Buildings is a local family business that has served the Pacific Northwest since 1981. Choosing a builder with years in both states helps your project meet all regional safety rules. This includes local needs for snow loads and high wind speeds.
How long does a typical pole building construction project take?
A typical pole building project often moves faster than normal construction. The exact time depends on the size of the structure and the site work you need. Most small or mid-sized shops take about three to six weeks to build once the site is ready. But the full process with design and permits can take several months. According to Washington State University, these quick timelines make post-frame buildings great for urgent storage needs.
What factors influence the cost of a pole building project in the Pacific Northwest?
Several factors change the final price of your project. These include the size of the building, the cost of materials, and the type of doors you pick. In the Pacific Northwest, local codes for snow and wind also affect the design and cost. Site work like grading or concrete adds to the total price as well. Experts at Locke Buildings suggest getting a custom quote. This is because every building site has unique needs that impact the total budget.
Do pole building contractors in Oregon and Washington provide online price estimates?
Many pole building contractors offer online tools to help you plan your project. These 3D design tools let you choose the size and layout of your structure from your own home. You can then submit your design to get a custom quote. While these tools give you a good start, most pros also need a brief talk to give a firm price. This ensures the estimate accounts for your exact lot and local permit fees.
Ready to start your custom 3D pole building design today?
Waiting to start your new pole building project often leads to higher supply costs and long wait times for local permits. Every month of delay means you risk missing your target date or facing weather issues during the construction phase. Starting your design now allows you to get your spot on our build list and contact our team before the yearly rush.
Ready to build? Use our 3D Building Designer to start your 3D building design and request a quote for your project. Our local family team is here and ready to help you plan your new shop, barn, or garage. We can help you lock in your plans today to make sure your building is ready when you need it.
Choosing a building plan is where you get to be the architect of your own space. It’s the most creative part of the process, where you decide the layout, features, and flow of your future building. With modern tools, you can even design your own structure online. But turning that creativity into a buildable project requires a solid foundation of knowledge. This guide is here to help you navigate the world of building plans and designs, ensuring your vision is practical, on budget, and ready for construction. Let’s get you started on a building that’s uniquely yours.
Treat Your Plan as a Communication Tool: A detailed building plan ensures everyone, from you to your builder to the permitting office, is working toward the same goal; this shared understanding is your best defense against budget overruns and construction delays.
Balance Your Vision with Reality: The right plan is a balance of three things: what you need now and in the future, the opportunities and constraints of your property, and a realistic budget. Considering all three early on is the key to a successful project.
Find a Plan That Fits Your Process: You have options for finding the perfect design, so choose the one that works for you: browse online marketplaces for inspiration, work directly with a builder for a custom plan, or use an online 3D tool to bring your own vision to life.
What Is a Building Plan?
A building plan is the essential first step for any construction project, whether it’s a new barn, a commercial shop, or a personal workshop. Think of it as the detailed recipe your builder will follow. It goes far beyond a simple sketch, providing a complete set of instructions that outlines every aspect of your future structure. These plans communicate your vision to the construction team, ensure you meet local building codes, and help you create an accurate budget before the first post is ever set. Without a solid plan, you’re just guessing, but with one, you have a clear path from concept to completion.
Floor Plans, Blueprints, and Drawings: What’s the Difference?
You’ve probably heard these terms used interchangeably, and while they’re all related, they have specific meanings. “Drawings” is a catch-all term for any visual representation of your building. A “floor plan” is a specific type of drawing: a top-down view that shows the layout, room dimensions, and the placement of doors and windows. It helps you visualize the flow of the space. “Blueprints” are the final, official construction documents. The name comes from an old printing process, but today it refers to the complete set of detailed drawings and specifications needed to get permits and build your structure. They contain everything from foundation details to electrical layouts.
Why Your Building Plan Matters
Putting time and effort into your building plan is one of the smartest things you can do. A great plan turns your ideas into a concrete reality, ensuring the final structure is exactly what you envisioned. It’s also your most important tool for budgeting. A detailed plan allows you to account for both material and labor costs, which helps you stay on budget and avoid surprises down the road. This document becomes the single source of truth for you, your builder, and permitting officials, making sure everyone is working toward the same goal. You can even start to design your own structure online to get a feel for how different layouts and features come together.
Common Types of Building Plans
Once you start looking for building plans, you’ll quickly see they fall into a few main categories based on their intended use. Think of it like browsing for a car; you wouldn’t look at sports cars if you need a family minivan. Understanding these common types of plans helps you focus your search and use the right language when talking to builders or designers.
Whether you’re planning a new home, a functional barn for your farm, or a commercial space for your business, there’s a category of plans designed specifically for that purpose. Each type prioritizes different features, from the open-concept flow of a residence to the durable, wide-open spaces required for an industrial shop. Let’s walk through the most common types so you can find the perfect starting point for your project.
Residential Plans
Residential plans are all about creating a home. These are the blueprints for houses, cabins, and other living spaces. You’ll typically find them organized by features like square footage, the number of bedrooms and bathrooms, or architectural style. Many online marketplaces offer thousands of pre-designed house plans that you can purchase and modify to fit your family’s needs and your property’s specific requirements. While a traditional house plan is a great starting point, remember that alternative construction methods, like pole buildings, can also be used to create beautiful and durable custom homes.
Agricultural and Barn Plans
If you have land in the Pacific Northwest, you know that a functional outbuilding is essential. Agricultural and barn plans are designed for the demands of farm life, whether you need housing for livestock, storage for hay and equipment, or a space for processing your harvest. These plans prioritize durability, ventilation, and efficient layouts. As a leading pole building contractor in Oregon and Washington, we specialize in creating structures that are perfectly suited for agricultural use. Pole building designs are particularly popular for barns because they offer wide, unobstructed interior spaces and are cost-effective to build.
Commercial and Industrial Plans
Commercial and industrial plans are created for business. These designs can range from a simple retail storefront or office to a large warehouse, manufacturing facility, or auto shop. The primary focus is on functionality, workflow, and safety. A good commercial plan will consider things like customer traffic patterns, inventory storage, and the placement of heavy machinery. Post-frame construction is an excellent choice for many commercial buildings because it allows for flexible, open floor plans that can be easily adapted as a business grows or its needs change over time.
Specialty Structures: Arenas, Shops, and More
Beyond homes and traditional barns, there’s a whole world of specialty structures. This category includes everything from personal workshops and RV garages to large-scale riding arenas. These plans are all about supporting a specific activity or hobby. For example, an arena plan will focus on clear-span width and proper footing, while a shop plan will emphasize ceiling height, door placement, and electrical layouts. If you have a unique project in mind, you can use an online tool to design your own building and bring your specific vision to life, ensuring every detail is exactly how you want it.
How to Choose the Right Building Plan
Choosing a building plan is one of the most exciting parts of the process. It’s where your vision starts to take shape on paper. But with so many options, it can also feel a little overwhelming. The key is to approach it methodically. By thinking through your needs, your property, and your budget, you can confidently select a plan that works for you not just on day one, but for years to come. Let’s walk through the four main steps to finding the perfect plan for your pole building.
Define Your Needs (Now and Later)
First, get really clear on the building’s primary purpose. Is it a garage for your vehicles, a barn for your animals, or a shop for your business? Start a list of “must-haves.” Then, think about the future. A simple storage space today might need to become a workshop with an office in five years. Considering your long-term goals now can save you from a costly renovation or a building that no longer fits your lifestyle. Once you have your list, try playing with different layouts. Using an online tool can help you design your building and see how your needs translate into a functional space.
Factor in Your Property and Local Codes
Your land plays a huge role in the design you can choose. Take a walk around your property and consider the best placement. Think about access for vehicles, the direction of sunlight and wind, and any slopes or natural features. Beyond the land itself, you’ll need to understand your local regulations. Every county in Oregon and Washington has its own zoning laws and building codes that dictate what you can build, where you can build it, and how it needs to be constructed. Securing the right building permits is a critical early step that will influence your final plan.
Align the Plan with Your Budget
A successful project is one that finishes on budget. Before you fall in love with a complex design, it’s important to understand your financial capacity. A good budget accounts for both “hard costs” and “soft costs.” Hard costs are the tangible expenses, like materials and labor. Soft costs are the other fees associated with the project, such as design fees, permits, and site surveys. Separating these costs helps you create a more accurate financial picture and make informed decisions about the size and features of your building. A clear budget for building will be your best tool for keeping the project on track.
Common Mistakes to Avoid When Choosing a Plan
We all want to get our projects started quickly, but rushing the planning phase is a common misstep. One of the biggest mistakes is failing to think through all the details before construction begins. Where will the doors and windows go for the best light and access? Is the layout practical for how you’ll actually use the space every day? Another mistake is choosing a plan that’s too big or too small for your needs, which goes back to that first step of defining your purpose. By taking your time and avoiding these common pitfalls, you set yourself up for a building that you’ll be happy with for a long time.
The Cost of Building Plans
Figuring out the cost of your building plans is a critical step in your project’s financial planning. It’s more than just the price tag on a set of drawings; it involves the initial plan, any changes you want to make, and other expenses that can pop up along the way. Thinking through these costs ahead of time helps you create a realistic budget and ensures your vision can come to life without any major financial surprises. Let’s break down what you can expect.
Understanding Base Plan Costs
When you start budgeting for a new structure, it’s helpful to think in terms of “hard costs” and “soft costs.” Hard costs are the tangible expenses like lumber, concrete, and labor. Soft costs are the less tangible but equally important fees for things like permits, inspections, and the building plans themselves. The price of a base plan is one of your first soft costs.
While a pre-designed plan is an affordable starting point, it’s just one piece of your overall financial picture. To budget for building a house or any structure effectively, you need to account for both the soft costs of planning and the hard costs of construction. Seeing the complete picture from the beginning helps you allocate your funds wisely and avoid stretching your budget too thin later on.
Budgeting for Plan Modifications
It’s rare to find a plan that fits your needs perfectly right out of the box. You might want to add a window for more light, move a wall to create an open-concept shop, or add another bay for equipment storage. These modifications are completely normal, but they do come at a cost. Designers and architects typically charge for changes with an hourly rate or a flat fee, depending on the complexity of the request.
Before you commit to a plan, it’s a great idea to visualize your changes. Using an online tool to design your building can help you experiment with different layouts and features. This process allows you to see how your ideas look and get a better sense of the scope of your modifications before you start paying for official revisions, saving you both time and money.
Hidden Costs to Watch For
A great building plan is the foundation of your project, but other costs can surface that aren’t included in the design fee. These often relate to your specific piece of land and local regulations. Common examples include fees for building permits, the cost of site preparation like grading or excavation, and expenses for connecting utilities like water and electricity.
To handle these variables, it’s smart to include a contingency fund in your budget, which is typically 10% to 20% of your total estimated cost. This fund acts as a safety net for unexpected expenses. By actively preparing for potential overruns, you can manage the financial side of your project with confidence, ensuring everything stays on track from start to finish.
Free vs. Paid Building Plans: Which Is Right for You?
When you start looking for building plans, you’ll quickly find both free and paid options. It can be tempting to go with a free plan to save money upfront, but it’s important to understand what you’re getting with each choice. The right decision depends entirely on your project’s complexity, your budget, and how much hands-on guidance you need. Making the right choice here sets the foundation for your entire project.
What to Expect from Free Plans
Think of free building plans as a starting point. They can be a great way to gather ideas and understand basic layouts, but they usually come with limitations. You’ll likely find that free plans offer very little room for customization and may not include the detailed specifications you need for permits or construction. If you have a very specific vision or need to adapt a design to your property, a free plan might feel more restrictive than helpful. They often lack professional support, leaving you to figure out material lists and structural questions on your own, which can be a challenge for any builder.
When to Invest in a Paid Plan
Investing in a paid plan is about more than just a drawing; it’s an investment in a smoother, more predictable building process. Paid plans provide the comprehensive details that free versions lack, like structural engineering specifics and complete material lists. This level of detail helps ensure your project is well-planned from the start, which can save you significant time and money down the road. Plus, paid plans often come with professional support. Having an expert to call with questions is incredibly valuable, especially if this is your first time managing a build. This guidance is a key part of what you get with both custom construction and high-quality pole building kits.
What to Look For in a Paid Plan
When you’re ready to purchase a plan, make sure you know what you’re paying for. A quality paid plan should include detailed blueprints, a complete list of materials, and clear, step-by-step construction instructions. These elements are your roadmap to a successful build and help prevent expensive mistakes. Beyond the basics, look for a plan that offers flexibility. The ability to make modifications is crucial for making the final structure truly yours. Good architectural design focuses on adapting a space to your specific lifestyle, so your plan should allow for that personalization.
Where to Find Building Plans
Once you have an idea of what you want to build, the next step is finding the plan to make it happen. The good news is you have a few great options, each with its own set of benefits. Whether you prefer browsing existing designs or creating something from scratch, there’s a path that will work for you.
Online Plan Marketplaces
Think of these as massive online catalogs for home and building designs. Websites like Architectural Designs and Houseplans.com gather thousands of plans from different designers all in one place. You can browse a huge variety of styles, from classic farmhouses to modern shops, and filter your search by size, features, and more. The best part is that most plans aren’t set in stone. If you find a design that’s almost perfect, you can often work with the designer to make modifications, giving you a semi-custom result without starting from scratch. This is a great way to see what’s possible and find a solid starting point for your project.
Work Directly with a Builder
If you have a truly unique vision or a tricky piece of land, working directly with a builder or an architect might be your best path. This is the most hands-on, collaborative approach. You’ll work with a professional to create a completely custom plan from the ground up, ensuring every detail fits your specific needs. The key here is finding the right partner. An experienced builder will guide you through the process, helping you avoid common pitfalls that can lead to budget issues or delays. This partnership is invaluable for turning a complex idea into a functional, well-built structure that serves you for years to come.
Use an Online Design Tool
For a perfect blend of creative freedom and practical guidance, an online design tool is a fantastic option. It puts you in the driver’s seat, letting you experiment with layouts, features, and finishes in real-time. We wanted to give our customers this power, which is why we created our own free online 3D designer specifically for pole buildings. You can easily design your own barn, shop, or arena, visualizing exactly how it will look. It’s a fun, no-pressure way to bring your ideas to life and get a clear picture of your project before you even break ground. It’s the ideal first step to making your vision a reality.
What Makes a Good Building Plan?
A great building plan is more than just a technical drawing; it’s a roadmap that ensures your final structure is practical, durable, and something you’re proud to own. It’s the critical step that translates your vision into a tangible reality. The best plans successfully balance three key elements: a functional layout, smart material choices, and thoughtful aesthetics. Getting these right from the start saves you from costly changes and headaches down the road. It’s why we encourage everyone to experiment and design your own structures with online tools to get a feel for how these pieces fit together.
A Functional Layout and Flow
Functionality is all about how you’ll use the space day-to-day. A good plan optimizes the layout to make your activities easier, not harder. Think about your daily routines. If you’re planning a barn, does the layout provide an efficient path from the feed storage to the stalls? For a workshop, is there enough clearance around heavy machinery and ample room for your workbenches? A well-designed plan considers this functional arrangement to ensure every square foot serves a purpose. It anticipates your needs, creating a natural flow that makes the building comfortable and intuitive to use from the moment you step inside.
Smart Material and Structural Choices
The materials and structural design specified in your plan determine your building’s strength, longevity, and maintenance needs. This is especially important in the Pacific Northwest, where buildings need to stand up to wind and rain. A solid plan calls for materials that not only look good but also offer superior performance and durability. This includes everything from the framing lumber and metal roofing to the siding and insulation. Making smart choices here means your building will be more energy-efficient, require less upkeep, and provide better protection for your equipment, animals, or inventory for decades to come.
Thoughtful Aesthetic Details
While function and structure are the foundation, the aesthetics are what make a building truly yours. This is where you balance practicality with personal style. A good plan incorporates visual details that reflect your taste, whether you prefer a classic rustic look or a more modern design. Elements like the roof pitch, window and door placement, wainscoting, and color combinations all contribute to the final appearance. This is your opportunity to build something that not only meets your needs but also enhances your property’s value and curb appeal through expert custom construction.
Why Pole Building Plans Are a Great Choice for the Pacific Northwest
If you live in Oregon or Washington, you know our landscape is as beautiful as it is demanding. From rolling hills and uneven terrain to the persistent rain, any structure you build needs to be tough, adaptable, and practical. This is where pole building plans truly shine. Unlike traditional construction that often requires extensive excavation and a continuous concrete foundation, pole buildings use a simpler, more robust method that works with the land, not against it. This approach makes them a smart and cost-effective choice for the Pacific Northwest.
Pole buildings are incredibly versatile, serving as sturdy barns, spacious workshops, commercial facilities, or even unique homes. Their design allows for wide, open interiors, giving you the freedom to create a layout that perfectly suits your needs. Whether you’re storing equipment, raising animals, or building out a new retail space, a pole building provides a durable shell that can stand up to regional weather while giving you a blank canvas inside. Because they are engineered for efficiency, they often go up faster and with less site disruption. For anyone looking to build in the PNW, starting with a pole building plan is one of the most reliable paths to getting a structure that lasts.
How Are Pole Building Plans Different?
So, what exactly makes a pole building plan unique? It all comes down to the foundation. Instead of a continuous concrete slab, pole buildings are built on large posts, or poles, that are set deep into the ground. These posts form the main structural frame, transferring loads directly into the earth. This method is often faster and more affordable than traditional foundations, especially on sloped or uneven lots common throughout Oregon and Washington.
Because the design is simpler, you can achieve wide, unobstructed interior spaces perfect for everything from horse arenas to large workshops. This construction style is incredibly efficient and has been perfected by experienced contractors. As a leading pole building contractor in the region since 1981, we specialize in designing and constructing buildings that are perfectly suited for our local environment and your specific needs.
The Flexibility of Pole Building Designs
One of the best things about pole buildings is their incredible design flexibility. The post-frame structure supports the roof without needing interior load-bearing walls, which means you get a massive, open space to work with. This is ideal for agricultural buildings where you need to maneuver large equipment, or for a personal shop where you want a completely open floor plan. You can place doors, windows, and interior walls almost anywhere you like without compromising the building’s integrity.
This flexibility also extends to the building process itself. You can choose to have a team handle the construction or opt for one of our pole building kits. These kits come with every piece of lumber and all the materials you need to complete your build, giving you a straightforward path from plan to finished structure.
Design Your Own Pole Building with Locke Buildings
Feeling creative? You don’t have to settle for a one-size-fits-all plan. Bringing your specific vision to life is easier than ever with tools that let you take the lead. Instead of trying to describe your ideal layout, you can map it out yourself, ensuring every detail is exactly how you want it. This is your chance to plan the perfect workshop, the most efficient barn, or the commercial space you’ve been dreaming of, right down to the placement of every door and window.
Our easy-to-use 3D building software lets you design and plan your project from your computer. You can experiment with different sizes, add features, and see your ideas take shape in real time. It’s a simple way to express your vision and get an accurate starting point for your project budget. When you’re done, you can send your design to our team for a quote.
Ready to Bring Your Plan to Life?
This is the exciting part. You have a vision for your new barn, shop, or arena, and now it’s time to make it real. Turning a plan into a physical structure is a rewarding process, but it starts with a few key considerations to ensure the final result is everything you hoped for. Think of your initial plan as a starting point, not a final command. The best designs are flexible, and nearly all building plans can be modified to better suit your property and your life. Don’t be afraid to ask for changes, whether it’s shifting a wall, adding a wash rack, or creating more storage space.
Of course, your budget plays a major role in what’s possible. It’s wise to create a clear financial plan before breaking ground. Think about not just the initial construction costs but also your future needs. Will your business expand? Will your family grow? Building a little bigger now might be more cost-effective than adding on later. It’s also smart to set aside a contingency fund, typically 10-15% of the total cost, to cover any unexpected expenses. A detailed guide on budgeting for your dream home can help you anticipate the true costs from the start.
Ultimately, a great building plan creates a space that works for you on every level. It needs to be functional, supporting your daily activities with a smart and efficient layout. But it also needs to feel right. The aesthetic details, from the siding material to the window placement, are what make a structure truly yours. A successful design is one that finds the perfect balance between practical function and a look you love. If you’re ready to see how your ideas come together, you can start creating a custom plan with our Design Your Building tool.
What’s the difference between a floor plan, a blueprint, and a building plan? Think of “building plan” as the overall project file that contains everything. A “floor plan” is just one document inside that file, specifically the top-down view showing the layout. “Blueprints” are the final, official set of construction documents that include the floor plan plus all the other essential details, like foundation, electrical, and structural specifics needed for permits and construction.
Do I really need a detailed plan for a simple structure like a garage or small barn? Yes, I always recommend it. Even for a simple project, a good plan is your best tool for communication and budgeting. It ensures you and your builder are on the same page, helps you get accurate quotes for materials and labor, and confirms the final structure will actually fit your needs. It prevents small misunderstandings that can lead to big, expensive problems later.
Can I change a plan after I buy it? Absolutely. It’s very common to find a plan that’s almost perfect and then make a few tweaks. Most designers offer modification services for an additional fee. Before you commit, it helps to use an online design tool to visualize your changes. This lets you experiment with moving doors or adding windows, so you have a clear idea of what you want before paying a professional to revise the official drawings.
How do I make sure the plan I choose will meet local building codes in Oregon or Washington? This is a critical step. While many stock plans are designed to meet general standards, codes can vary significantly by county. The best way to ensure compliance is to work with a local builder or designer who is familiar with your area’s specific requirements for things like snow load and wind resistance. They can review your chosen plan and make any necessary adjustments to ensure it will be approved for a permit.
What makes a pole building plan different from a plan for a traditional building? The main difference is the foundation and framing. A traditional plan usually specifies a continuous concrete foundation. A pole building plan, however, is designed around large posts set deep into the ground, which serve as the main structural support. This method is often more cost-effective and adaptable to uneven land, and it creates the wide, open interior spaces that make pole buildings so versatile for shops, barns, and arenas.
Property owners across the Pacific Northwest choose post-frame structures for their many uses and low costs. These buildings adapt to almost any need, from simple equipment sheds to complex homes and shops.
The main pole building types include farm, home, business, and horse structures designed to meet specific storage or living needs. Farm designs often focus on animal housing and tool storage, while home options range from detached garages to finished living spaces. Business types provide large, open spaces for storage or offices, and horse models usually include indoor riding areas and stalls. Research from the University of Illinois shows this method uses large wood posts as the main support to allow for wide interior spaces. Each type offers a flexible way to build strong structures that can handle the unique weather and snow in Oregon and Washington. Whether you need a simple kit for a DIY project or a full build, choosing the right design ensures your building fits your goals.
Finding the perfect design for your land starts with knowing which group fits your specific use and budget. We will look at how these different groups serve owners across the Pacific Northwest. Our first section answers the question What are the main pole building types? for your property. The path begins with
Which pole building types work best for farms?
Agricultural pole buildings prioritize open spans, large equipment access, ventilation, and layouts that can adapt as a farm grows. They can serve as machine sheds, hay storage, livestock shelter, or dry work areas.
Farmers have used post-frame construction methods for decades. These pole building types work well on a farm because they offer large, open spaces without the need for many inside walls. This design comes from the way upright posts support the roof. Since these posts can stand far apart, you get plenty of room to move large tractors or store bulk feed. Most basic farm shells cost between $25 and $45 per square foot, making them a smart choice for a growing business.
Common farm storage uses
Storing big tools and crops is the most common use for an agricultural pole building. Machine sheds and tool shops keep your gear safe from the rain and wind. You can plan for wide door openings so that combines and balers fit inside with ease. If you have tall hay stacks, you can build with higher walls to get more space. These buildings also work great as farm workshops where you can fix tools in a dry spot.
Livestock housing is another top choice for this building style. Horse barns and cattle sheds provide shelter from the cold. When you design for these herds, you must think about health and safety. You should use smooth surfaces that are easy to clean in any spot where you handle food or stock. While wood is common, some farm structures use special finishes to stop germs from growing.
Planning for air flow and moisture
Good air flow is key for any farm shop or barn. Without it, moisture can build up and cause mold or rot. This is true for hay storage and for buildings that house stock. You can add vents along the ridge of the roof or in the gables to keep air moving. If your shop will have a concrete floor, a vapor barrier can help keep the space dry. This simple layer stops dampness from the ground from rising up through the floor.
Door size is also a key part of your plan. Farm tools keep getting bigger. It is wise to choose doors that are wider and taller than what you need right now. This makes it easy to bring in new gear later on. You should also think about where you place the building on your land. Leaving room on the sides makes it easier to add more space if your farm grows in the future.
Choose high-clearance doors for large farm tools.
Use ridge vents to keep fresh air moving through the barn.
Install vapor barriers under concrete floors to stop moisture.
Plan for extra land around the site for future growth.
Designing for snow and weather
Weather in the Pacific Northwest can be tough on farm roofs. You must design your building to handle the local snow and wind. Many farm buildings use a standard 20 psf snow load to stay safe. This rating means the roof can hold about four feet of dry snow or two feet of wet, heavy snow. If you live in a spot with high snow, you might need a stronger design.
Roof pitch also helps with snow safety. If a roof is too flat, snow will not slide off fast. Roofs with a pitch of 3/12 or less often hold onto snow longer than steeper roofs. Adding a slope helps the snow fall off before it gets too heavy. You can also use porous snow fences to help keep snow from piling up in big drifts against your walls. These steps help keep your tools and herds safe all year long.
An agricultural pole building can be planned around equipment access, storage, and future expansion.
Which residential pole buildings fit storage, work, and living?
Residential pole buildings can become garages, workshops, RV storage buildings, or finished living spaces. The right layout starts with the vehicles, activities, utilities, and future uses the building must support.
Residential pole buildings offer more than just a place to park a car. These structures give people space for hobbies, big toys, and even new homes. Many owners choose these pole building types because they are fast to build and easy to change. You can design a simple shed or a complex home that fits your life. These buildings work well on large lots where you need more room than a standard house can give.
Garages and personal workshops
A large garage is a common choice for many people who own homes. These buildings protect cars and trucks from the rain in the Pacific Northwest. You can add extra room for a workbench or a craft area. The open floor plan makes it easy to move tools and large items around. Many people find that a special shop helps them focus on their work without clutter in the main house.
When you plan a shop, think about how you will use the space. You might need thick concrete for heavy machines or high walls for car lifts. A post frame building uses strong wood columns to carry the weight of the roof. This design allows for wide rooms without the need for middle walls. You get a clear space that works well for any hobby. You can also add windows and doors exactly where you need them for better light and access.
RV and boat storage solutions
Big vehicles like RVs and boats need a safe home during the winter months. A standard garage door is often too short for these tall items. Residential pole buildings can have very high ceilings and wide doors. This lets you back in a large trailer or a tall camper without any stress. You won’t have to pay for storage off your land when you have a safe spot at home.
Safety is also a key part of the design for these units. Residential structures must meet strict rules for safety and strength. For example, snow load standards for homes are often higher than for farm sheds. This ensures the roof can hold the weight of heavy, wet snow. A steep roof pitch also helps snow slide off so it does not pile up. You can rest easy knowing your costly boat or RV is safe from the weather and falling debris.
Barndominiums and living spaces
Some people want to combine their work and living areas into one spot. A barndominium is a pole building that includes a home. You can have a giant workshop on the main floor and a cozy house on the second level. This setup is great for small business owners, artists, or people who want a unique home. The style works well and allows for modern designs with open lofts and tall windows.
Building a home inside a pole structure requires careful planning. You must follow local rules for permits and zoning in your area. Living areas need more insulation and better air flow than a simple shed. Working with an expert barndominium builder helps you do these tasks. You will need to split the shop area from the living space with fire-safe walls. This keeps your home quiet and safe while you work on projects next door. Using a concrete base also helps keep the floor level and strong for your home.
Commercial pole buildings built around operations
Commercial pole buildings provide clear-span space that can be organized around inventory, vehicles, production, customer access, and offices. Planning circulation and code requirements early keeps the building aligned with daily operations.
For many business owners, the right space is the key to daily success. A commercial post frame building gives you the room you need to grow. It costs less than common steel or stone buildings. These structures use large wood posts to support the weight of the roof and walls. This design means you can have a wide, open floor plan. Locke Buildings can design these pole buildings with clear spans up to 100 feet wide. This is perfect for moving large tools or trucks.
Space for every business need
Business needs change fast, and your building must keep up. Post-frame designs are among the most useful pole building types ready today. Whether you need a simple shop or a complex retail hub, this method works well. Many firms use these buildings for large shops and fleet storage. The wide gaps between posts allow for large bay doors. This makes it easy to move trucks, forklifts, and heavy goods in and out of the site.
Other common uses for commercial pole buildings include:
Light work and making shops.
Auto repair centers and service bays.
Retail stores and farm markets.
Office-shop mixes with finished front rooms.
Large storage units for boats or RVs.
These buildings offer a clean look and a sturdy frame. Because the posts carry the load, you do not need inside walls to hold up the roof. This lets you create a custom layout that fits your exact workflow. You can place your office, break room, and shop floor just where they make the most sense for your team.
Designing for workflow and codes
When you build for a business, you must follow strict local codes and safety rules. Post-frame construction is a building technique where large, tall wood posts or columns serve as the main structural support. According to experts at the University of Illinois, these posts are spaced far apart. This allows for open inside spans. This wide spacing is a big win for your budget. It lowers the amount of stuff you need for the foundation and the walls.
Our team at Locke Buildings helps you plan for these rules early. We look at your daily tasks to find the best layout. We think about where your power lines should go and how to best light your workspace. We also make sure the building meets snow and wind load standards for the Pacific Northwest. Using a 3D design tool early in the process helps you see how the building will work before we start. This saves you time and prevents costly changes later.
Room for future growth
A smart business owner always looks ahead. One of the best parts of post-frame design is how easy it is to change later. If your business grows, you can often add on to the length of the building with ease. The clear span design means you can move inside walls without worry. You can also add more bay doors or windows as your team needs more light or access.
Because these buildings go up fast, your business can move in sooner. This quick start helps you get back to work and start seeing a return on your money. We focus on building a structure that serves you now but stays ready for what comes next. Whether you need a main base or a small shop, we build with your long-term goals in mind.
Commercial pole buildings can combine vehicle access, open work areas, storage, and room for growth.
Equestrian pole buildings should balance horse safety, ventilation, efficient daily chores, and protected space for riding or training. Stall layouts, aisle widths, drainage, and arena clearances should be decided around the property’s specific operation.
Horse owners in the Pacific Northwest need structures that keep animals safe and dry. An agricultural pole building is the best choice for these needs. These buildings use large wood posts for support. This allows for wide spans without many interior walls. This open design works well for stables, tack rooms, and large riding spaces.
Flexible stall and stable design
A well-planned horse barn starts with the stalls. Most owners choose 12 by 12 foot stalls to give horses room to move. You can add matted floors and wash racks to make daily care easier. Post-frame design makes it easy to add wide aisles. This helps with moving animals and tools through the barn safely. You can also plan for feed and tack storage in the same shell to keep items close.
Safety is the top goal when you build for animals. It is best to avoid rough surfaces that could harm a horse. Using smooth finishes helps keep the space clean. You should also think about the air. Good airflow keeps the barn fresh and prevents health issues. Placing doors at each end of the aisle creates a natural draft. This keeps the air moving and helps control dust and moisture.
Riding arenas and weather protection
Covered and indoor arenas are a must for riders in Oregon and Washington. These structures can reach a post frame building span of up to 100 feet without center posts. This clear span gives riders a safe, open space for training all year. You can pick the footing that works best for your style of riding. Adding mirrors or viewing areas can also help you track your progress.
Regional weather plays a big role in your design. In the Northwest, you must plan for heavy snow and rain. Roof pitch is key for shedding snow. Roofs with a pitch of 3/12 or less do not shed snow well. This can be a risk for the roof. A steeper roof helps snow slide off and keeps the frame safe. You can find more tips on roof safety from the University of Minnesota. They share data on snow loads for farm buildings.
Planning your equestrian space
Before you start, think about how the barn will sit on your land. You want to place it where water will drain away from the stalls. This keeps the footing dry and protects the wood posts. If you want to build it yourself, you can use a DIY pole barn kit to save on costs. For a more complex project, you may want a full design-build service. Use a 3D designer to see your ideas before you build.
How roof styles shape pole building function
Roof style affects usable interior volume, drainage, exterior appearance, and how easily a pole building can support features such as lofts or covered extensions. The best choice depends on the building’s purpose and site conditions.
When you plan a new shop or barn, the roof is the first thing people see. But pole building types are defined by more than just looks. The roof shape you pick affects how much gear you can store and what you will pay for the project. It also dictates how the building stands up to heavy rain and wind.
Most owners in Oregon and Washington choose from a few time-tested pole building types. These shapes help manage the wet weather while giving you the open space you need. Choosing the right design early makes the rest of the planning process much easier.
Common roof designs for post-frame buildings
The gable roof is a top pick for many pole buildings. It has two sloped sides that meet at a high point in the center. This design is simple and stays at a low cost for most builders. It works well for garages, home shops, and basic storage sheds.
If you need more light and air, the monitor roof is a great choice. It has a raised middle part that often includes windows. This works well for horse barns or large shops that need extra venting. Gambrel roofs have two slopes on each side and look like a classic farm barn. This shape creates a large loft for hay or tools.
For a quick and easy add-on, a lean-to roof uses a single slope. It is a smart way to get extra cover without building a whole new structure. Many people use them to store wood or park small gear outside the main shop.
Check common roof styles
Picking a roof depends on what you plan to do inside. A shop for cars needs a different shape than a barn for cows. Use this table to see how the most common styles stack up for your project.
Style
Best fit
Planning note
Gable
Garages and shops
Simple, practical roof form
Monitor
Horse barns and large shops
Raised center can add light and airflow
Gambrel
Barns with storage lofts
Two slopes create useful upper space
Lean-to
Covered equipment storage
Extends shelter beside the main building
How weather affects your choice
In the Pacific Northwest, your roof must handle a lot of water. In post frame building plans, the roof trusses rest on thick wood posts. This structure must be strong to keep your gear safe during storms.
According to research, these posts are often spaced 8 to 12 feet apart. This wide spacing means the roof must be very sturdy. A steeper roof slope helps rain and snow slide off fast. This is key for buildings in the mountains or wet valleys.
If you live in a snowy area, you may need a stronger design. You can use a 3D designer tool like the IdeaRoom to test these shapes. It lets you see how your building will look before you start to build. This helps you balance style with the needs of your local weather.
How do you choose the right pole building type?
Choose a pole building type by defining its primary use, required clearances, site constraints, weather exposure, service path, and likely future changes. A design that reflects those factors is easier to price and refine.
Picking between pole building types starts with your land and goals. Think about how you will use the space daily. A horse barn needs tall doors and good air flow. A garage needs room for cars and tools. Plan now to avoid costly errors later. It makes sure your new shop fits your life for a long time.
Think about your building goals
Pick a main use for your structure. Most pole buildings fall into four groups: farm, home, business, and horse barns. Each group has its own needs for size and floor plans. A shop might need a thick slab for heavy tools, while a hay barn might just need a roof and open sides to stay dry.
Think about the future too. Many people need more space just a few years after they build. It is cheaper to add a few feet now than to add on later. Measure your gear to pick the right door size. Clear spans can go up to 100 feet for large shops or riding arenas.
Plan for your site and weather
Your land and local weather help you pick the right design. In our area, you must think about rain and snow. Your roof pitch is vital for shedding snow. Flatter roofs with a pitch of 3/12 or less do not let snow slide off well. Check the standards for snow loads in your area to stay safe. Using the right pitch protects your gear and your family.
Check your local rules before you start. Some areas have strict codes for how close you can build to a road or neighbor. A good site needs to stay dry so your posts do not rot. Most new builds use vertical wood posts as the main support. These posts give you an open inside and keep the building level for a long time.
Pick your service path
Decide how the building will be built. Choose a full-service build or a kit. Locke Buildings offers full building work from Centralia, WA, to Salem, OR. This path is best if you want experts to handle permits, site prep, and labor. If you live outside this area or like to build yourself, a kit is a great choice. We ship DIY pole barn kits to any site in OR or WA.
Define your primary use. Decide if the building is for work, storage, or living. This sets your needs for heat, water, and power.
List your size and flow needs. Write down every big item you will store. Measure your largest gear to pick the right door size.
Check local codes and land. Talk to your county office about permits and rules. Make sure your site is flat and has good drainage.
Choose your roof and style. Pick a roof pitch that fits your local snow and rain levels. Select colors that match your home.
Pick your service path. Decide if you want a full build or a kit. Think about your skills, tools, and free time.
Use 3D design software. Visual tools help you see the final look. Use a 3D pole barn designer to test sizes and features online.
Once you have a plan, get a price. Using a 3D tool lets you see how changes shift the cost. Swap metal for wood or add windows with a click to find the best value. A well-planned building adds value to your land and makes work easier. Start with must-have features and then add the extras that make the space yours.
Frequently Asked Questions
What is the most cost-effective type of pole building?
Agricultural shells are often the most affordable option. These basic designs use simple metal siding and roofing over a post-frame structure. They do not usually need heavy insulation or complex floor plans. According to Locke Buildings, the cost for an agricultural shell usually ranges from $25 to $45 per square foot. This price is for the main building and does not include site work or interior finishes.
Are there size limits for different pole building types?
Post-frame construction is very flexible and can fit almost any size. You can build a small garden shed or a massive industrial warehouse. The design allows for large open rooms because it does not need internal walls for support. Most builders can create structures with a clear span of up to 100 feet. This makes them a top choice for commercial shops and large horse arenas. You can also connect multiple units to create a very large complex for your business.
Can I buy a pole building kit for any building type?
Yes, most designs are available as DIY kits or full-service projects. A kit includes all the materials you need to build the shell of your structure. This includes the posts, trusses, metal siding, and roof panels. According to Locke Buildings, kits are a good way to save money if you have the tools and skills to build. However, kit prices do not include the cost of concrete, labor, or site preparation. You should check local codes before you start.
Which pole building type is best for heavy snow areas?
Buildings with a steep roof pitch are best for snowy regions like the Cascade Mountains. A steep slope helps snow slide off before it gets too heavy. Residential pole buildings must meet strict safety rules to handle these loads. For example, some homes in the north are built to hold 42 pounds per square foot of snow. According to the University of Minnesota, flatter roofs are much more likely to have problems during a heavy storm.
What foundation is used for most pole building types?
Most modern pole buildings use a concrete perimeter foundation or concrete piers. These bases provide a strong and level surface for the vertical posts. Historically, some builders placed wood posts directly into the ground, but concrete is now more common for long-term strength. Using a slab floor is also a popular choice for workshops and garages. This keeps the interior dry and provides a smooth surface for moving tools or cars. It is the best choice for a high-quality finished building.
Ready to design your pole building and request a quote?
A clear concept makes it easier to discuss your site, intended use, layout, and service path with a building specialist. Locke Buildings can support full-service construction in its primary build area and deliver DIY building kits throughout Oregon and Washington.
Ready to design your pole building and request a quote? Use the 3D Building Designer to create your concept and share it with Locke Buildings.
I’ve seen so many business owners get overwhelmed trying to pick the right software. The options seem endless, and the technical jargon doesn’t help. My goal is to cut through the noise and give you a straightforward guide. We’re going to look at the Google Workspace plans in practical terms that make sense for a busy contractor. Think of me as your guide to getting your digital toolbox organized. We’ll figure out exactly what you need for your team, so you can spend less time wrestling with technology and more time focusing on what you do best: building.
Key Takeaways
Choose a plan based on your biggest need: Business Starter is great for small teams, while Business Standard is better for those who need more storage and meeting recording. For advanced security and compliance, look to the Business Plus or Enterprise plans.
You get a complete professional toolkit with any plan: Every subscription includes a custom email address, the full suite of collaborative apps like Docs and Drive, AI assistance from Gemini, and 24/7 support, giving you a solid foundation from day one.
Plan for your future growth and the transition: Before committing, consider how the platform will scale with your business and integrate with your other tools. Use the free trial to test your team’s actual storage needs and map out a smooth switch.
What Are the Google Workspace Plans?
Choosing the right digital toolkit for your business is a lot like picking the right plan for a new building. You need something that’s reliable, fits your budget, and can handle the job, whether you’re setting up a small workshop or a large commercial facility. Google Workspace organizes its offerings into several distinct plans, each designed for a different type of team and workflow. From a solo operator just getting started to a growing business with a full crew, there’s a plan that fits.
The main differences come down to storage space, security features, and the number of people you can host in a video meeting. As you move up the tiers, you get more of everything, just like adding more bays to a shop or reinforcing your structure. Let’s walk through each option so you can see which one makes the most sense for your company. You can find a full comparison and the latest promotional offers on the official Google Workspace pricing page, which is always the best place for up-to-date information.
Business Starter
Think of the Business Starter plan as your foundational toolkit. It’s perfect for small businesses or solo entrepreneurs who need professional tools to get up and running. For $7.00 per user per month, each person on your team gets a custom email address (like [email protected]), 30 GB of cloud storage, and the ability to host video meetings for up to 100 people. This plan gives you access to all the core apps like Gmail, Calendar, Drive, and Docs, plus the Gemini AI assistant to help you write emails and get organized. It’s a solid, no-fuss starting point for laying your business’s digital foundation.
Business Standard
If your team is growing and you find yourself juggling more files, project photos, and client documents, the Business Standard plan is a fantastic upgrade. At $14.00 per user per month, the biggest change is the huge jump in storage to 2 TB per user, which is plenty of space for project plans and high-resolution images. Video meetings also get an improvement, allowing up to 150 participants and adding the ability to record sessions. This is incredibly useful for documenting client meetings or creating training videos for your team. This plan also introduces a handy eSignature feature right within Google Docs.
Business Plus
The Business Plus plan is designed for businesses that need more advanced security and data management. Priced at $22.00 per user per month, it gives you a massive 5 TB of storage for every user, which is ideal for companies that handle large video files or extensive project archives. On the security front, this plan introduces tools like Google Vault, which lets you retain, archive, and search your company’s data for compliance or legal reasons. Your video meetings can now host up to 500 people and include attendance tracking. This plan is a great fit for established businesses that want to protect their data and streamline administrative controls.
Enterprise
For large organizations with complex security, compliance, and operational needs, the Enterprise plan offers the most comprehensive set of features. Storage starts at 5 TB per user with the option to request more as needed. Video meetings can accommodate up to 1,000 participants and include in-domain live streaming for company-wide announcements. The real power of the Enterprise plan lies in its advanced security controls, including top-tier data loss prevention (DLP) and S/MIME encryption for securing your email communications. Pricing is customized for this tier, so you’ll need to contact Google’s sales team to get a quote based on your company’s specific requirements.
Google Workspace Pricing: A Simple Breakdown
Figuring out the cost of new software can feel like a chore, but Google Workspace keeps its pricing pretty straightforward. The final price depends on the plan you choose, how many users you have, and whether you prefer to pay month-to-month or commit to a full year. Understanding these options is the first step to making sure you get the features you need without overspending. Google offers a few different ways to pay, giving you flexibility as your team grows or your budget changes. Plus, there are some great introductory offers that let you try out the platform before making a long-term commitment. Let’s walk through how the billing works and what promotions you can find so you can make a confident choice for your business.
Monthly vs. Annual Billing
When you sign up, you’ll need to decide between monthly and annual billing. If you want the freedom to change your plan or cancel at any time, the monthly option is perfect since it offers maximum flexibility. However, if you know you’re in it for the long haul, the annual plan is the smarter financial choice. Committing to a year upfront saves you 16% on the total cost. All Google Workspace pricing is calculated per user, so you can easily add or remove team members and your bill will adjust accordingly. This makes it simple to scale your plan as your business evolves.
Finding Free Trials and Promotions
If you’re not quite ready to commit, Google makes it easy to test the waters. You can start with a 14-day free trial to explore all the features and see if it’s the right fit for your team. This is a great way to get a feel for the tools without any pressure. For new customers, Google often provides a significant discount for your first few months, which is applied automatically when you check out. There are also special introductory prices available for your first 20 users during the first year, making it an especially attractive option for startups and small businesses looking to get established.
What’s Included in Every Plan?
One of the best things about Google Workspace is that every plan, from Business Starter to Enterprise, is built on the same powerful foundation. While higher-tier plans add more storage and advanced features, you’re not missing out on the essentials if you start small. No matter which option you choose, you get a core suite of tools designed to help your team communicate, create, and collaborate effectively. Let’s walk through the key features that come standard with every single Google Workspace subscription.
Custom Business Email
First impressions matter, and a professional email address is a simple way to build credibility. Every Google Workspace plan lets you create a custom email address using your company’s domain (like [email protected] instead of [email protected]). This is all managed through the familiar, user-friendly Gmail interface that most people already know how to use. You get the same powerful search, spam protection, and organization features of a personal Gmail account, but with an address that reinforces your brand identity with every message you send. It’s a small detail that makes a big difference in how customers and partners see your business.
Core Collaboration Tools
At its heart, Google Workspace is a suite of apps designed to work together seamlessly. Every plan includes the full lineup of core collaboration tools that have become staples for modern teams. This includes Gmail for email, Google Drive for cloud storage, Google Calendar for scheduling, and Google Meet for video conferencing. You also get access to Google Docs for word processing, Sheets for spreadsheets, and Slides for presentations. Because these tools are all interconnected, you can easily schedule a meeting from an email, share a document in a chat, or attach a file from your Drive without ever leaving your workflow.
AI-Powered Assistance with Gemini
Google is integrating artificial intelligence across its products, and every Workspace plan benefits from this. You get access to the Gemini AI assistant, which is built to help you save time and be more productive. Gemini can help you draft emails in Gmail, organize ideas in Sheets, create images for Slides, or summarize long documents in Docs. While the more advanced AI capabilities are reserved for the higher-priced plans and add-ons, the foundational AI assistance included in every plan gives you a powerful partner for tackling your daily to-do list and sparking new ideas.
Mobile Device Management
In a world where work happens everywhere, keeping your company’s data secure is critical. That’s why every Google Workspace plan includes basic mobile device management. This gives you or your IT administrator the ability to require screen locks and passcodes on mobile devices that access company accounts. You can also remotely wipe a device if it’s lost or stolen, ensuring your sensitive business information doesn’t fall into the wrong hands. These controls provide a necessary layer of security and peace of mind, allowing your team to manage their mobile devices and work safely from anywhere.
24/7 Support
When you run into a technical issue, you can’t afford to wait days for a response. All paid Google Workspace plans come with access to 24/7 support from Google’s team of experts. Whether you have a question about billing, a problem with an account, or need help with a specific feature, you can get assistance via phone, email, or chat at any time. This round-the-clock support is invaluable for any business, as it ensures you can resolve problems quickly and minimize any disruption to your team’s workflow. You can feel confident knowing that 24/7 help is always available when you need it.
What Sets Each Plan Apart?
While every Google Workspace plan covers the essentials, the real differences show up in the details. As you move up from Business Starter to Enterprise, you get more storage, more powerful meeting features, and stronger security controls. Think of it like this: the Starter plan gives you a solid foundation, while the higher-tier plans add specialized tools designed for larger teams and more complex needs. Understanding these key distinctions will help you pinpoint the exact plan that fits your team’s size, workflow, and security requirements without paying for features you won’t use. Let’s break down what you get with each upgrade.
How Much Storage Do You Get?
Cloud storage is one of the biggest factors when choosing a plan, especially if your team works with large files. The Business Starter plan includes 30 GB of pooled storage per person, which is a great starting point for small teams handling mostly documents and spreadsheets. Once you jump to the Business Standard plan, your storage increases significantly to 2 TB per user. This is usually more than enough for growing businesses that create video content or use high-resolution images. For data-heavy organizations, the Business Plus and Enterprise plans both offer a generous 5 TB of storage per user, with Enterprise providing options to request even more as your company scales.
Advanced Video Meeting Features
All plans include Google Meet for video calls, but the capacity and features expand as you upgrade. The Business Standard plan allows for meetings with up to 150 participants and adds helpful tools like meeting recordings and noise cancellation. This is perfect for making your team calls more professional and accessible. If you host larger events or webinars, the Business Plus plan increases the participant limit to 500 and includes attendance tracking, which is a fantastic tool for mandatory trainings or company-wide announcements. For major events, the Enterprise plan supports up to 1,000 participants and adds the ability to live stream within your organization’s domain.
eSignature and Document Tools
Managing documents and getting approvals becomes much easier with the features in the higher-tier plans. While all plans have Google Docs and Drive, the Business Standard plan introduces a native eSignature tool. This lets you request and add signatures to official documents right from Docs or Drive, which simplifies finalizing contracts and agreements. The Business Plus plan adds another layer with enhanced eDiscovery and retention capabilities, allowing you to find and manage company data for legal or compliance reasons. The Enterprise plan builds on this with even more advanced controls to ensure your documents remain secure and compliant with industry standards.
Key Security and Data Protection Features
Protecting your company’s information is critical, and Google Workspace adds more security layers with each plan. The Business Standard plan offers more security and management controls than the Starter plan, giving you a stronger defense. A major step up comes with the Business Plus plan, which includes Google Vault. Vault lets you retain, search, and export your organization’s data for compliance and eDiscovery, which is essential for businesses in regulated industries. For the highest level of protection, the Enterprise plan introduces data loss prevention (DLP). This feature helps prevent users from sharing sensitive information, like credit card numbers, outside of your company.
Expanded Admin and User Controls
As your team grows, you need more control over devices, apps, and user settings. The Business Plus plan provides advanced device management, giving administrators the power to enforce strong passwords, wipe data from a lost or stolen device, and manage which apps employees can use on their work phones. This is a huge benefit for companies with remote or hybrid teams. The Enterprise plan takes this even further with the most advanced controls and analytics. It also includes enhanced support, which gives you faster, more direct access to Google’s support team for any critical issues that might come up, helping you keep your business running smoothly.
Choosing the Right Plan for Your Team
Picking the right Google Workspace plan comes down to understanding your team’s unique needs. Are you a small crew just getting started, or a large organization with complex security requirements? Each plan is designed to solve a different set of problems, so matching your team’s size, workflow, and budget to the right feature set is key. It’s not just about the price; it’s about finding the tools that will help your team work smarter, not harder. Let’s walk through the most common scenarios to help you find the perfect fit for your business.
Think about where your business is today and where you want it to be in a year. Choosing a plan that can grow with you will save you a headache later on. The good news is that Google makes it simple to find a starting point and scale up as your needs change. From basic professional email to advanced enterprise security, there’s a plan built for every stage of business growth. We’ll look at options for startups, remote companies, growing businesses, and even large enterprises, so you can feel confident in your choice. This section will break down who each plan is best for, helping you align your team’s day-to-day operations with the right set of features.
For Startups and Small Teams
If you’re a startup or a small team, the Business Starter plan is your best bet. It’s designed to give you all the professional tools you need without a hefty price tag. For a low monthly cost per user, you get a custom business email (so you can finally ditch that @gmail.com address), 30 GB of cloud storage per person, and access to the core collaboration apps. It also includes video meetings for up to 100 people and the helpful Gemini AI assistant right inside your Google apps. It’s the perfect foundation for building your business.
For Remote and Hybrid Companies
Google Workspace is a natural fit for remote and hybrid teams. Since every tool is cloud-based, your team can securely access their work from any device, anywhere. The platform excels at keeping distributed teams connected with high-quality video calls that include smart features like noise cancellation, so you can sound professional even with background chaos. The ability to record meetings and generate transcripts makes it easy for everyone to stay in the loop, regardless of their time zone. This seamless online collaboration is what makes it a go-to for modern companies.
For Growing Businesses
As your business expands, your needs for storage and collaboration will grow with it. The Business Standard plan is the ideal upgrade for growing teams. It includes everything in the Starter plan but significantly increases your resources. You get a massive jump to 2 TB of pooled storage per person, which is perfect for teams creating lots of documents and media. Video meetings also get an upgrade, allowing for up to 150 participants and adding the ability to record your calls, a crucial feature for training, archiving important discussions, and sharing with team members who couldn’t attend live.
For Enterprises Needing Advanced Controls
Large organizations with strict security and compliance needs should look at the Enterprise plan. This tier is built for scale and control, offering advanced features that protect your company’s data. You get a whopping 5 TB of storage per person to start, with the option to request more. Security is a top priority here, with features like S/MIME encryption for email and advanced data loss prevention. Video meetings can host up to 1,000 people and even include in-domain live streaming, making it perfect for company-wide announcements. You’ll need to contact sales for custom Google Workspace pricing, as this plan is tailored to your organization’s specific needs.
For Educational Institutions
Google also provides powerful tools tailored for educational settings. While there are specific Google for Education plans, many smaller institutions find that the standard Business editions are a great fit, especially for administrative staff. These plans offer professional email, robust collaboration tools, and secure video calling for up to 300 users. They provide the essential framework for faculty and staff to communicate effectively and manage school operations. Institutions can purchase these plans directly from Google or work with a local partner to get set up.
How to Pick Your Perfect Plan
Choosing a Google Workspace plan feels a bit like ordering coffee. Do you need a simple black coffee, or are you looking for a triple-shot latte with all the extras? The best plan for you depends entirely on your team’s specific needs. To cut through the noise, let’s focus on four key areas. Thinking through these points will help you pinpoint the exact features you’ll actually use, ensuring you get the most value without paying for things you don’t need.
Security and Admin Needs
First, let’s talk about security. Google Workspace is designed for fast, low-maintenance collaboration, which is perfect for teams that want to stay productive without a huge IT department. The real question is how much control you need. The Business plans offer essential security features like 2-step verification and basic endpoint management. However, if you handle sensitive data or need more granular control, you might look toward the Business Plus or Enterprise plans. These offer advanced tools like data loss prevention (DLP) and security sandboxing to protect against threats. Think about your industry and the type of information you manage to find the right security balance for your team.
Storage and Scalability
Next up is storage and room to grow. It’s easy to underestimate how much digital space you’ll need. The Business Starter plan gives each user 30 GB of pooled storage, which is great for small teams. But if you work with large files like videos or extensive design assets, you’ll want to consider the Business Standard plan (2 TB per user) or higher. Also, think about your team’s size. The Business plans support up to 300 users, while Enterprise has no user limit. If you anticipate significant growth, choosing a plan that can scale with you is key. A great way to test the waters is with a free 14-day trial to see how much storage your team actually uses.
Integration With Your Existing Tools
Your business probably already relies on a set of favorite apps, whether it’s for project management, communication, or CRM. The good news is that Google Workspace is built to play well with others. Before you commit, make a quick list of your essential third-party tools and check if they integrate smoothly. The Google Workspace Marketplace is your best friend here, offering thousands of apps that connect directly with Gmail, Drive, and Calendar. A seamless transition is crucial, and Google provides helpful guides to make moving your existing emails and files as painless as possible. This ensures your team can keep working together without missing a beat.
Document Management and Approvals
How does your team handle contracts, proposals, and internal approvals? If your workflow involves a lot of document signing, the built-in eSignature feature in Google Docs can be a game-changer. This tool, available on select plans, lets you request and add signatures to official documents without ever leaving your workflow. For teams looking to streamline their processes even further, the advanced AI features in Gemini can help. Gemini acts as an assistant within your apps, helping you draft emails, summarize meetings, and research topics. Consider how much time you could save by automating document approvals and leveraging AI to handle repetitive tasks.
Google Workspace vs. Microsoft 365 and Zoho
While Google Workspace is a fantastic choice for many businesses, it’s smart to see how it stacks up against the other big names in the productivity space: Microsoft 365 and Zoho Workplace. Each platform has a different philosophy. Google was born in the cloud and built for real-time collaboration. Microsoft is the long-standing champion of desktop software, now powerfully integrated with cloud services. Zoho aims to be an all-in-one operating system for your entire business, with a huge suite of connected apps.
The right choice really comes down to how your team works. Are you constantly co-editing documents and living in your browser? Google might feel like a natural fit. Is your team deeply invested in Excel and Outlook? Microsoft 365 could offer a smoother transition. Or are you looking for a single, affordable platform to run everything from email to CRM? Zoho deserves a serious look. Let’s break down how they compare in the areas that matter most.
Feature-by-Feature Breakdown
When it comes to the core experience, each suite has a distinct feel. Many teams find that Google Workspace leads the pack with its intuitive user experience and powerful collaborative tools, making it ideal for fast-moving environments where multiple people need to work together seamlessly. Everything is designed to be shared and edited in real time, right from your browser.
Microsoft 365’s strength lies in its combination of familiar desktop apps with robust cloud services. It bundles the Microsoft apps you know, like Word, Excel, and PowerPoint, with services like SharePoint and Teams for communication and file management. If your workflows depend on complex spreadsheets or specific desktop features, Microsoft 365 provides that power. Zoho Workplace, on the other hand, shines with its deep integration across the entire Zoho ecosystem. Tools like Zoho Cliq support real-time collaboration through channels and threads, connecting effortlessly with its project management, CRM, and finance apps.
Price-for-Price Breakdown
On the surface, pricing for these suites can seem similar, but the value depends on what’s included. Google’s Business Starter plan is a popular entry point, typically costing around $7 per user per month. For that, you get custom email, 30 GB of storage per user, and access to the full suite of collaboration tools.
Microsoft 365 has several plans, with its Apps for Business plan starting around $8.25 per user per month. This plan focuses on giving you the desktop versions of Office apps like Word and Excel, along with cloud storage. For email and Teams, you’d need to look at a different tier, like Business Basic. Zoho is often the most budget-friendly, with a free-forever plan for small teams and a Standard plan that offers an incredible amount of value for just a few dollars per user each month.
Integrations and App Compatibility
No business tool is an island, and how well your suite connects with other software is critical. Google Workspace has a massive marketplace with thousands of third-party apps you can plug directly into Gmail, Drive, and Docs, making it incredibly flexible.
Microsoft 365 naturally has deep ties to the Windows operating system and other enterprise systems, which is a major advantage for companies that already use Microsoft products extensively. Zoho’s greatest integration strength is within its own family of applications. If you decide to use Zoho for your CRM, accounting, and project management, you’ll find that all the tools communicate with each other seamlessly. This creates a powerful, unified system, but it can feel a bit walled off if you rely heavily on outside software.
Making Your Final Decision
You’ve compared the features, weighed the costs, and probably have a good idea of which Google Workspace plan feels right. Now it’s time to pull it all together and make a choice. This final step is about looking beyond today’s needs and thinking about the practical side of implementing a new system for your business. A little foresight now will save you a lot of headaches later. It’s one thing to pick a plan on paper, but it’s another to integrate it smoothly into your daily operations, whether you’re coordinating at the main office, on a job site, or from a home office.
Before you click “buy,” let’s walk through three final checkpoints. First, think about growth. Will this plan grow with you, or will you outgrow it in a year? Second, be realistic about the transition. What does it actually take to move your team and your data over? And finally, how will you make sure you get your money’s worth? A new tool is only as good as its adoption rate. Considering these points will help you feel confident that you’re not just buying software, but making a smart, long-term investment in your business’s efficiency and communication.
Does It Scale With Your Business?
Your business isn’t static, and your software shouldn’t be either. Think about where you see your company in one, three, or five years. Google Workspace is designed to grow with you. The main Business editions (Starter, Standard, and Plus) are built for teams of up to 300 people. If your ambitions are bigger or you’re already nearing that number, the Enterprise plans have no user limits. Choosing a plan that can scale means you won’t have to go through another big software change right when your business starts hitting its stride. It’s about picking a partner for the long haul, ensuring your digital infrastructure is as ready for the future as you are.
What to Expect When You Switch
Making the move to a new system is a project in itself, so it’s wise to go in with clear eyes about the process. You’ll need a plan for transferring data, making sure file permissions carry over, and checking that important links don’t break. Setting clear goals for what you want to achieve with the new platform is a key first step. A successful migration doesn’t happen by accident; it happens because you have a solid plan. By transitioning to Google Workspace with a clear strategy, you can minimize disruption and get your team working efficiently from day one.
Getting the Most From Your Plan
Once you’re set up, the real work begins: making sure your team uses the tools to their full potential. Google Workspace shines when it comes to teamwork, especially for hybrid or remote teams that need to stay connected. It’s designed for fast, low-maintenance collaboration that keeps projects moving forward. Encourage your team to collaborate seamlessly in real time, whether they’re editing a document together in Google Docs or brainstorming on a Jamboard. The more your team uses the integrated tools, the more value you’ll get from your subscription and the smoother your entire operation will run.
Frequently Asked Questions
I’m a small business owner. Is the Business Starter plan enough for me? For most small businesses and solo operators, the Business Starter plan is the perfect place to begin. It gives you the essentials you need to look professional and stay organized, including a custom email address for your company, 30 GB of storage per user, and the full suite of collaboration tools like Docs and Sheets. It’s a solid, affordable foundation that you can easily upgrade later if your team grows or your storage needs increase.
What’s the main reason to upgrade from the Starter to the Standard plan? The biggest difference is the massive increase in storage. With the Business Standard plan, you jump from 30 GB to 2 TB of storage for each user, which is crucial if your team works with large files like project photos, videos, or extensive plans. You also gain the ability to record your video meetings, a feature that’s incredibly useful for creating training materials or sharing important discussions with team members who couldn’t attend.
Can I use my existing company domain for my email address? Yes, and you absolutely should. Every Google Workspace plan is designed to let you create professional email addresses using your own domain (for example, [email protected]). This is all handled through the familiar Gmail interface, so there’s no steep learning curve. Using a custom domain helps build credibility and reinforces your brand identity with every message you send.
Is it difficult to switch my team over to Google Workspace? It’s more straightforward than you might think. Google provides migration tools to help you move your existing emails, contacts, and calendar data from your old system. The key to a smooth transition is planning ahead. By mapping out the process and communicating with your team, you can minimize disruption and get everyone up and running on the new platform quickly.
Do I have to commit to a full year right away? No, you have flexibility. You can opt for a monthly payment plan, which allows you to make changes or cancel at any time. This is a great option if you want to try it out without a long-term commitment. If you know you’re in it for the long haul, choosing an annual plan will save you money on the overall cost. You can also start with a 14-day free trial to make sure it’s the right fit before you pay anything.
Comparing pole barn kits and pricing in Oregon and Washington takes more than checking a supplier’s headline number. The building size matters, but so do the material specifications, engineering requirements, delivery details, site conditions, and the work you plan to complete after the package arrives.
A pole barn kit price generally covers a material package for the building shell. Site preparation, concrete, labor, installation, permits, utilities, and interior finishes may be separate. Because inclusions vary, buyers should compare written scopes and request a project-specific quote instead of treating an advertised kit price as the total cost of a finished building.
For Oregon and Washington buyers, a useful quote also accounts for the conditions and requirements at the specific building site. This guide explains what to compare, which choices affect cost, and how to select a DIY kit, contractor-supply package, or full-service construction path.
What pole barn kits and pricing really cover
A pole barn kit is a full set of parts for a post-frame building. It gives you what you need to build the main frame, walls, and roof. Many people in Oregon and Washington buy these kits to save money on labor. You get the parts and build the shell yourself or hire a crew. It is vital to know that kits from Locke Buildings include expert plans and engineering papers. This means the building is made for your exact land and climate.
Standard parts in a building kit
A high-grade kit should have more than just wood and metal sheets. A full set includes the posts, roof trusses, girts, and purlins. It also comes with metal siding, roof panels, and all the hardware like screws and bolts. This makes it much easier to choose the right pole barn kit for your needs. A good kit should have all the parts needed for the main shell.
When you buy a kit, you should also get clear step-by-step guides. These guides help you or your crew put the building together safely. In the local area, your kit must also include data from a pro. This proof shows the building can handle heavy wind and snow. For one, the Oregon Structural Specialty Code sets strict rules for snow loads on buildings. These rules make sure your barn stays safe during big winter storms.
Kit pricing versus total project costs
When you see a price for a kit, it covers the building parts only. You must also plan for the cost of site work, concrete, and labor. These items can add a lot of money to the final bill. Site work includes clearing the trees and leveling the dirt. You also need to think about the cost of getting water and power to the building site. Building near your home can often help you save on these power costs.
Some low pole barn kits and pricing you find online do not include all you need. You might find a kit that looks cheap but lacks the right hardware or plans. In Washington, safety rules say each post must have at least four anchor rods. If a kit skips these parts, you will have to buy them on your own. This can lead to a much higher price than you first planned. Knowing what is in the box helps you keep your budget on track.
Comparing the scope of your quotes
To get the best value, you must look at the full list of parts in each quote. One kit might use better metal or have stronger trusses than another. It is very helpful to review pole building quote scopes line by line. This way, you can see if the price covers the same grade of wood and metal. A lower price might mean the kit uses smaller posts or thinner roof panels.
You should also check if the kit includes shipping and tax. These extra fees can change the total price by a lot. Kits from Locke Buildings are ready for use across Oregon and Washington. Our team makes sure the package has every part needed to meet local building codes. Checking the small details now will help you avoid costly lags during the build. Buying a complete kit saves time and gives you peace of mind.
Organized kit materials and a clear written scope make it easier to compare what each package includes.
What is included in a pole building kit?
A pole building kit is a full set of parts to build a post-frame structure. It is not just a pile of wood and metal. A good kit has everything you need to build the outer shell. When you look at pole barn kits and pricing, you must check what each seller offers. Locke Buildings gives you a full package so your project goes well from the start.
Frame parts and outer supplies
The core of any kit is the frame. This includes the posts, which are the main support for the building. It also has the roof trusses and the wood for the walls and roof. These wood parts are girts and purlins. Locke Buildings kits include all frame supplies and the metal parts to join them. A standard kit includes these items:
Main posts and roof trusses
Wood girts and roof purlins
High-grade metal siding and roofing
Full trim and flashing sets
Most kits also come with the screws you need. These are the bolts and nails for the frame and skin. Having every screw in the box is a big help for a DIY builder. Washington safety rules say that each column must have at least four anchor rods to stay safe. A complete kit makes sure you have these parts on hand. This saves you trips to the store and keeps your site moving. It makes sure that the building is safe and meets the laws in your area.
Plans and local papers
In the Pacific Northwest, you need more than just wood. You need plans that meet local building codes. Oregon and Washington have high snow and wind loads that change by spot. You need stamped plans to get a permit from your town. Locke Buildings includes these plans and design papers in their kits. This is a key part of the value they offer to every buyer. It ensures that the building is strong enough for the local climate.
Recent changes have made this even more vital for home owners. Oregon now uses new rules for design snow loads based on risk. Your building must be strong enough for the exact spot where you build. If your kit does not have local plans, it may fail or you may not get a permit. This could lead to big costs later on. Having the right papers from the start is a big help for any project. It gives you peace of mind that your shop can handle the winter weather.
Parts not in the box
You should know what a kit does not have. Kit prices are for the parts and plans only. They do not include the work to build it. You will also need to pay for site prep. This means clearing the land and making it flat. Concrete for the floor and post holes is also not in the kit. Most people hire a team for this or do it on their own. You will need to buy these from a local store to finish the job.
You must also think about power and water. A kit does not have the parts for lights or pipes. This includes wires and drains. If you build near your house, you can save cash on these lines. Before you buy, you should check what each building quote includes to see the full cost. This helps you plan your cash and avoid shocks. A kit is a great way to save, but you must know the full scope of the work before you start. Knowing what is in the box helps you find the best value.
A typical pole building kit supplies the structural shell, plans, and specified hardware. It generally does not include site preparation, concrete, labor, installation, utilities, or interior finishes, so buyers should confirm every inclusion and exclusion in writing.
What affects pole barn kit pricing?
The cost of a material package for your barn involves many parts. While size is a big driver, the way you build matters too. You should look at the full list of what you get. A good kit has more than just lumber and steel. It has every bolt, plan, and guide you need to finish the job. Knowing these facts helps you set a real budget for your build. It also stops you from having to buy extra parts at the last minute. This saves you time and keeps the work moving fast.
Building size and structural spans
The width and length of your building are the first things to think about. Larger buildings need more wood and metal, which raises the price. But the clear span is also a major factor in pole barn kits and pricing. A clear span means you have no posts inside to block the floor. To do this, you need bigger and stronger roof trusses. These large trusses use more high-grade lumber and cost more to build. For example, a 60-foot span needs much heavier wood than a 24-foot span. This is why wider buildings see a jump in the price for each square foot.
Wall height is another key choice that changes the cost. Taller walls need longer posts and more metal siding. They also catch more wind, so the frame must be stronger to stay safe. If you want a shop for a large RV or a farm tractor, you will need more height. This change adds to the part count and the final price of the kit. Most people find that adding a few feet of height is a smart move. It gives you more space for storage or future lofts without adding much to the footprint. But keep in mind that taller walls might need thicker posts to handle the wind.
Local snow and wind loads
In the Pacific Northwest, weather plays a huge role in the plan for your barn. You cannot use the same kit in the valley that you use in the high mountains. High spots get much more snow each year. This extra weight puts a lot of stress on the roof and the walls. New rules from the Oregon Building Codes Division now use new maps to set these loads. These maps help find the right snow load for your exact spot. This ensures your barn is safe and meets all local building laws.
Wind loads are also vital in coastal areas or open plains. Strong winds can lift a roof or push a wall over if the frame is too weak. Plan teams adjust the kit parts to handle these forces. This may mean adding more braces or thicker steel panels. In places like Washington, safety rules require at least four anchor rods for each post. These bolts keep the frame tied to the ground during a storm. While these parts add to the cost, they keep your barn standing for many years. You should always use Locke’s quote comparison guide to see if these parts are in the price.
Detail
Standard Utility Kit
Custom Plan Kit
Best Use
Basic storage or shed
Workshops or commercial use
Roof Trusses
Standard spacing
Heavy-duty snow load design
Main Posts
6×6 treated lumber
Built-up or large-scale posts
Wall Height
Usually 10 to 12 feet
14 feet or taller
Anchor Plan
Basic concrete pads
Four-bolt steel anchor rods
Design and finishing choices
The number of doors and windows you add will change the price of the kit. Each opening needs a header and extra framing to hold the weight. Large bay doors for trucks cost more than small doors for people. You can also pick from many types of metal siding and roof colors. Some finishes stay bright longer or resist rust better in our wet climate. You might also want to add insulation or a vapor barrier to keep the inside dry. These choices allow you to match your new barn to your home or other shops on your land.
Think about site access and delivery too. If your land is hard to reach, it may cost more to get the parts there. You should plan for a flat spot where the truck can unload the wood and steel. This helps keep the kit in good shape and makes the build go faster. When you look at pole barn kits, make sure you know what is in the box. A full kit saves you from many trips to the lumber yard later on. It also ensures that every screw and bolt fits the way the plans say they should.
Size establishes the baseline kit cost, but structural spans, wall height, openings, engineering loads, finishes, delivery access, and material specifications determine the final package price. Compare quotes by scope and specification, not by headline price alone.
How Oregon and Washington change the project
Building a new shop or barn in the Pacific Northwest brings big jobs. The land and the weather in Oregon and Washington are unique. These local facts change how you plan your build and how you budget. You must think about state rules, county laws, and the real site before you buy. Knowing these details helps you choose the right pole barn kit for your land.
Codes and permits
Each county in Oregon and Washington has its own set of rules for building. Some areas have strict laws that limit where you can put a barn. You will need a permit before you start any work on your site. The process often starts with a trip to the local office to learn what they need. In Washington, safety rules are very strict for post-frame work. For example, the state says each main post must have at least four anchor rods or bolts to keep it steady. These small details ensure your building stays safe and strong for a long time.
Getting your plans right from the start saves you time and money. If you try to build without a permit, the county might stop your work or fine you. This is why top kits include the plans you need to show the local office. Most counties want to see that an expert checked the plans for safety. When you look at pole barn kits and pricing, check if the plans are part of the deal. Some kits only give you the wood and metal, but others give you the full paper trail for the permit office.
Snow, wind, and seismic needs
The Pacific Northwest has very varied weather. A barn in the Cascades needs to hold much more snow than a shop in the valley. Oregon uses the Structural Specialty Code to set these rules. In 2025, Oregon changed how they map snow loads to make them more exact for each spot. Your building must handle three main forces in this region:
Heavy snow loads that can weigh down a roof in the winter.
High winds from the coast or through the Gorge.
Shaking from likely quakes across the region.
These needs have a big effect on pole barn kits and pricing. A kit for a mild climate might fail in a high-snow zone. Stronger wood and more metal add to the cost of the supply package. For a medium 24×24 kit, prices in Washington may start near $22,000. But if you need a huge barn, the cost can go up to $250,000 or more. Always make sure your quote includes the right loads for your set zip code so your permit gets a green light.
Design work is not a place to cut costs. A building that is not strong enough for the local snow can sag or fall. Most local offices will not give you a permit unless a pro signs off on the design. This stamped plan shows that the building is tough enough for your land. It proves the trusses can hold the weight and the posts can stand the wind. Having these papers ready makes the whole process smoother and keeps your build on track.
Climate and site drop off
Rain is the most common factor for builds in Oregon and Washington. The wet ground can make site prep hard and slow. You must ensure your site has good drainage so water does not pool near your posts. It is best to plan your dirt work for the drier months if you can. If you build in the winter, you might need to spend more on rock and gravel to keep the site from turning into mud. This helps big trucks get in and out when they drop off your supplies.
The drop off is another key part of the plan. Locke Buildings sends kits all across Oregon and Washington. But their full-service crew stays in a tighter zone between Centralia and Salem. If you are outside this area, you will likely be the one to manage the build. You need a clear path for a large truck to reach your site. Low trees or soft soil can block a shipment. Checking these paths before the truck arrives prevents delays and extra fees.
Think about where you put the building on your land too. Putting it near your main power or water lines can save you a lot of money. If you build far away in the back of a lot, you will pay more for pipes and wires. A good site plan looks at the whole picture. It tracks where the sun hits, where the wind blows, and how the trucks will get there. Taking the time to map this out ensures your new barn fits your needs and your budget.
Should you choose DIY, contractor supply, or turnkey?
Picking the right way to build depends on your skills, tools, and free time. You can save money by doing the work yourself or let experts handle the whole project. Each path has different costs and needs. It is key to compare specifications and exclusions to see which choice fits your budget and your plan for the new space.
Building it yourself with DIY kits
A DIY kit is a great choice if you have the tools and time to lead the build. These kits give you all the parts you need to finish the main shell of the barn. Locke pole barn kits include the plans, wood, metal, and bolts. In Oregon and Washington, these kits must meet strict rules for wind and snow. This is because regional weather changes fast based on local terrain and height, as noted by the Oregon Building Codes Division.
You can get kits delivered anywhere in Oregon or Washington. But keep in mind that kit prices only cover the materials. You will still need to pay for site prep, concrete, and any labor you do not do yourself. Most pole barn kits can help you save on total costs if you have the right help to set them up. Building a kit near your existing home can also help you save on power and water lines.
Working with a contractor supply plan
If you have a local builder you trust, a contractor supply plan works well. We give the materials and plans to your pro. This path is good for people who live outside our main building zone but want our high-quality parts. You get our expert design and strong materials while your own crew handles the daily work on the site.
This middle path gives you more control than a full build but less work than a DIY project. It lets you use our regional skills while keeping your own team. Your builder will need to follow local safety rules. For example, laws in Washington state say that all structural columns must have at least four anchor rods to stay safe.
Choosing a full turnkey project
A turnkey project is the easiest path for most owners. We take care of everything from the first design to the final trim. Our team runs the crew and makes sure the build meets all local codes. This full service is available from Centralia, Washington down to Salem, Oregon. It is best for complex jobs like large shops or custom homes where you want one point of contact.
While this path costs more than a kit, it saves you the stress of running a building site. You get a firm plan and a team that knows the local soil and weather. We use our own crews to ensure the highest quality. This path is the fastest way to get your building ready to use without having to lift a finger yourself. It is the best choice for those who want a professional result without the hard work.
The best build path depends on who will manage labor and site coordination. DIY kits offer the most hands-on control, contractor supply pairs Locke Buildings materials and plans with a local crew, and turnkey construction places more project responsibility with Locke Buildings within its full-service area from Centralia, Washington to Salem, Oregon.
A completed post-frame building begins with a design, material package, and service path matched to the site.
How to plan and price your pole building kit
Planning for pole barn kits and pricing starts with a clear goal for your land. You must find the right spot on your property and decide how you will use the space. A solid plan helps you get an exact quote and avoids costly changes later. Follow these steps to move from an idea to a ready-to-build material package.
Choose your building size and site
First, pick a size that fits your needs for work or storage. Think about what tools, cars, or animals will go inside. You also need to check your building site for level ground and easy access. Building near water and power lines can help you reduce the cost of setting up services like light and heat.
Check local rules and loads
Every county has different rules for how you build. You must know your local snow and wind loads before you buy a kit. In Oregon, local codes must account for diverse climate zones and steep hills to keep the structure safe. Your kit should come with stamped plans that meet these specific regional needs.
Pick your size and use. Decide the length, width, and height based on what you need to store. Think about future needs so you do not outgrow the space too fast.
Use the 3D Building Designer. Go to the Interactive 3D Pole Barn Designer to see your ideas in real time. You can add doors, windows, and pick colors for your siding and roof.
Confirm your site details. Make sure your site is flat and has room for delivery trucks to get in. Check for any underground lines or overhead wires that might be in the way.
Decide your build scope. Determine if you will build the kit yourself or hire a pro. This choice affects your total budget but does not change the cost of the material package.
Review the material list. A high-quality kit includes all structural wood, metal, and hardware. Check that it also comes with the engineering papers you need for a permit.
Submit your design for a quote. Once your design is ready, send it in to get a firm price. This step turns your 3D plan into a real list of costs for your project.
Compare your building quotes
When you look at prices, make sure you compare the same items. Some low prices may leave out key parts like trim or heavy-duty trusses. A full pole building kit should have every piece of hardware and wood needed to finish the shell. Always ask if the price includes the stamped plans you need for your local permit.
How to compare pole barn kit quotes
Getting quotes for your new building is a big step. But not all quotes are the same. Some shops show a low price that skips vital parts. Others give you a full package that is ready for a permit. To make a good choice, you must check each detail. This helps you find the best value for your pole barn kits and pricing needs.
Look for stamped engineering
The first thing to check is if the kit has plans done by an engineer. In Oregon and Washington, local codes are very strict. Oregon uses a special list to find ground snow loads for every spot. You can see how these rules work on the Oregon state website. A good kit should come with plans that have a seal from a pro. This seal proves the barn can handle the wind and snow in your town.
Without these plans, you might fail your permit check. Some cheap kits only give you a basic sketch. They do not account for the weight of wet snow or strong gusts of wind. If you have to buy your own engineering later, it will cost much more. A full quote lists stamped plans as a part of the price. This saves you time when you talk to the building office.
Review the main materials
Next, look at the list of main parts. A true pole barn kit should have every piece needed to finish the shell. This includes the posts, roof trusses, and wall boards. You also need the metal siding and roofing. It is smart to compare pole building quotes to see which one is the most full. Look for better items like high-end metal that resists rust. Better metal keeps the barn looking new.
Also, check the post depth and size. A quote that includes these details shows that the shop knows how to build a strong frame. It gives you peace of mind that your barn is built right. You want parts that are made to last in our rainy Pacific Northwest climate. Comparing these specs helps you avoid low-quality materials that fail early.
Check for hardware and safety
Small things matter just as much as the big ones. Some sellers skip things like bolts and screws to keep the price low. A complete kit should have all the hardware needed to put the barn together. In Washington, safety rules say each column must have at least four anchor rods. You can check these safety rules online to see why it matters. If the kit does not have these rods, you will have to buy them yourself.
A good quote will list these safety items clearly. It should also show things like closures for the roof and door seals. These parts keep the weather and bugs out of your new barn. Having everything in one package makes the job much easier for you or your team. Buying a complete kit saves you from extra trips to the store.
Verify shipping and support
Think about how the kit will get to your land. Shipping is a big part of the total cost. Some companies charge a high fee to ship long ways. Others might have a better way to move goods. You should ask if they ship to your spot in the Northwest. Knowing where the kit comes from helps you plan for when it gets there. Always ask about the unloading process to avoid surprises on delivery day.
Last, ask about the help you get after you buy. You want a team that is easy to reach if you have a question. Check if the kit has a clear guide with steps to follow. Good guides show you how each part fits together. This makes the work go faster for you or your crew. A shop with local knowledge can also help with permit questions. They know what local checkers look for and can guide you through the process.
Frequently Asked Questions
How much do pole barn kits cost in Oregon and Washington?
Prices for complete kits in this region usually range from $22,000 for a small 24×24 shop to over $250,000 for large commercial sites. According to Columbia Structure, these costs depend on local snow and wind loads. You must also account for local taxes and shipping fees. Keep in mind that kit prices only cover the building materials and do not include the work to set them up.
What is included in a typical pole barn kit?
A professional kit includes more than just wood and metal. Most packages come with stamped building plans, structural framing, trusses, and full roof sheathing. They also include the siding and all the hardware you need to finish the job. According to Locke Buildings, quality kits also provide full engineering papers and manuals. These documents help you get the permits you need from your local city or county building department.
Does the price of a pole barn kit include installation?
No, the price you see for a kit covers the materials only. It does not include the cost of labor to build the structure. You will also need to pay for site prep and concrete separately. While Locke Buildings offers full building services from Salem to Centralia, their kits are for DIY builders or contractors. You should get separate quotes for any earth work, foundation pours, or electrical needs you have.
Are site preparation and concrete included in kit pricing?
No, site work and concrete are not part of a standard kit package. You must prepare a level pad and pour the foundation before the building arrives. These steps are vital for a safe build and long life. According to Washington State law, safety rules require specific anchor rods for each column. You will need to hire local pros to handle these tasks or do them yourself before the kit delivery.
Can I customize the design of my pole barn kit?
Yes, you can customize almost every part of your building kit. You can change the size, door style, and color to fit your needs. Many buyers use a 3D design tool to see their barn before they buy. This allows you to add features like porches or lean-tos. Once you finish your design, a team will check it to make sure it meets the snow load rules for your specific area.
Are you ready to design your pole building and request a quote?
When you are ready to move from research to a real plan, Locke Buildings can help you choose the right project path and prepare a project-specific quote. Start with a design that reflects your site, intended use, dimensions, doors, and other priorities.
Ready to design your building and request a quote? Use our 3d building designer to request a quote for your custom building today so you can start your project in Oregon or Washington and get the space you need for your tools and gear.
Your new pole building is full of potential, and its large, open walls are waiting to tell your story. A well-executed gallery wall does more than just fill space; it serves as a focal point that showcases your personality, memories, and unique style. But creating a display that looks curated rather than chaotic requires a bit of planning. Getting the wall frame design right is key to turning a simple collection of photos and art into a stunning feature. From selecting styles that complement your building’s rustic charm to mastering the art of spacing, we’ll break down the process into simple, actionable steps. Let’s turn that blank wall into a beautiful reflection of you.
Key Takeaways
Choose frames with intention: Your frame is a key design element, not an afterthought. Select styles, materials, and colors that complement both your artwork and the unique architecture of your pole building to create a cohesive look.
Plan your layout to avoid mistakes: Before making a single hole, map out your gallery wall on the floor or with paper templates. This simple step helps you perfect the scale, balance, and spacing, ensuring your final arrangement looks polished and intentional.
Hang art securely for a professional finish: For a balanced display, hang art with its center at eye level, which is about 57 inches from the floor. Always use two hooks for stability to prevent crooked frames and select hardware that is appropriate for your wall type.
Find Your Perfect Frame Style
Once the construction dust settles on your new pole building, you’re left with a beautiful, open space that’s ready for your personal touch. One of the easiest and most effective ways to make a new structure feel like home is by adding art and photos to the walls. But before you start hammering nails, think about the frames themselves. The style of your frame can have just as much impact as the picture inside it, setting the tone for your entire room. Your frame choice can either complement the rustic wood beams and industrial feel of your building or create a compelling contrast.
Think of it like the process you used to design your building in the first place, where you selected the roof style, siding, and colors to create a specific look. Choosing a frame style follows the same principle. It’s about defining your aesthetic and making intentional choices that reflect your personality. Whether you’re decorating a cozy barndominium, a functional workshop, or a spacious horse arena, the right frames will tie everything together. Let’s walk through a few popular styles to help you find the perfect match for your space and your vision.
Modern and Minimalist
If you believe less is more, a modern and minimalist style might be for you. This approach is all about clean lines, simple geometric shapes, and a neutral color palette. The goal is for the frame to blend seamlessly with your decor, allowing the art or photo to take center stage without distraction. This style works exceptionally well in pole building shops or commercial spaces where you want a clean, professional, and uncluttered look. In a home, minimalist frames in black, white, or natural wood can create a sophisticated gallery wall that feels intentional and chic, letting the architecture of your space shine.
Japandi
Japandi is a beautiful hybrid style that merges the calm, thoughtful minimalism of Japanese design with the cozy functionality of Scandinavian decor. It emphasizes natural materials like light-colored wood, muted earth tones, and an overall sense of peace and tranquility. If you want your home to feel like a serene retreat, Japandi is an excellent choice. The focus on natural textures and craftsmanship pairs perfectly with the exposed wood beams and simple, strong construction of a pole building, creating a warm and inviting atmosphere in any living space or quiet corner.
French Country
Leaning into the rustic charm of your new barn or barndominium? The French Country style is a natural fit. This aesthetic is known for its warmth, elegance, and slightly rustic feel. Think frames with soft, muted colors, distressed finishes, and perhaps some gentle, ornate detailing. It’s less about perfect, clean lines and more about creating a space that feels lived-in, comfortable, and full of personality. French Country frames add a touch of vintage-inspired character that beautifully complements the agricultural roots of pole building design, making your space feel both timeless and welcoming.
Glam
For those who love a touch of drama and luxury, the glam style is all about making a statement. This look incorporates bold design choices, rich textures, and eye-catching finishes. Picture frames with metallic sheens like gold or silver, mirrored surfaces, or intricate, decorative patterns. While it might seem like an unexpected choice for a pole building, a glam style can create a stunning high-contrast look. Imagine a sleek, glamorous frame against a wall of reclaimed wood or a polished concrete floor. It’s a fantastic way to add a layer of sophistication and surprise to your space.
Nordic and Boho
If your style is more eclectic and personal, you might find yourself drawn to Nordic or Boho design. Nordic style prioritizes simplicity, light colors, and functionality, creating a bright and airy feel. Boho, on the other hand, embraces a more-is-more philosophy with vibrant colors, mixed patterns, and a collection of unique, personal items. You can stick to one or mix elements from both for a look that’s creative and uniquely you. This approach is perfect for showcasing your personality in a studio, living room, or any space where you want the decor to tell a story.
How to Choose the Right Frames for Your Space
Once you’ve designed your perfect building, the frames you hang on the walls are what truly make it a home. Choosing the right ones can feel like a big decision, but it’s really just about finding a balance between your artwork, your frame, and your room. Think of a frame as the supporting character that helps your artwork tell its story. By considering a few key elements like size, color, material, and style, you can select frames that feel intentional and bring your space to life.
Consider Size and Scale
The first step is getting the proportions right. A frame that’s too small can make your art look lost on the wall, while one that’s too large can easily overwhelm the piece and the room. Start by measuring your artwork, then think about the wall where it will hang. A large, empty wall needs a substantial piece or a collection of smaller ones to feel balanced. A great way to visualize the final look is to use painter’s tape to outline the frame’s dimensions on your wall. This lets you step back and see how the scale works in your space before you commit to a size.
Pick a Color and Finish
Next, think about color. Your frame should complement both the artwork and your room’s decor. You can choose a frame color that picks up on an accent color in the room, creating a sense of harmony. Alternatively, classic neutrals like black, white, or natural wood are always a safe bet because they let the artwork be the main focus. The finish matters, too. A glossy finish can add a touch of modern polish, while a matte or distressed finish offers a more relaxed, rustic feel. The key is to tie it into the room so the final look feels cohesive, not distracting.
Select Your Material and Texture
Frames come in a wide range of materials, and your choice will have a big impact on the overall style. Wood frames are classic and versatile, offering warmth that fits well in everything from a modern farmhouse to a traditional shop. Metal frames, like aluminum or iron, often feel more contemporary and sleek. Even materials like acrylic or bamboo can add a unique touch. Think about the textures in your room and in the artwork itself. A rough-hewn wood frame can add rustic character, perfectly suiting the aesthetic of a custom barn or shop space, while a smooth metal frame enhances a clean, minimalist design.
Mix Styles for a Curated Look
If you’re creating a gallery wall, don’t be afraid to mix different frame styles. This is how you achieve a collected, personal look that feels like it has evolved over time. The secret to success is to maintain a common thread that ties everything together. This “cohesive link” could be a consistent color palette, such as all-black frames or all-gold frames in different styles. Or, you could unify the display with similar matting or by featuring only black-and-white photos. This approach allows you to build an interesting collection that looks curated rather than chaotic.
How to Arrange a Stunning Gallery Wall
The high ceilings and expansive walls in a pole building are a decorator’s dream. A gallery wall is a fantastic way to fill that space, add personality, and tell your story. It might seem intimidating to stare down a big, blank wall, but creating a beautiful arrangement is easier than you think. It just takes a little planning to turn a collection of frames into a stunning focal point. Here’s how to get it right.
Plan Your Layout First
Before you even think about picking up a hammer, map out your design. This single step will save you from misplaced nail holes and a lot of frustration. If you have the floor space, you can plan your arrangement by laying all your pieces out to see how they work together. An even better method is to trace each frame onto kraft paper, cut them out, and tape them to the wall with painter’s tape. This lets you live with the layout for a day or two and make adjustments easily. You can move the paper templates around until the composition feels just right, ensuring you love the final look before making any permanent marks.
Balance the Visual Weight
A great gallery wall feels balanced and cohesive, not chaotic. The key is to find a common thread that ties everything together. This doesn’t mean everything has to match. Instead, you can create harmony through a consistent color palette, similar frame styles, or a unified theme in your artwork. Try to mix different frame sizes and orientations (horizontal and vertical) to create visual interest. A good rule of thumb is to place your largest or boldest piece slightly off-center to anchor the arrangement, then build the smaller pieces out from there. This creates a natural flow that guides the eye across the wall.
Get Your Spacing Right
Consistent spacing is the secret to making a gallery wall look polished and professional. As a general guideline, aim for about two to three inches of space between each frame. This gives each piece enough room to breathe while still feeling like part of a cohesive group. Before you hang anything, it helps to measure the total height and width of your gallery wall area. Using a tape measure and a level is non-negotiable here. While an eclectic, floor-to-ceiling gallery might have more varied spacing, a more structured arrangement relies on that consistency to look clean and intentional. Taking the time to measure carefully will pay off in the end.
Build an Arrangement That Can Grow With You
Your gallery wall doesn’t have to be a one-and-done project. Think of it as a living collection that can evolve with you over time. You can easily design gallery walls that grow by starting with an asymmetrical or organic layout. This approach is much more forgiving and makes it simple to add new photos, art, and memories as you collect them. As you use our tool to design your building, you can envision a wall that tells the story of your family or business for years to come. Don’t be afraid to start with just a few core pieces and leave space to fill in later.
Think Beyond Photos: What to Display in Your Frames
Once you’ve picked your frames, the real fun begins: deciding what to put inside them. While personal photos are a classic for a reason, your frames are an opportunity to showcase your personality in countless other ways. Think of them as a canvas for your creativity. The expansive walls inside a new shop or barn are perfect for making a statement, so don’t be afraid to think big. From fine art to found objects, let’s explore some beautiful and unexpected things you can display on your walls.
Personal Photos
Displaying personal photos is a heartfelt way to make a house feel like a home. To give your photo wall a modern twist, try creating a large, structured gallery around a central feature, like a fireplace or a television. This can make your family photos feel like an intentional design element. You can also go for impact by printing a single favorite photo in an oversized format. A large, beautifully framed portrait can become the focal point of any room. For a curated look, try mixing black-and-white photos with color ones or using a consistent filter to create a cohesive photo wall aesthetic.
Artwork and Prints
Art is one of the best ways to inject personality and color into your space. You don’t need a massive budget to become a collector, either. You can frame anything from a large-scale abstract painting to affordable prints that you love. Explore online marketplaces to discover unique art from independent creators around the world. Don’t forget about the artists in your own home, either. Framing your children’s drawings in high-quality frames is a charming way to celebrate their creativity and add a touch of whimsy to your decor. The key is to choose pieces that speak to you and help set the mood you want for the room.
Mirrors, Shelves, and Other Objects
Frames aren’t just for flat items. You can create a stunning three-dimensional display by mixing frames with other objects. An ornate, empty frame placed around a simple mirror can create a custom, high-end look that also makes your space feel brighter and larger. You can also build shallow shadow boxes or use deep-set frames to display small, meaningful objects like vintage keys, ceramic figures, or sentimental keepsakes. For a more eclectic vibe, try arranging a collection of framed vinyl records or even beautiful, empty frames of different styles and sizes for a purely architectural statement.
DIY and Mixed Media Art
Get creative and make your own custom art. You can frame a piece of beautiful fabric, a vintage scarf, or a remnant of striking wallpaper for an instant, high-impact art piece. This is a fantastic way to add texture and pattern to your walls. If you’re feeling crafty, you can create your own abstract painting on a canvas. Another deeply personal idea is to create a mixed-media collage using ticket stubs, handwritten letters, maps from your travels, and other paper ephemera. A DIY art project is not only a budget-friendly option but also ensures your decor is completely unique to you and your story.
Tips for Hanging and Maintaining Your Frames
Once you’ve chosen your frames and planned your layout, the final step is getting them on the wall. Hanging your frames correctly is just as important as the art inside them. It ensures your display looks polished and professional, and a little bit of maintenance will keep it looking great for years to come. Whether you’re decorating a cozy living room or the expansive walls of a new custom shop, these practical tips will help you hang your frames securely and with confidence.
Hang Frames at the Right Height
The golden rule for hanging art is to position it at eye level. For most people, this means the center of the frame or gallery wall grouping should be about 57 to 60 inches from the floor. This creates a comfortable viewing experience and makes the art feel connected to the room’s furniture and decor. If you have particularly high ceilings, you can hang your art a little higher, but the eye-level principle is still the best starting point. Following this guideline helps you avoid common mistakes and ensures your display looks balanced and intentional.
Use Two Hooks for Stability
There’s nothing more frustrating than constantly straightening a crooked frame. To keep your art perfectly level, always use two hooks instead of one. Place the hooks several inches apart on the wall, corresponding to D-rings or a wire on the back of your frame. This two-point system provides much more stability than a single, central nail. It prevents the frame from shifting, tilting, or swinging every time a door closes or someone walks by. This simple trick is a game-changer for maintaining a tidy and professional-looking gallery wall over time and is one of the best ways to prevent common photo framing mistakes.
Choose the Right Hardware
The hardware you use can make or break your display, both literally and figuratively. Before you start hammering, consider the weight of your frame and the type of wall you’re working with. For drywall, a simple nail might work for a very light frame, but heavier pieces will require a wall anchor for a secure hold. If you’re hanging on plaster, brick, or wood paneling, you’ll need specific hardware designed for those materials. Using the right picture-hanging hardware prevents damage to your walls and protects your precious art from falling.
Explore Damage-Free Options
If you’re a renter or simply don’t want to put holes in your walls, you have plenty of great options. Damage-free adhesive strips have become incredibly reliable and can hold a surprising amount of weight. They are perfect for creating a gallery wall that you can easily change or take down without needing to spackle and paint afterward. Another idea is to use a picture ledge. You can lean and layer frames of different sizes for a relaxed, curated look that’s easy to update whenever you feel inspired. These damage-free hanging options give you the freedom to decorate without the long-term commitment.
Keep Your Frames Clean
To keep your wall decor looking its best, a little regular cleaning goes a long way. Dust your frames weekly with a soft microfiber cloth to prevent buildup. For the glass or acrylic, use a gentle, ammonia-free cleaner sprayed onto the cloth, not directly onto the surface, to avoid any liquid seeping behind the glass and damaging your photo or artwork. Taking a few minutes to clean your frames as part of your regular routine ensures your display remains a bright and beautiful focal point in your space.
Common Design Mistakes to Avoid
Designing a gallery wall is a fantastic way to personalize your space, but a few common slip-ups can take your display from “wow” to “whoops.” The good news is that these mistakes are easy to sidestep once you know what to look for. It’s not about following rigid rules, but about understanding a few simple principles that help create a balanced and beautiful arrangement. From picking the right size frames to giving your layout a little breathing room, a bit of forethought goes a long way.
Thinking through your design choices helps you create a wall that feels intentional and polished, rather than something that was thrown together. Whether you’re decorating the living space in your new barndominium or adding personality to your workshop, avoiding these common pitfalls will help you build a display you’ll love for years. Let’s walk through some of the most frequent design blunders and how you can steer clear of them.
Being Too Matchy-Matchy
While it might seem like the safest route, buying a set of identical frames can make your gallery wall feel flat and impersonal. The most interesting displays have variety. Instead of perfect uniformity, aim for cohesion. You want your collection to look curated, not like it came straight out of a box. Create a common thread that ties everything together. This could be a consistent color palette, a similar theme in the artwork, or sticking to one type of frame material, like all wood or all metal, in different styles and finishes. This approach allows you to mix and match pieces while still creating a unified look.
Ignoring Scale and Proportion
One of the most common mistakes when hanging art is getting the scale wrong. A few tiny frames floating on a large, empty wall can feel lost and insignificant, while an oversized piece can easily overwhelm a small space. Before you buy frames, consider the size of your wall and any furniture nearby. As a general rule, artwork hung above a sofa or console table should be about two-thirds the width of the furniture. Thinking about scale ensures your arrangement feels balanced and properly anchored in the room, rather than like an afterthought.
Skipping the Planning Stage
It’s tempting to grab a hammer and start hanging as soon as you have your frames, but winging it is a recipe for regret (and a lot of extra nail holes). The best gallery walls require a little planning. Before making any permanent marks, lay your frames out on the floor to experiment with different arrangements. Once you find a layout you like, you can trace each frame onto kraft paper, cut them out, and tape the templates to the wall. This lets you visualize the final look and make adjustments easily. A few minutes of planning can save you a major headache later.
Using Inconsistent Spacing
The space between your frames is just as important as the frames themselves. Inconsistent or random spacing can make an otherwise great collection look messy and chaotic. For a clean, professional feel, aim for uniform spacing between all your pieces. A gap of two to three inches is a good starting point, but the key is to keep it consistent throughout the entire arrangement. You can use a ruler or even a small block of wood as a spacer to ensure every gap is exactly the same. This small detail makes a huge difference in creating a cohesive, intentional display.
Overcrowding the Wall
When you have a lot of art you love, you might be tempted to fit as much as possible onto one wall. However, overcrowding can make your display feel cluttered and overwhelming, preventing any single piece from standing out. Don’t be afraid of negative space; a little breathing room is essential. A well-curated gallery wall allows each piece to shine. Instead of covering the wall from edge to edge, group your frames toward the center and leave some empty space around the perimeter. This helps frame your collection and gives it more impact.
Overcommitting to Trends
It’s fun to incorporate new styles, but designing your entire gallery wall around a fleeting trend can leave it feeling dated in a year or two. One of the biggest decorating mistakes to avoid is ignoring your personal taste in favor of what’s popular. Your home should be a reflection of you, so choose art and photos that have personal meaning. You can still give a nod to trends with one or two pieces, but build your collection around timeless items you truly love. That way, your gallery wall will feel authentic and relevant for years to come.
Frequently Asked Questions
What if my pole building has really high ceilings? Does the eye-level rule still work? Yes, the eye-level rule is still your best starting point. The goal is to make the art feel connected to the human-scale elements in the room, like your furniture. Position the center of your main art piece or the center of your entire gallery grouping at about 57 to 60 inches from the floor. If you have a very tall, open wall, you can then build your arrangement upwards from that anchor point. This ensures the display feels grounded and comfortable to view, rather than floating too high up on the wall.
I want to mix different frame styles, but I’m worried it will look messy. How do I get it right? Creating a collected look is all about finding a single, unifying element to tie everything together. Instead of worrying about matching, focus on creating harmony. You could choose to use all black frames, for example, but in a variety of styles, materials, and sizes. Another approach is to use only wood frames but mix different finishes, from light oak to dark walnut. This common thread creates a sense of intention and keeps your eclectic collection from looking chaotic.
Do I have to use a mat in my frames? Not at all. Whether you use a mat is a style choice. A mat can give your artwork some breathing room and make a smaller piece feel more substantial and important. It also serves a practical purpose by keeping the art from pressing directly against the glass. However, framing a photo or print without a mat, known as a “full bleed,” creates a very bold and modern look. Consider the style you’re aiming for; a matted frame often feels more classic, while a full-bleed frame feels more contemporary.
How do I start a gallery wall if I only have a few pieces right now? You don’t need a huge collection to begin. In fact, the most personal gallery walls are often built over time. Start with an asymmetrical or organic layout using just three to five of your favorite pieces. Arrange them in a way that feels balanced but not perfectly symmetrical. This type of layout is very forgiving and makes it easy to add new art, photos, and objects as you find them, allowing your wall to grow with you and tell your story as it unfolds.
What’s the safest way to hang a very large or heavy frame? For anything with significant weight, safety comes first. A single nail in drywall is not enough. Your best option is to use a stud finder to locate the vertical wood beams inside your wall and drill directly into a stud. If a stud isn’t in the right spot, use a wall anchor, like a toggle bolt or a screw-in anchor, that is specifically rated to hold more than your frame’s weight. Using two anchor points instead of one will also provide extra stability and keep the frame level.
Post-frame construction provides a durable solution for property owners in Oregon and Washington. This engineered system uses wooden columns for support instead of standard walls. It is a top choice for barns and workshops across the Pacific Northwest.
Post-frame construction uses widely spaced wood columns to carry roof and wall loads, creating strong buildings with flexible, open interiors. For Oregon and Washington owners, it is a practical system for barns, shops, garages, arenas. Homes, and commercial spaces when engineered for the site’s wind, snow, soil, and moisture conditions.
Finding the right answer to What is post-frame construction? is the first step toward planning a successful project. We will look at the engineering behind this system to show why it remains a top choice for local owners. The path begins with
What is post-frame construction?
Post-frame construction is an engineered building method in which widely spaced wood columns carry structural loads. Trusses, girts, purlins, and exterior panels connect the frame, allowing broad clear spans with few interior support walls. The system suits many agricultural, residential, commercial, and recreational uses.
Post-frame construction is an engineered wood-frame building system. It uses large wooden posts or columns as the main support. These posts are set deep into the ground or onto a concrete slab. This method differs from normal framing, which relies on many smaller walls. Because the posts carry the weight, you can have wide, open spaces inside without needing extra walls. It is a fast and strong way to build. This method is used for everything from simple sheds to large homes.
The structural skeleton
The frame of a post-frame building has a few key parts. The posts are the primary columns that stand upright. Large wooden trusses sit on top of these posts to hold up the roof. To connect the posts side to side, builders use pieces of wood called girts. On the roof, they use similar boards called purlins to bridge the gap between trusses. These girts and purlins provide a solid base for the outer shell. Finally, the outer skin of the building is called cladding. This is mostly made of steel or wood panels. For long-term use, any posts in the ground should be pressure-treated to stop rot.
How the load path works
Every building must manage forces like wind, snow, and gravity. In post-frame construction structural basics, the weight of the roof travels through the trusses and down into the large posts. These posts then transfer that weight directly into the ground. For side forces like high winds, the building relies on something called diaphragm action. The roof and the shear walls resist these side loads to keep the structure stiff. This simple path makes the building very strong yet easy to build quickly. This design allows for more freedom when you plan your layout.
Not just for barns
Many people use the term “pole barn” to describe any post-frame building. While a barn is one use for this system, post-frame construction is a much broader group. It is a smart choice for many types of structures because it uses fewer parts and less labor than other methods. You will see this style used for modern homes, busy shops, and large riding arenas. When designing a post-frame building, you have the freedom to create a custom layout. Since the inside walls do not have to hold up the roof, you can move them freely. You can also leave them out to create large, open rooms.
Because the system is efficient, it often results in a faster build time and lower costs. It is a great way for property owners who want a durable structure that can serve many needs. Whether you need a farm shed, a home, or a shop, this system delivers value and strength. It combines modern planning with normal wood framing. The result is a versatile building that can meet the needs of farmers, homeowners, and business owners alike. This building style continues to grow in use because it is both tough and flexible.
How a post-frame building goes from idea to finished structure
A post-frame building moves from site assessment and engineered design through permits, site preparation, post setting, framing, roofing, siding, and interior work. Early decisions about use, access, drainage, and utilities shape the entire project, so careful planning before construction prevents expensive changes later.
A post-frame project moves from needs assessment and 3D design through engineering, permitting, site preparation, framing, enclosure, and interior finishing. Early decisions about use, access, drainage, doors, utilities, and local loads help the finished building perform well and reduce costly changes during construction.
The building process for this style is fast and easy to change. It starts with your idea and moves through a few clear stages. This way of building is a great path to get a big, open space without the high cost of old styles. Many people choose it for shops, barns, and even homes. By using modern tools, you can see your plan before the work even starts.
The first design and permit phase
First, you need to turn your idea into a real plan. You can use a designing a post-frame building tool to see your project in 3D. This helps you pick the right size, color, and doors for your needs. Once the design looks right, experts check the plans. They make sure the building will stand up to local snow and wind loads. This stage is vital for getting the right permits from your local office.
In Oregon and Washington, each county has its own rules. A team with local knowledge can help you get through this step. They know what the local building codes need for a safe structure. This saves you time and keeps the project on track. After the permits are set, you are ready to prep the ground for the crew.
Design and Planning: Use a 3D tool to map out your building and pick your features. Experts then review these plans to meet local safety codes and weather needs.
Permit Approval: Submit your plans to the local building office to get the needed permits. This step makes sure your project follows all state laws and safety rules.
Site Setup: Clear the land and level the ground where the building will sit. Proper drainage is also key to keeping the site dry and the building stable.
Setting the Posts: Dig deep holes and place pressure-treated wood columns into the ground. These posts must meet UC4B standards for long life and strength.
Building the Frame: Connect the posts with horizontal beams called girts and trusses for the roof. This creates the skeleton of your new post-frame building.
Adding the Skin: Attach metal or wood panels to the walls and roof. This step seals the building from rain and wind and gives it a finished look.
Inside Finishing: Pour the concrete floor and add any walls, power, or water lines you need. This is when the empty shell becomes a usable space for your work or hobby.
Site setup and main framing
Before the first post goes in, the site must be ready. You need a level spot with good drainage. This prevents water from pooling around the base of your building. A clear site also makes it easier for crews and trucks to move. Once the ground is ready, the crew marks the spots for the main posts. This ensures the building is square and true from the start.
The framing phase happens quickly. Unlike stick-built walls, this method uses large posts to hold the weight. These posts are the core of post-frame construction and provide great strength. Girts and purlins link the posts and trusses together. This creates a tough frame that can handle heavy loads for many years.
Finishing the outside and inside
The last steps turn the frame into a real building. Steel sheets are often used for the roof and walls. These sheets add stiffness to the whole structure through a process called diaphragm action. This helps the building resist wind and side loads. Once the shell is closed, the building is safe from the weather and ready for use.
The inside is where the building truly fits your needs. You can leave it open for a barn or shop. You can also add walls and heat for a home or office. Many owners choose to pour a concrete floor at this time. This gives you a smooth, clean surface for your tools or cars. It makes the space feel complete and ready for your projects.
Where post-frame buildings work especially well
Post-frame construction works especially well for garages, workshops, agricultural storage, equestrian facilities, commercial buildings, and barndominiums. Its widely spaced structural posts create flexible clear-span interiors, while exterior finishes and insulation packages can be tailored to the building’s use and Pacific Northwest climate.
Post-frame buildings work especially well where owners need large, adaptable interiors and efficient construction. Common applications include agricultural storage, equestrian arenas, garages, workshops, commercial spaces, and barndominiums. Wide clear spans and flexible door placement make the system useful for equipment, vehicles, animals, businesses, and changing needs.
Post-frame construction is a top choice for many types of buildings because it is strong and simple. This method uses large wooden posts for support rather than many small wall studs. This design lets you have big open spaces without needing extra inside walls. Many people find that designing a post-frame building is easier when they want a floor plan that can change over time. It is a smart way to get the most out of your land and your budget.
Farming and horse buildings
Post-frame methods are a classic choice for farms and horse owners. The wide spans are perfect for hay storage, cattle barns, and indoor riding arenas. You can keep large animals safe and dry while having enough room for tractors and tools. Because the posts are spaced far apart, you can add large doors easily for big machines. This makes it simple to move gear in and out without hitting walls.
Experts from the Montana DEQ state that post-frame systems are the main choice for barns and storage sheds. They handle heavy snow and high winds in the Pacific Northwest well. Farmers and ranchers like that these buildings go up fast. You can get your structure built in weeks rather than months. This helps you get back to your daily work with less stress and wait time.
Shops, garages, and business spaces
Many people need a place for their hobbies or a base for their work. Post-frame shops and garages work well because they give you a clear space for car lifts or wood shops. You can choose different wall heights to fit tall boats or large RVs. These buildings also cost less to build than many other types. They need fewer materials and less labor, which keeps more money in your pocket.
For business owners, post-frame is a smart move for retail shops or small warehouses. You can customize the outside to look like any other modern building. You can use wood, metal, or stone to match the look you want. This lets your business stand out while you save money on the main frame. The inside stays open, so you can change the layout as your company grows or your needs change.
Homes and living spaces
More people are using post-frame for their homes now. These are often called barndominiums or pole-barn homes. They are energy efficient because they have fewer spots where heat can leak out. The deep wall spots allow for thick insulation. This helps keep your home warm in the winter and cool in the summer. You can have a big, open living room without any poles in the way of your view.
The flexible design of post-frame means you can add on to your house later. If your family grows or you need a new home office, it is simple to expand the frame. You can work with a pro to plan for this growth from the very start. The frame can also handle many types of siding and roofing. This makes it a great long-term choice for anyone looking to build a custom home in Oregon or Washington.
Post-frame vs. stick-frame and steel buildings
Post-frame, stick-frame, and steel buildings solve different problems. Post-frame often provides the best balance of open interior space, design flexibility, and efficient construction for rural properties. The right choice depends on intended use, site conditions, local codes, finish expectations, and total project budget.
Post-frame combines widely spaced wood columns, flexible clear spans, and lighter foundation options. Stick-frame uses closely spaced studs and typically suits detailed residential layouts. Steel can span the widest spaces but may require more specialized installation and insulation. The right choice depends on use, site, budget, and finish requirements.
When you plan a new shop, barn, or home, you must pick a building style. The three most common types are post-frame, stick-frame, and steel buildings. Each system has its own traits that change your costs and project goals. Knowing how benefits of post-frame construction compare to other ways will help you make a good choice for your land.
Structure and clear spans
Post-frame construction uses large wood posts as the main support. These posts go deep into the ground or onto concrete piers. This system does not need load-bearing walls inside the building. Because of this, it allows for wide, open spaces. You can have large clear spans that make it easy to store big gear or set up a large shop. This method is an engineered wood-frame system that uses columns for support rather than standard walls. These wood columns are often pressure-treated to keep them strong for a long time.
The roof system in a post-frame building also works with the walls to keep the structure stiff. It uses roof diaphragms and shear walls to stay strong against wind and snow. This means the building can handle lateral loads without shifting. Stick-frame buildings use many small wood studs. These studs are often 16 or 24 inches apart. This style works well for homes but needs more walls inside to hold the weight of the roof. Pre-engineered steel buildings use heavy metal frames. They can span very wide distances without any poles inside. But, steel can cost more for small jobs. It also takes more skill and tools to put together than wood framing.
Foundation and site prep
The foundation is where these styles differ the most. Stick-frame and steel buildings usually need a full concrete slab or a wall. This means you must dig deep and pour a lot of concrete before you even start the walls. This adds time and cost to your build. If your land is not flat, you may have to do more work to get it ready for a slab foundation. This can be a big task on some plots of land.
Post-frame is different because the posts give the support. You can build on many sites with less prep work. The post-frame construction structural basics allow you to use a pier foundation or a simple slab. This often makes it faster to get started. It also works well if you want a dirt floor for a barn or an arena. This is very helpful for many people who build in the Northwest.
Insulation and energy use
Heat and air flow are other big things to think about. Post-frame buildings have posts spaced far apart, often 8 feet or more. This leaves big gaps for thick insulation. There are fewer wood studs to let heat escape. This low thermal bridging makes it easy to keep your building warm in the winter and cool in the summer. It is a very good way to build a home or a heated shop.
Stick-frame homes have studs every few inches. Each stud acts as a path for heat to move through the wall. You can still insulate them well, but it takes more work to get the same results. Steel buildings can be hard to keep warm because metal moves heat very fast. You must use special layers to stop moisture and keep the heat in. If you want a space that is easy to heat, post-frame is a strong choice for you.
Feature
Post-frame
Stick-frame
Steel
Primary Support
Wood posts
Wood studs
Steel frames
Clear Span
Very high
Low to medium
Highest
Foundation
Piers or slab
Full slab or wall
Full slab or wall
Build Speed
Fast
Medium
Medium
Insulation Ease
High
Medium
Low to medium
Each style has its place. Stick-frame is great for complex house plans. Steel is best for massive warehouses. Post-frame is the top pick for shops, barns, and simple homes because it is fast and costs less. By looking at your needs for span, site prep, and heat, you can find the best fit for your next project. This helps you build a space that lasts for years to come.
What changes when you build in Oregon or Washington?
Building in Oregon or Washington requires site-specific planning for permits, snow loads, wind exposure, seismic design, drainage, and wet-season construction. Requirements vary by county and property, so owners should confirm local rules and use engineered plans that reflect the exact building location and intended use.
Oregon and Washington projects must account for highly local moisture, soil, snow, wind, seismic, and permitting conditions. Good drainage, proper ventilation, treated ground-contact columns, and site-specific engineering protect the building. A regional builder can help align the design with the jurisdiction’s requirements and the property’s conditions.
Building in the Northwest brings new tasks. Our region has many types of weather and land. From the rainy coast to the snowy hills, your site tells you your plan. Locke Buildings has helped people in Oregon and Washington since 1981. We know that a shop in Salem needs a different touch than one in Centralia. When you use post-frame construction, you gain a system that fits these local needs.
Handling Moisture and Soils
Water is a big factor in the Northwest. Frequent rain can turn a building site into a swamp if you are not careful. You must plan for good drainage before you start. This means looking at the slope of your land. You want water to move away from your structure, not toward it. If water pools near your posts, it can cause the soil to soften or shift over time.
Soil types also vary across Oregon and Washington. Some areas have heavy clay that holds water. Others have sandy soil that drains fast. Knowing your soil helps you choose the right base. For strength in wet earth, wood quality is vital. Experts suggest using pressure-treated columns for ground contact. This wood resists rot and pests, which is a must in our damp air.
Our cool and damp air also creates a risk for moisture inside. When warm air hits a cold metal roof, water forms. This is called condensation, and it can drip on your floor. To stop this, you need a plan for air flow and insulation. Proper vents let moist air out before it causes trouble. This protects your steel from rust and your wood from mold. Insulation also helps keep your shop warm in the winter and cool in the summer.
Snow Loads and Wind Strength
Wind and snow are serious risks here. Coastal towns face salt spray and high gusts. Mountain towns deal with feet of heavy, wet snow. Your building must be designed for your exact spot. There is no such thing as one plan for all sites. Local rules set the bar for how much weight a roof must hold. This keeps your family and your gear safe during a big storm.
Strength is what keeps a building standing in a gale. In these wood frame systems, the skin and the frame work as one unit. Studies from Washington State University show that roof diaphragms help resist these forces. The metal sheets on the roof and walls give the needed shear strength. This design is why post-frame is a top choice for big open spaces like barns. When you learn more about post-frame construction, you see how these parts work as a team.
Local Permits and Rules
Permit needs are a key part of the planning process. Oregon and Washington have their own sets of rules. Your local county office will have maps showing setbacks. These are the gaps you must keep from property lines or roads. You should also check for any rules on the height or size of your shop. Getting this info early saves you time and money and helps avoid shocks.
Setbacks are not just about rules; they are about safety. They ensure fire trucks can reach your building if they need to. They also keep your neighbors happy by not blocking their views. Every site is unique, so do not guess on these values. Talking to a local expert can help you find the right path for your specific lot. Whether you buy a kit or want full service, knowing the local law is the first step. Using our 3D tool can help you see your project before any work begins.
What determines the cost of post-frame construction?
Post-frame construction cost depends on building dimensions, engineering requirements, site preparation, concrete, doors, windows, insulation, utilities, finishes, and whether you choose a materials kit or turnkey service. A project-specific quote is more useful than a generic square-foot estimate because every property and design differs.
Post-frame construction cost depends on building dimensions, site access and preparation, local engineering loads, materials, doors, insulation, utilities, interior finishes, and the delivery model. Kit prices cover material packages, not site preparation, concrete, labor, or installation. A project-specific estimate is the reliable planning tool.
Post-frame construction is a smart choice for many building projects. This method uses large wood posts as the main support for the frame. This style is open and can work for a shop, a barn, or even a home. Costs will shift based on your site, the size of the build, and the parts you pick. Knowing what drives these costs helps you plan a budget that works for your goals.
Project size and site needs
The size of your build is the main factor for the final price. A large barn or a wide shop needs more wood, steel, and concrete. The wall height also plays a big role in the budget. Taller posts and bigger roof trusses add to the total cost. A roof with many peaks or complex angles will also cost more than a simple gabled roof.
Site work is a key part of your budget that you should plan for early. You must clear, grade, and level the ground before the build starts. Some lots may need extra work to drain water away from the site. You should check post-frame construction structural basics to see how to plan your base. Local permit fees and engineering rules also vary based on where you live in Oregon or Washington.
Design costs can vary depending on the details of the plans. Each building must be strong enough to handle local wind and snow loads. According to state building standards, the lateral loads in these buildings are resisted by roof diaphragms and shear walls. Often, these use wavy steel sheets to add stiffness to the frame. Making sure your plans meet local codes is a key step in the cost of post-frame construction projects.
Materials and building options
The parts you choose for your building will change the final bill. More windows and custom doors will add cost quickly. Many owners use steel siding because it is tough and lasts a long time. If you want a warm and dry space, you must add insulation and interior liners. Post-frame construction can save money on heating and cooling because it has less thermal bridging than stick-frame builds.
The quality of the wood used for the posts is also important for the price. Posts that go into the ground should be pressure-treated to high standards. This helps them resist rot and pests for a long time. Using the right materials keeps your shop or barn strong for decades. Picking high-grade steel for the roof and walls also makes sure the building can stand up to the wet weather in the Pacific Northwest.
Interior finishes can greatly increase the total project cost. If you plan to use the space for a shop or office, you might want to add drywall, lighting, and plumbing. These choices depend on how you will use the building. A simple cold storage barn will cost much less than a fully finished hobby shop or a barndominium with living quarters. Each extra feature adds to the labor and material needs.
Turnkey service versus kits
You can buy a building kit or pay for a full turnkey build. A kit gives you all the wood, steel, trim, and hardware in one package. Review Locke Buildings’ pole building options when comparing a materials kit with a full-service project. Keep in mind that kit prices only cover the material parts. They do not include the cost of labor, concrete, or site prep work.
A turnkey build means a pro crew does all the work for you. They handle the design, the permit process, and every step of the build. This path costs more but saves you a lot of time and effort. It is often the best choice for complex projects or for owners who do not have building skills. At Locke Buildings, we have helped people in the Northwest since 1981. We can help you pick the right building and service level for your needs.
Should you choose turnkey construction or a DIY kit?
Choose turnkey construction when you want one experienced team to coordinate the build. Choose a DIY kit when you have the equipment, skills, time, and local help to manage construction. Locke Buildings provides full construction service from Centralia to Salem and delivers kits throughout Oregon and Washington.
Choose turnkey construction when you want an experienced team to manage the build. Or choose a DIY kit when you have the time, skills, equipment, and labor to construct it yourself. Contractor supply is a middle path. Compare total scope, location, schedule, and responsibilities before deciding.
Deciding how to build your structure is just as important as the design itself. At Locke Buildings, we offer options to fit your skill level and budget. You can choose full-service turnkey construction, a DIY kit, or a contractor supply package. Each path has its own pros and cons based on your schedule and tools.
The turnkey construction path
Turnkey construction is the most hands-off choice for property owners. Our team handles the project from the ground up. This service is best for those who want a pro to manage every detail. We offer full-service construction in a specific region. This area runs from Centralia, Washington down to Salem, Oregon. Choosing this path lets an experienced team handle the details. Learn more about Locke Buildings and its regional experience.
When you go turnkey, you do not have to worry about finding workers or renting tools. We take care of the site prep, concrete, and building assembly. This method is often faster because our crews have the right gear and experience. It is a great fit for busy owners or complex commercial builds that need strict oversight.
Building with a DIY kit
If you have the right skills, a DIY kit is a smart way to save on labor costs. We deliver high-quality materials to your site anywhere in Oregon or Washington. These kits are a popular choice for shops, garages, and small barns. You get the same custom-engineered parts we use in our own builds, but you do the work yourself.
Before you start, make sure you have the right equipment. You will likely need a tractor or skid steer to set large posts. You also need to know how to read building plans and handle local permits. To get started on your plan, try designing a post-frame building using our 3D tools. Keep in mind that kit prices do not include site prep, concrete, or the labor to put it all together.
Choosing the right fit for you
The best choice depends on your time and comfort with tools. If you enjoy manual work and have a few weeks to spare, a kit might be your best bet. It allows you to build at your own pace while keeping more money in your pocket. But if you want the peace of mind that comes with a pro build, turnkey is the way to go.
Regardless of your choice, post-frame construction is a highly efficient way to build. This method uses large wooden posts as the main support instead of load-bearing walls. This setup allows for large open spaces and saves on material costs. Whether you build it or we do, you get a strong, versatile building that lasts for decades.
How do you protect a post-frame building over time?
Protect a post-frame building with routine inspections, prompt leak repairs, clear gutters, good drainage, intact siding and roofing, pest control, and careful moisture management. A brief annual check helps owners catch small concerns before they affect structural components, stored property, or interior finishes.
Protect a post-frame building by directing water away from the site, keeping gutters and drainage paths clear. Inspecting roof and wall panels, maintaining sealants and fasteners, and watching for pests or moisture. Regular checks reveal small issues early and help preserve the frame, cladding, and interior.
Upkeep for post-frame construction structural basics is easy but needed. You want your building to last for many years. Set checks help you find small issues before they become big ones. A good plan keeps your shop, barn, or garage in top shape. While these buildings are strong, they still need some care to stay in peak form.
Control water and drainage
Water is the biggest threat to any home or shed. You must keep dampness away from your wood posts and metal siding. Good gutters and downspouts are your first line of shield. They move rain away from the base of the building. This helps stop rot and soil shifts near the main supports. If rain hits the ground and splashes up, it can wear down the paint on your metal walls over time.
The ground around your building should slope away from the walls. This is called grading. If water pools near the posts, it can cause wood decay or rust on the base trim. Check your drainage after a big storm to see where the water goes. Fix any low spots right away to keep the site dry. Keeping the area around your building clear of weeds also helps the soil dry out faster after a storm.
Check the roof and siding
The outside of your building takes a lot of stress from the wind and sun. You should walk around your building twice a year to look for wear. Look for loose trim or dents in the metal panels. Tighten any screws that have backed out over time. This keeps the shell tight and stops leaks from starting. A small leak can lead to big costs if you do not catch it early.
Roof leaks can cause rot in the wood trusses or framing. Use a lens or look from a ladder to check the roof. Look for signs of rust or damage near the ridge cap and vents. A well-built post-frame construction project uses strong parts, but the sun can still wear down rubber seals. If you see a seal that is cracked, swap it out for a new one to keep the inside dry.
Watch for pests and moisture
Pests like mice or bugs can cause real harm to wood and wires. Look for signs of nests or wood damage near the base of the posts. Most modern posts are treated to high standards to stop bugs. But you should still keep wood piles and tall grass away from the walls. This removes hiding spots for pests that might try to get inside. Keeping the base of the building clean also makes it easier to spot new issues.
Damp air can also be a risk inside a closed shop or barn. Good air flow helps keep the space dry. Check your vents to make sure they are clear of dust or bird nests. If you see wet spots on the walls, you may need more fans or vents to move the air. Keeping the air moving is the best way to stop mold and keep your tools from rusting.
If you want to add on to your building, talk to a pro first. Do not cut into the main posts or trusses without a good plan. Changes to the shell can change how the building handles heavy wind or snow. A pro can help you make sure your new space stays safe and strong for the long haul.
How to plan your post-frame building
Plan a post-frame building by defining its use, measuring needed clearances, assessing the site, confirming local requirements, choosing kit or turnkey service, and developing a realistic total budget. Locke Buildings’ 3D designer helps owners test dimensions, doors, colors, and features before requesting a quote.
Plan a post-frame building by defining its present and future use, assessing access and drainage, checking local permit and engineering requirements, and setting a complete budget. Then use a 3D designer to test dimensions, doors, colors, and features before requesting a project-specific quote.
Planning is the key part of any new shop or barn. A good plan helps you avoid mistakes that cost time and money later. When you start your project, think about how you will use the space today and ten years from now. This focus on future needs ensures your post-frame construction meets your goals for a long time. It also helps you pick the right size and style for your land.
Define the building’s use
Start by making a list of what you need to store or do in the space. Will you use it as a garage for cars or a large workshop for tools? Many people find that their needs grow over time. It is often cheaper to build a larger space now than to add onto it later. Consider how much height you need for vehicle or tool clearance. If you have a large tractor or an RV, you will need tall doors and enough room to move inside.
Door placement is also key for a useful layout. You should place doors where they make the most sense for how you move in and out. Think about where your work benches or storage racks will go before you set the wall layout. Standard post-frame construction allows for large open floor plans because it does not need many interior load-bearing walls. This freedom makes it easy to change your layout as your hobbies or business needs change. You can leave the interior as one big room or add walls for an office or shop area.
Assess the building site
Your land will dictate much of your building’s design. You must look at site access for large trucks during the build process. If a semi-truck cannot reach the site, it may be hard to get your materials sent. You also need to think about power and water. It is much easier to run these lines before the concrete floor is poured. Good drainage is another vital step to keep your building dry and safe from water damage. You should plan for a slope that moves water away from the base.
Local rules and permits are also a big part of the planning stage. Each area in Oregon and Washington has different codes for snow loads and wind speeds. Working with a team that knows these local needs can help you get through the permit process faster. They can guide you on where you can build and what permits you need. For more help with these early steps, use the 3D pole barn designer to test a building concept that fits your land and local rules. Proper site prep will save you from many headaches during the build.
Design and budget your project
Once you know what you want and where it will go, you can start the design phase. Planning for post-frame construction is often simpler than standard framing because the system uses fewer materials and less labor. This speed helps you get the most out of your budget. You should decide early on if you want a full-service build or a DIY kit. Keep in mind that kit prices usually do not include the cost of site prep, concrete, or labor. Knowing your budget scope early helps you make better choices on finishes and features.
The best way to see your ideas come to life is to use a 3D building tool. Locke Buildings offers a 3D designer that lets you change colors, doors, and sizes on your screen. You can test different looks until you find the perfect one for your land. You can also see how different insulation or interior finish choices look in the space. When you finish your design, you can submit it to get a custom quote. This step takes your plan from a simple idea to a real project with clear costs and a set timeline.
Frequently Asked Questions
What are the pros and cons of post-frame construction?
Post-frame construction is an engineered wood-frame system that uses large posts for support. A major benefit is better energy efficiency due to less heat loss in the walls. These buildings are often faster to build and cost less than common stick-frame structures. However, they need treated columns to prevent rot. According to Montana DEQ, this method allows for large open spaces and easy designs while using fewer materials.
How is a post-frame building constructed?
The build process starts with a grid layout of posts set deep into the ground. These wooden columns act as the main support, replacing the need for load-bearing walls. Builders use treated wood for columns to make sure the structure lasts a long time. Roof panels and shear walls help the building stand against wind. According to Washington State University, using corrugated steel sheets helps give more strength to the whole frame.
Is post-frame construction a good choice for a garage?
Yes, post-frame construction is a great choice for garages and workshops. This method is very flexible and allows for wide open spaces because it does not need inner support walls. This makes it easy to store large cars or tools. It is also faster to build than common framing, which can save on work costs. Many owners choose this style for its strength and easy design. You can even use tools to see the plan before work starts.
Can post-frame construction be used for barndominiums?
Post-frame methods are a popular way to build homes and barndominiums. The system offers high energy efficiency and an easy building process. Because the posts support the roof, the inside can have a very open floor plan with high ceilings. This design flexibility is great for custom home layouts. Many people in the Pacific Northwest use this method for its strength and speed. It provides a solid frame that can handle local weather while offering a unique, modern look.
Ready to design your building online and request a quote?
Waiting to start your build can lead to higher price tags and long wait times as our project list for the year fills up very fast. In our area, starting your plan early is the best way to beat the winter weather and get your permits in order on time now. By taking action today, you make sure your shop or barn is ready when you need it and your costs are set before price hikes.
Ready to design your building online and request a quote? Use our 3D building designer to design your building online and request a quote with our expert team so you can get started on your dream building today.
You have the vision for your new building: a spacious workshop for your projects, a secure barn for your animals, or a garage with plenty of storage. A pole barn kit is a fantastic way to make that vision a reality, giving you a high-quality structure with a ton of flexibility. The next practical step is figuring out the budget. Understanding pole barn kit prices is key to planning your project effectively. In this article, we’ll walk through everything that goes into the cost, from the building’s dimensions and materials to the add-ons that make it uniquely yours.
Budget Beyond the Kit: Remember that the kit price is just the starting point. Your total project cost will also include essential expenses like site preparation, permits, assembly labor, and any interior finishes such as electricity or insulation.
Customization Drives the Cost: Your final price isn’t fixed; it’s determined by your choices. Key factors like the building’s dimensions, material quality, roof style, and add-ons like windows or doors will have the biggest impact on your budget.
Invest in Quality for Long-Term Savings: A cheaper kit isn’t always the better deal. Opting for higher-quality materials, proper engineering for your local weather, and a strong warranty will save you money on future repairs and ensure your building lasts for decades.
What Is a Pole Barn Kit?
Think of a pole barn kit as a complete building package, with all the essential structural materials bundled together and delivered right to your property. It’s a fantastic option if you have some construction experience or plan to hire your own builder. A kit gives you a major head start by providing everything you need in one go, which helps reduce material waste and ensures all the components are designed to work together perfectly.
Instead of sourcing lumber, metal siding, and trusses from different suppliers, a kit streamlines the entire process. You get professionally engineered plans and all the core materials matched to your specific design. This approach is popular for everything from garages and workshops to storage buildings and hobby barns. At Locke Buildings, we’ve been helping people in Oregon and Washington with their pole building projects since 1981, offering both kits and full construction services. A kit provides a solid foundation for your project, giving you control over the timeline and labor while still benefiting from high-quality, pre-packaged materials.
What’s Included in the Price?
When you buy a pole barn kit, the price typically covers all the primary structural components. This includes the posts, trusses, roofing, siding, and all the fasteners and hardware needed to put it together, along with a full set of blueprints. Prices can start around $4,000 for a small shed and go up to $15,000 or more for a larger garage or workshop.
What’s generally not included are things like the concrete for the foundation, labor for assembly, or any interior finishing like insulation and electrical. The final cost depends entirely on the size, style, and features you choose. You can add windows, walk-in doors, or large roll-up doors, all of which will influence the price. The best way to get an accurate estimate is to design your building and see how different options affect the total.
Kits vs. Custom Builds: A Cost Comparison
Choosing between a kit and a custom build often comes down to your budget and how hands-on you want to be. A pole barn kit has a lower upfront cost because you are primarily paying for the materials. In contrast, a custom build is a full-service solution where a contractor handles everything from site prep to final assembly.
On average, a custom-built pole barn can range from $20 to $60 per square foot, which includes both materials and labor. While a kit’s initial price is lower, you’ll need to budget for labor, equipment rental, and site work. The good news is you have options. Whether you prefer the DIY-friendly approach of a kit or want a team to manage the project from start to finish, we offer both pole building construction and kits to fit your needs.
What Influences Pole Barn Kit Prices?
When you start shopping for a pole barn kit, you’ll quickly notice that there isn’t a single, simple price tag. The final cost is a lot like ordering a custom coffee; it all depends on what you put into it. The price can shift based on a handful of key factors, from the size of your building to the style of your roof. Understanding these variables is the first step to creating a realistic budget and ensuring you get the exact building you need without any surprises.
Think of it less as a fixed price and more as a starting point. The base price for a kit often covers the essential structural shell, but the real magic (and cost) comes from the choices you make. We’ll walk through the five main elements that shape the final price of your pole barn kit: the building’s size, the quality of its materials, the complexity of the roof, any custom add-ons, and even your location. By the end, you’ll have a clear picture of how to plan your budget effectively.
Building Size and Dimensions
It’s no surprise that the biggest driver of cost is the size of your pole barn. A larger building requires more lumber, more steel, and more hardware, which naturally increases the price. When we talk about size, we’re looking at three key measurements: width, length, and height. A 30×40 foot kit will cost less than a 60×120 foot arena, for example.
But it’s not just about the overall square footage. The eave height, which is the distance from the ground to the bottom of the trusses, also plays a significant role. A 16-foot high building will require longer posts and more siding than a 12-foot high building of the same footprint, adding to the material cost. Deciding on the right dimensions is a balancing act between securing enough space for your needs and staying within your budget.
Material Quality and Framing
Not all pole barn kits are created equal, and a lot of that comes down to the quality of the materials. A basic, budget-friendly kit might use lower-gauge steel and standard lumber, while a premium kit will feature higher-quality components designed for longevity. For the framing, this includes using pressure-treated posts that resist rot and insects. For the exterior, it means choosing thicker-gauge steel for roofing and siding that can stand up to Oregon and Washington’s weather, along with long-lasting paint finishes.
While a lower-cost kit might seem appealing upfront, investing in better materials often saves you money in the long run by reducing maintenance and extending the life of your building. When you get a quote, always ask about the specific materials included.
Roof Style and Complexity
The style of your roof does more than just define your barn’s look; it also impacts the price. A simple gable roof, with its classic triangular shape, is the most common and cost-effective option. It’s straightforward to engineer and requires the least amount of material.
If you’re interested in a more distinct look, like a gambrel roof (the traditional barn style with a two-sided slope) or a monitor roof (which has a raised center section for ventilation or light), expect the price to go up. These more complex designs require additional framing, more intricate truss work, and more labor to assemble. The roof pitch also matters. A steeper pitch can be great for shedding rain and snow but uses more roofing material, which adds to the cost.
Custom Features and Add-Ons
This is where you can truly personalize your pole barn, but it’s also where costs can add up. The standard kit provides the basic shell, but you’ll likely want to add features to make it functional for your specific needs. You can change almost every part of the barn to make it exactly what you need.
Common add-ons include:
Doors: Roll-up garage doors, sliding barn doors, and walk-in man doors.
Windows: For natural light and ventilation.
Wainscoting: A band of contrasting steel at the bottom of the walls for protection and style.
Overhangs and Lean-Tos: To provide extra covered space along the sides of your building.
Insulation: To help regulate the temperature inside.
Gutters and Downspouts: To manage water runoff.
The best way to see how these features affect the price is to experiment. You can explore all these options and get a feel for your ideal layout with our design tool.
Your Location and Site
Finally, where you plan to build has a direct impact on the price of your kit. First, there’s the cost of delivery. Shipping a large, heavy pole barn kit to a remote location will cost more than delivering it to a site near a major highway.
More importantly, your specific location in the Pacific Northwest determines the engineering requirements for your building. A barn built near the coast in Oregon needs to withstand high winds, while one in the Cascade mountains of Washington must handle heavy snow loads. These local building codes dictate the strength of the trusses, the spacing of the posts, and other structural details. A kit engineered for a high snow load area will be more robust, and therefore more expensive, than a standard one. Working with a local company like Locke Buildings ensures your kit is designed to meet your area’s specific codes from the start.
A Look at Pole Barn Kit Prices by Size
One of the first questions I get is, “How much will it cost?” While the final price depends on many factors, the size of your building is the biggest piece of the puzzle. To give you a clearer picture for your budget, let’s look at some typical price ranges based on three common sizes: small, mid-size, and large. Think of these as starting points. As you add custom features or choose different materials, the price will adjust, but this breakdown will help you understand the general investment for the space you need.
Small Kits (Hobby Barns and Sheds)
If you’re dreaming of a backyard workshop, a garden shed, or a small hobby barn, a small kit is the perfect place to start. These kits are ideal for personal storage and projects. Generally, you can expect basic kits to begin in the $3,000 range. More elaborate designs with extra features might reach over $10,000, but many simple, functional structures fall comfortably within that spectrum. This makes them an accessible option for adding valuable, durable space to your property. You can even start sketching out your ideas with our building design tool to see how different dimensions affect your layout.
Mid-Size Kits (Garages and Workshops)
This is the sweet spot for many people, covering everything from a two-car garage with extra storage to a dedicated, spacious workshop. Because these buildings are so versatile, their prices can vary quite a bit. A straightforward mid-size kit might have a different price point than one loaded with features. For example, a more complex 30×40 kit with specific doors, windows, and other options could start around $24,000. The final cost depends heavily on your choices, like the number of garage doors, window placements, and insulation needs. Exploring the different pole building kits we offer can give you a better sense of the possibilities for your project.
Large Kits (Commercial and Ag Buildings)
When your needs are on a bigger scale, for commercial storage, agricultural operations, or even a horse arena, you’ll be looking at large pole barn kits. The price range here is broad, reflecting the vast differences in size and complexity. A smaller “large” kit might start between $6,000 and $16,000. As you move into more substantial structures, prices can range from $14,000 to over $30,000. To give you a concrete example, a very large 50’x80’ kit could be priced around $40,000. These buildings are significant investments designed for serious, long-term use in your business or farm operations.
Planning for Costs Beyond the Kit
When you’re budgeting for your new pole barn, it’s tempting to focus only on the price tag of the kit itself. But the kit is just one piece of the puzzle. To get a true picture of your total investment, you need to account for the essential work that happens before, during, and after the kit is delivered. From preparing the ground to finishing the interior, these additional costs are what will transform your kit into a fully functional building. Let’s walk through the major expenses you should plan for beyond the initial purchase.
Site Prep and Foundation
Before your pole barn can go up, your land needs to be ready to support it. Site preparation involves clearing and leveling the ground where the building will stand. Depending on your property, this could be a simple job or a more involved project requiring excavation and grading to create a stable, flat surface. While pole barns don’t need a continuous concrete slab like other structures, they do require a solid foundation of posts set in the ground. The cost for site work can vary widely based on how much work your land needs, so it’s a critical line item to investigate for your specific building project.
Permits and Building Codes
Navigating local regulations is a non-negotiable step in the construction process. Before you start building, you’ll need to secure permits from your local city or county. The fees for these permits can differ significantly based on your location. Additionally, your project must adhere to local building codes, which dictate requirements for things like structural integrity, wind resistance, and foundation depth. These codes can influence your final design and materials, which in turn affects the cost. It’s always a good idea to contact your local planning department early to understand the specific requirements and fees for your area. This will help you avoid surprises and delays down the road.
Labor and Assembly
A pole barn kit provides the materials, but you still need a plan for putting it all together. While some experienced DIYers may take on the assembly themselves, it’s a big job that requires the right tools, equipment, and know-how. For most people, hiring a professional crew is the best approach. Labor costs for assembly can range from $20 to $60 per square foot, depending on the building’s complexity and local rates. Paying for professional construction services ensures your barn is built safely, efficiently, and correctly, giving you peace of mind that your investment is sound.
Utilities and Interior Finishes
The final costs depend on how you plan to use your building. A simple barn for hay storage will have different needs than a workshop or commercial space. Think about what you need to make the building functional for you. This includes running utilities like electricity and plumbing, which are essential for workshops, garages, or living quarters. You’ll also need to budget for interior finishes such as insulation, drywall, lighting, and flooring. These details are what turn a basic shell into a comfortable and complete space. You can explore different features and finishes with a design tool to see how customizations can impact your vision.
Understanding the Value Behind the Price
When you look at the price of a pole barn kit, it’s easy to focus on the number. But that price represents so much more than just a pile of materials. It’s a reflection of the building’s future strength, its adaptability to your needs, and the peace of mind that comes with a quality investment. A cheaper kit might save you money today, but a well-engineered kit from a reputable company saves you from headaches, repairs, and regrets for decades to come.
Think of it as the difference between a quick fix and a long-term solution. The value is in the details: the grade of the lumber, the thickness of the steel, the warranty on the paint, and the engineering behind the design. These are the elements that ensure your building stands strong against Pacific Northwest weather and serves you well, whether it’s for your business, your hobby, or your home.
Built to Last: Strength and Durability
A pole barn is a significant investment, and you want it to last. The durability of your building starts with the quality of the materials. Reputable kits use strong, high-quality components like premium wood and heavy-gauge metal siding and roofing. At Locke Buildings, we’ve built our reputation since 1981 on structures that are made to endure.
When you invest in a quality kit, you’re paying for longevity. For example, many high-quality metal panels come with a 40-year warranty, protecting your building’s appearance and integrity for decades. This commitment to quality means your structure will require fewer repairs and less maintenance over its lifetime, saving you money and effort in the long run. It’s about building it right the first time so it can serve you for a lifetime.
More Than a Barn: Versatile Designs
One of the greatest things about a pole barn is its incredible versatility. The open-concept design allows you to create almost any space you can imagine. Forget the idea that they are just for agricultural use. People are using pole buildings for workshops, multi-car garages, retail shops, and even beautiful, open-concept homes. This flexibility means the building’s value extends far beyond its initial purpose.
Your pole barn can adapt as your needs change. What starts as a workshop could one day become a guest suite or a studio. You can explore all the possibilities and see how a structure can be tailored to your exact vision. With our design tool, you can experiment with different layouts and features to create a building that perfectly fits your life, both now and in the future.
Why Quality Materials Matter
The range in pole barn kit prices often comes down to one crucial factor: the quality of the materials. While a basic kit might seem like a bargain, it often uses lower-grade lumber or thinner metal that may not stand up to heavy snow or strong winds. Opting for a kit with superior materials is a direct investment in the safety and longevity of your building.
Think about the specific demands of our climate in Oregon and Washington. Quality materials are engineered to handle the rain, wind, and temperature changes common to our region. Paying a bit more upfront for pressure-treated posts, stronger trusses, and thicker steel siding means you’re getting a structure that is built to last. It’s the difference between a building that merely stands and one that stands strong for generations.
How to Choose the Right Kit
Once you have a handle on the potential costs, you can start comparing your options. But choosing the right pole barn kit isn’t just about finding the lowest price. You’re looking for a partner who will provide a high-quality, durable structure that meets your exact needs. A great kit is a combination of quality materials, a solid warranty, and the flexibility to create the building you’ve envisioned.
Think of it as a long-term investment. The right choice will give you a building that stands strong for decades, while the wrong one can lead to headaches and unexpected costs down the road. To make sure you’re getting the best value, focus on a few key areas. Pay close attention to the warranty details, ask about available financing, and confirm you have the freedom to customize the design. These steps will help you confidently select a kit that’s perfect for your project.
Review the Warranty
A warranty is the manufacturer’s promise that their product will last. When you’re investing in a structure that needs to withstand Oregon and Washington weather, this promise is incredibly important. Before you commit to a kit, take a close look at the warranty coverage. A reputable supplier will stand behind their materials.
For example, it’s common to see substantial warranties on the most critical components, like the metal roofing and siding. Look for specifics, such as a 40-year warranty on the paint so it won’t chip or fade, and a 25-year warranty against rust. This level of coverage gives you peace of mind, knowing your building is protected and built to endure for years to come.
Ask About Financing
Let’s be honest, a new pole building is a significant purchase. While kits offer a cost-effective way to build, the upfront expense can still be a hurdle. That’s where financing comes in. Many suppliers understand that their customers are working with a budget and offer financing options to make the project more manageable.
Don’t be shy about asking potential suppliers what kind of financing they offer. Spreading the cost over time can make it much easier to get the building you need without having to compromise on size or features. Exploring these options early in the process can help you set a realistic budget and move forward with your project sooner rather than later.
Check for Design Flexibility
Your pole barn should work for you, not the other way around. Whether you need a specific layout for your workshop or extra clearance for an RV, your building needs to fit your life. That’s why design flexibility is so important. The best kits aren’t one-size-fits-all; they are a starting point for your vision.
Look for a provider that allows you to customize nearly every part of the barn, from the dimensions to the door and window placements. Some companies even offer online tools that let you design your own building and see your ideas come to life. This freedom ensures you get a structure that is perfectly tailored to its purpose from day one.
Design Your Pole Barn and Get a Quote
Once you have a good handle on the different factors that influence cost, it’s time for the fun part: bringing your vision to life. Instead of guessing what your ideal pole barn might cost, you can get a detailed and accurate quote by creating a design yourself. This step is where all your ideas about size, style, and features come together into a tangible plan. It’s the most effective way to see how your choices impact the final price tag, taking the guesswork out of budgeting for your project.
The best way to do this is with an interactive design tool. Think of it as a digital sandbox where you can build, modify, and price your pole barn in real time. You are not limited to a few standard options; you can adjust everything from the building’s width and length to its height. Want to see how a different roof pitch looks or what adding a lean-to does to the price? A good design tool lets you make those changes with a simple click. This flexibility ensures the final structure is exactly what you need, whether it’s a simple two-car garage or a large agricultural building.
With Locke Buildings’ online 3D designer, you can experiment with different layouts and features to create your perfect structure. You can select your dimensions, choose your roof style, and place doors, windows, and other custom add-ons exactly where you want them. As you make adjustments, you’ll see the design and the price update instantly. It’s a straightforward, no-pressure way to explore all your options and receive a detailed quote for the building you truly want. When you’re ready, you can submit your design directly to our team to get the conversation started.
What’s the main difference in cost between a kit and having you build it for me? The primary difference is that a kit’s price covers the materials package, while a custom build includes both materials and all the labor for construction. A kit has a lower upfront cost, but you will need to budget separately for assembly, whether you do it yourself or hire a contractor. A full-service build from our team wraps everything into one price, giving you a complete, ready-to-use structure without you having to manage the construction process.
Do I need to be an expert builder to assemble a pole barn kit? While you don’t need to be a professional contractor, having solid construction experience is a huge advantage. The kits come with engineered plans, but assembly is a major project that requires the right tools, safety knowledge, and often a few extra sets of hands. If you’re new to building, we generally recommend hiring a professional crew to ensure your barn is assembled safely and correctly.
Besides the kit, what are the biggest extra costs I should plan for? The three biggest costs beyond the kit itself are site preparation, labor, and the foundation. Preparing your land might involve clearing and leveling the ground. Labor for assembly is a significant expense if you hire a crew. Finally, you’ll need to budget for the concrete needed to set the posts in the ground, which forms the building’s foundation.
Why does my location in Oregon or Washington affect the price of the kit? Your location impacts the price because every building must be engineered to meet local codes for wind and snow. A barn near the coast needs to be stronger to handle high winds, while a structure in the mountains requires a design that can support heavy snow. These specific engineering requirements mean we use different materials or designs to ensure your building is safe and durable, which can influence the final cost.
Can I really customize any part of the kit, or are there standard designs I have to choose from? You have a tremendous amount of design freedom. While we start with a basic structure, you can adjust nearly everything to fit your needs. You can change the building’s dimensions, choose the roof style, and add features like roll-up doors, windows, and lean-tos exactly where you want them. Our online design tool is the best place to experiment with these options and create a building that is truly your own.
You know that feeling when you walk into a space and everything just works? Tools are within reach, pathways are clear, and there’s a natural, easy flow from one area to the next. That feeling doesn’t happen by accident. It’s the direct result of a well-planned building layout. For any barn, shop, or commercial space, the layout is the key to productivity, safety, and overall enjoyment. It determines whether your building is an active partner in your work or a constant source of friction. This guide will show you how to think like a designer and create a building layout that supports your specific needs.
Key Takeaways
Design for Your Daily Workflow: A successful layout is all about function. Create a space that works for you by planning clear traffic paths, grouping related tasks into logical zones, and leaving room for future growth.
Account for Real-World Details: Avoid common frustrations by planning for the little things from the start. Measure your equipment, consider where you will need electrical outlets, and mentally walk through your daily tasks to ensure your layout is truly practical.
Visualize Your Plan Before You Build: Use free online design tools to turn your ideas into a visual plan. Experimenting with different layouts helps you understand the scale and flow of your space, letting you fix problems on screen instead of on site.
What Is a Building Layout?
Think of a building layout, or floor plan, as the master blueprint for your future space. It’s a scaled bird’s-eye view diagram that shows how every part of your building relates to the others. This isn’t just a rough sketch; it’s a detailed plan that maps out walls, rooms, doors, windows, and major structural elements. It’s the roadmap that dictates how people, animals, or equipment will move through the building.
For a pole building, the layout is everything. It determines where you place horse stalls for easy access, how you arrange car lifts for an efficient auto shop, or where you position aisles and checkout counters in a retail store. A good layout defines the building’s flow and function before a single post goes into the ground. It helps you visualize exactly how you’ll use the space day-to-day, ensuring the final structure is practical, safe, and perfectly suited to your needs. Getting the layout right is the most critical first step in creating a building that truly works for you.
Why a Smart Layout Is So Important
A smart layout is the difference between a building that feels intuitive and one that creates daily frustrations. Its importance goes far beyond just looking good on paper; it’s about creating functional and aesthetically pleasing spaces that support your goals. A well-designed layout maximizes every square foot, ensuring you have an efficient workflow, easy circulation, and no wasted space.
This thoughtful planning prevents future headaches. It ensures your building can adapt as your needs grow and change, saving you from costly renovations down the road. Whether it’s for a commercial business, a farm, or a personal workshop, a smart layout makes the building more productive, comfortable, and valuable in the long run. It’s an investment in functionality that pays off every single day.
What Makes a Layout Functional?
A functional layout is one that works for you, not against you. It’s the invisible framework that makes your daily activities smoother, safer, and more efficient. Think of it as the choreography of your space. Whether you’re running a commercial business, managing a farm, or working on projects in your shop, a well-designed layout considers how you move, what you need, and where you need it. It’s about more than just four walls and a roof; it’s about creating a space that supports your goals. A layout that feels intuitive and effortless doesn’t happen by accident. It’s the result of careful planning that prioritizes how the building will actually be used day in and day out.
When your building’s layout is right, everything just clicks. Tools are within reach, equipment has a designated home, and there’s a natural flow from one task to the next. When it’s wrong, you feel it in the form of daily frustrations, like bottlenecks, wasted steps, and cramped quarters. A smart layout can make a small shop feel spacious or a large barn feel organized and manageable. It’s the foundation of a productive and enjoyable space. Let’s break down the four key elements that turn a simple floor plan into a truly functional building.
Plan for Traffic Flow
The first step is to think about movement. How will people, animals, and equipment get from point A to point B? The goal is to create unobstructed paths that make sense for your daily routines. Clear pathways should be wide enough to move through easily, even when you’re carrying tools or leading livestock. For most spaces, a width of three to four feet is a good starting point. In a workshop, this means you can wheel a project across the room without hitting a workbench. In a barn, it ensures safe and easy passage for both you and your animals.
Define Your Zones
Every building has different activities happening within it, and a smart layout gives each one a dedicated home. This is called zoning. It’s about grouping related tasks together and separating activities that might clash. For example, you wouldn’t want your dusty woodworking area right next to a clean office space or a vehicle painting station. In an agricultural building, you might keep feed storage separate from the tack room. By defining your zones, you create a more organized, efficient, and pleasant environment for everyone. Think about your workflow and group stations logically to minimize unnecessary steps.
Let in Light and Air
Never underestimate the power of good lighting and ventilation. Placing windows and doors thoughtfully can fill your space with natural light, making it a more enjoyable place to be and even reducing your electricity bill. It’s often best to position large windows to capture morning light while avoiding the harsh afternoon sun. Proper airflow is just as important, especially in workshops creating fumes or agricultural buildings housing animals. A well-ventilated space is safer and healthier. Consider how large roll-up doors, windows, and ridge vents can work together to create a bright and airy environment.
Design for Future Growth
It’s easy to design for your needs today, but a truly functional layout also anticipates your needs for tomorrow. One of the biggest mistakes people make is underestimating future space requirements, which can lead to a cramped and inefficient building down the road. Will your business expand? Might you buy larger equipment for your shop? A flexible layout with open, adaptable areas gives you room to grow without needing a major renovation. Planning for the future from the start ensures your building serves you well for years to come.
How Layout Affects Your Building’s Daily Use
A building’s layout is much more than a simple floor plan; it’s the blueprint for how you’ll live, work, and move within the space every single day. The right layout can make your daily routines feel effortless, while a poorly planned one can create constant, low-grade frustration. Think about the path you’ll walk from your truck to your workshop bench, how easily livestock can move from a stall to a pasture, or how customers will browse your retail space. Each of these scenarios is directly shaped by your design choices.
A thoughtful layout considers not just where to put the walls, but how the entire building will function as a cohesive unit. It anticipates your needs and streamlines your activities, whether you’re running a business or pursuing a hobby. When planned correctly, your building becomes an active partner in your work, making every task simpler and more efficient. The goal is to create a space that feels intuitive and supportive, preventing bottlenecks and making it a genuine pleasure to use. We’ve seen how a great layout transforms our clients’ pole buildings from simple structures into highly functional and enjoyable environments.
Make the Most of Your Space
Your building is a significant investment, so you want every inch to work for you. An effective layout helps you do just that by maximizing every square foot. Instead of wasted corners or awkward, unused areas, a smart design creates a purpose for the entire footprint. This is where you can get creative with dual-purpose zones and adaptable spaces that can change as your needs evolve. For example, a section of your workshop could have modular workbenches that can be cleared away to create open floor space for a large project. The key is to design for efficiency and flexibility from the very beginning, ensuring your building serves you well for years to come.
Create a More Productive Workflow
For any commercial, agricultural, or workshop building, the layout directly impacts productivity. A well-designed space is about crafting an environment that actively supports your goals. For instance, in a manufacturing or warehousing setting, a customized layout can significantly reduce the time it takes for employees to move between stations and complete their tasks. Think about the natural sequence of your work. In a barn, this might mean placing the tack room close to the grooming area. In a commercial shop, it could involve arranging equipment to create a logical production line. By minimizing unnecessary steps and creating a clear path for movement, you build an environment that makes work flow smoothly.
Improve the Experience for Everyone Inside
A great layout isn’t just about efficiency; it’s also about creating a space that is safe, comfortable, and pleasant for everyone who uses it. This human-centric approach considers factors like natural light, ventilation, and ease of movement. For example, placing large windows in a workshop not only reduces the need for artificial lighting but also makes it a more enjoyable place to spend time. In a horse arena, a well-designed layout ensures clear sightlines for both riders and spectators. Achieving this requires a clear vision and good communication, ensuring the final design is operationally efficient and adaptable. When you start to design your own building, think about the experience from the perspective of every person (or animal) who will be inside.
Layout Ideas for Different Pole Buildings
The beauty of a pole building is its versatility. A simple, open shell can become anything you imagine. But the secret to a truly great building isn’t just its strong frame; it’s a layout that works for you, not against you. The right plan can make your daily tasks smoother, your space feel bigger, and your work more enjoyable. Whether you’re building a barn, a shop, or a retail space, thinking through the layout is the most important first step. Let’s look at some ideas for different types of buildings to get your own creativity flowing.
For Barns and Agricultural Buildings
When your building is part of your livelihood, efficiency is everything. A well-designed layout for an agricultural building can directly impact your productivity and bottom line by saving time and effort. Think about your daily chores and map them out. A central feed and tack room can reduce walking distance, while wide alleyways make it easy to move animals and equipment. Consider placing wash stalls near an exterior door to minimize mess inside. A customized layout helps reduce the time it takes to complete tasks, which is a huge win in any agricultural setting where every minute counts.
For Commercial and Retail Spaces
For a retail or commercial building, your layout is your silent salesperson. It needs to welcome customers, reflect your brand, and guide them effortlessly through your space. Start with a welcoming entrance and a clear path that encourages a natural flow. Use your layout to create focal points that showcase key products and encourage purchases. The design should feel authentic to your brand; a rustic farm store will have a very different feel and flow from a modern auto showroom. Your layout is a key part of the customer experience, making them feel comfortable and eager to see what you have to offer.
For Workshops and Shops
A personal or professional workshop is all about workflow and function. The best layouts are designed for both efficiency and flexibility. Think about creating distinct zones for different tasks, like a cutting area, an assembly table, and a finishing station, to keep your process organized and safe. Smart storage is also key to maximizing every square foot. Consider vertical shelving and mobile workbenches that can be moved as your needs change. A great workshop layout not only improves your current workflow but also includes adaptable spaces that allow for future growth and new equipment.
For Arenas and Open-Span Structures
The main advantage of a pole building for an arena is the ability to create massive, open-span interiors without interior support columns. Your layout should capitalize on this. Focus on creating a functional and safe space for both participants and spectators. This includes planning for adequate and comfortable seating, clear sightlines, and safe entry and exit points. Functionality and scalability are crucial. You want a space that is operationally efficient for daily use but can also adapt for special events. Good lighting and ventilation are also non-negotiable for creating a comfortable environment for everyone.
Bring Your Layout to Life with Our Design Tool
So, you have a vision for your new barn or workshop. But how do you get that idea from your head onto paper, let alone into a real building plan? It can feel like a huge leap, especially if you don’t have any drafting or design experience. The good news is, you don’t need to be a professional architect to create a solid plan. Modern design tools have completely changed the game, making it simple for anyone to map out and visualize a space.
Instead of just imagining where the doors will go or how big the main area should be, you can create a digital model to see it all come together. This is where the magic happens. Visualizing your layout in 2D and 3D helps you understand the scale and flow of your building in a way that a simple sketch can’t. You can experiment with different configurations, move walls, and place equipment to see what works best. This process is crucial because it helps you catch potential issues, like a poorly placed door or a cramped workspace, long before construction begins. It turns your abstract concept into a tangible plan, giving you the confidence that the final structure will be exactly what you need for your farm, business, or hobby.
Use Our Free Online Building Designer
This is exactly why we created our own design tool. We wanted to give you a simple, powerful way to bring your ideas to life. With our free online building designer, you can play the role of architect for your own project. Adjust the building’s width, length, and height, then add features like roll-up doors, windows, and lean-tos. You can even experiment with different color combinations for the roof, walls, and trim. Once you’re happy with your design, you can submit it directly to our team for a personalized quote. It’s the perfect first step to making your dream building a reality.
Common Layout Mistakes (and How to Avoid Them)
Designing your building is exciting, but a few common missteps can turn a dream layout into a daily frustration. Thinking through these potential issues ahead of time will save you from costly changes and ensure your new space works for you, not against you. Here are some of the most frequent layout mistakes we see and simple ways to steer clear of them.
Forgetting About Future Needs
It’s easy to design for your needs right now, but what about five or ten years from now? One of the biggest mistakes is underestimating future space requirements, which can lead to a building that feels cramped and inefficient sooner than you think. Before you finalize your plans, consider your long-term goals. Will your business expand? Do you plan on getting more livestock or larger equipment? Building a little bigger than you currently need, or designing a layout that’s easy to add onto later, provides valuable flexibility for growth.
Ignoring Furniture and Equipment Size
A floor plan can look perfect on paper, but reality hits when you try to move in your equipment. Forgetting to account for the actual dimensions of furniture, machinery, or storage racks is a classic mistake that makes a space feel awkward and unusable. Before you commit, measure everything that will go inside your building, from tractors and workbenches to retail displays. You can even use our free online building designer to place items in your layout and get a better sense of scale, ensuring you have plenty of room to work and move.
Creating Bottlenecks and Bad Flow
How will people, animals, and equipment move through your building? A poor layout can create bottlenecks that hinder movement and disrupt your daily workflow. Think about the main pathways. For a shop, that might be the path from your workbench to your tool storage. For a barn, it’s how you’ll move animals or feed. A layout should promote efficiency with clear, wide paths for high-traffic areas. Mentally walk through your daily tasks in the space to spot any potential choke points before they’re built.
Overlooking Accessibility and Modern Details
Functionality is more than just an open floor plan; it’s about making the space usable for everyone and everything. For commercial buildings, this means incorporating accessibility features. Overlooking modern details can also create problems, like not having enough electrical outlets or placing them in the wrong spots. If your building will be open to the public, you’ll need to follow ADA standards for things like ramps and doorway widths. For any building, planning for utilities like power, water, and internet from the start will make your space far more functional.
DIY Design vs. Hiring a Professional
One of the biggest decisions you’ll make is whether to design your building’s layout yourself or hire a professional. There’s no single right answer; the best path depends on your project’s complexity, your budget, and your own comfort level with design. The good news is that you have great options for either route. Whether you’re sketching on a napkin, using a digital tool, or collaborating with an architect, the goal is the same: to create a functional space that serves you well for years to come. Let’s walk through when each approach makes the most sense.
When to Design It Yourself
You don’t need a degree in architecture to start mapping out your pole building. Thanks to intuitive digital tools, anyone can bring their ideas to life. This is the perfect approach for straightforward layouts or if you simply want to explore different possibilities before talking to a contractor. Playing with the design yourself helps you understand your priorities, like where you want windows for morning light or how wide a hallway needs to feel comfortable. It’s a fantastic, no-pressure way to get started. You can even use our free online building designer to create and visualize your layout, giving you a solid foundation for your project.
When to Call in the Experts
If your project involves complex structural changes, a tricky building site, or requires navigating a web of local permits, it’s probably time to call in a professional. An expert can save you from costly mistakes and ensure your building is safe and up to code. A draftsman can turn your sketches into formal construction plans, which is ideal for simpler additions. For more complex or highly custom projects, an architect provides a comprehensive level of design and project management. Think of them not as an extra cost, but as an investment in getting the job done right the first time.
A Quick Look at the Costs
The cost of design help scales with the level of expertise you need. Simple digital drafting services might only cost a small amount per floor plan. Hiring a draftsman for a standard project could run from several hundred to a few thousand dollars. A licensed architect will be a larger investment, often starting in the low thousands and going up depending on the project’s scope. While these numbers might seem high, remember to weigh them against the potential cost of a major design flaw. A professional can often find efficiencies in the layout that save you money on construction, making their fee a worthwhile expense for a building you’ll love.
Frequently Asked Questions
What’s the very first thing I should do when planning my layout? Before you even start sketching, grab a notebook and think about your daily routine. Make a list of every task you plan to do in the building. What tools or equipment will you need for each task? How do you move from one activity to the next? Thinking through your personal workflow on this level gives you a practical foundation. This simple exercise helps you identify your real needs so you can design a space that truly supports how you work and live, rather than just guessing what might look good.
How do I figure out how much space I actually need? It’s a common fear to build too small. A great way to get a real-world sense of scale is to go to an empty driveway or lawn with some chalk or marking flags. Measure and mark the dimensions of your key equipment, workbenches, and vehicles. Then, walk around them. This gives you a physical feel for how much clearance you need. As a general guideline, it’s wise to plan for about 15 to 20 percent more space than you think you need today to allow for comfortable movement and future growth.
When should I use your design tool versus hiring an architect? Our online design tool is the perfect starting point for everyone, regardless of your project’s size. It’s a fantastic way to explore your options and clarify what you want in a no-pressure environment. You should consider hiring an architect or a professional designer when your project is highly complex, has unique structural requirements, or if you need help navigating local building codes and permits. Many people use our tool to create a solid initial design and then bring that to a professional for refinement.
Does a more complicated layout cost more to build? Generally, yes. The more complex your interior layout is, the more it can add to the final cost. Things like numerous interior walls, custom angles, and a high number of doors and windows all require more materials and labor. A simpler, more open floor plan is typically the most budget-friendly approach. The key is to find the right balance, creating a layout that is highly functional for your needs without adding features that unnecessarily increase the price.
My current building has a terrible layout. Is it too late to fix it? It’s a frustrating situation, but you might have more options than you think. One of the great advantages of pole buildings is their clear-span construction, which means the interior is often free of load-bearing walls. This structure makes them much easier to reconfigure than conventionally framed buildings. It’s often possible to move interior walls, create new openings, or completely rethink the zones within the existing shell to create a more functional and efficient space.
A new post frame building is more than just a structure; it’s a long-term investment in your property. While the initial price is a key consideration, it’s important to also think about durability, functionality, and resale value. So, as you ask, “how much does a post frame building cost,” remember to also consider the quality of the materials and the experience of the builder. A well-built structure from a trusted local contractor will stand strong against Pacific Northwest weather for decades, adding significant value to your home or business. This guide will help you understand the costs and the long-term benefits, ensuring you make a smart investment.
Key Takeaways
Plan for the Full Project Cost: The price of a building kit is just the starting point; a realistic budget must also include site preparation, a concrete foundation, permits, and utility connections.
Decide Between DIY Savings and Pro Convenience: A DIY kit can lower your costs if you have the right skills and time, while hiring a professional builder offers peace of mind, quality assurance, and expert project management.
Understand Why Post-Frame is a Smart Choice: The value of a post-frame building comes from its efficient construction method, which creates durable, wide-open interiors that are versatile enough for any use, from a simple barn to a finished workshop.
What Is a Post Frame Building?
You’ve probably heard them called pole barns, and for good reason. Post-frame buildings are a popular construction method known for their structural strength, design flexibility, and cost-effective approach. Instead of a traditional foundation with walls built stick-by-stick, a post-frame structure uses large, solid posts (or columns) that are secured deep in the ground or anchored to a concrete slab. These posts support the roof trusses, creating a strong, durable frame that doesn’t rely on interior walls for support.
This building method results in wide-open interior spaces that you can configure any way you like. Because the structural load is transferred directly to the ground through the posts, you need fewer materials and less site preparation compared to other construction types. This efficiency is what makes post-frame construction a go-to choice for anyone in Oregon and Washington needing a reliable and versatile structure. Whether you’re looking for a simple garage or a complex commercial facility, a post-frame building offers a practical and long-lasting solution.
Post Frame vs. Stick Frame and Masonry
When you picture a typical house being built, you’re likely thinking of stick-frame construction. This method involves creating a frame piece by piece on a continuous concrete foundation. It works well, but it often requires more materials, labor, and interior load-bearing walls, which can limit your floor plan. Masonry buildings, using brick or concrete blocks, are incredibly durable but are generally more expensive and time-consuming to construct.
Post-frame construction offers a smart alternative. With its widely spaced columns and clear-span trusses, it provides superior design flexibility and energy efficiency at a lower cost. You get a cavernous interior that you can leave completely open or divide up however you see fit, without worrying about structural walls getting in the way. This makes it easy to design your building to perfectly match your needs, whether you need space for large equipment or an open-concept workshop.
Popular Uses for Post Frame Buildings in Oregon and Washington
Here in the Pacific Northwest, the versatility of post-frame buildings makes them a perfect fit for our way of life. Their durability and open design are ideal for a huge range of applications. Many people use them for agricultural purposes, creating sturdy barns for livestock, hay storage, or protecting expensive farm equipment from the elements. Covered horse arenas are another popular choice, giving you a place to ride year-round, rain or shine.
Beyond the farm, these structures are perfect for personal workshops, RV garages, and hobby shops. We’re also seeing more people use post-frame construction for unique residential projects, like “barndominiums,” which combine living quarters with a large shop or studio space. Because they are so adaptable, you can customize a post-frame building for just about any purpose, making it a practical investment for property owners across Oregon and Washington.
How Much Does a Post Frame Building Cost?
So, what’s the bottom line? While the true answer is “it depends,” you can get a solid idea of the investment required for a post frame building. The final cost is a combination of the building’s size, the materials you choose, and the complexity of your design. Whether you opt for a DIY kit or a full-service construction project will also be a major factor in your budget. Let’s look at some typical price ranges to help you start planning.
Breaking Down Costs by Size
As you might guess, size is the biggest driver of cost. A smaller, basic pole barn kit might start around $6,000, while larger or more complex kits can range from $25,000 to $75,000 or more. For a popular size like a 30×40 building, you could expect the total cost to fall between $20,000 and $45,000, depending on the features. It’s also helpful to think in terms of cost per square foot, which often decreases as the building gets bigger. To get a more accurate estimate for the dimensions you have in mind, you can use a tool to design your building and see how different sizes affect the price.
Estimating Costs by Building Type
The intended use of your building plays a huge role in the final price. A simple agricultural storage barn will cost less than a fully finished workshop with insulation, concrete floors, and electrical wiring. A horse arena with special footing and high clearances will have a different set of costs altogether. While a DIY approach can save you money on labor, be careful with quotes that seem too good to be true. An unusually low price can sometimes signal lower-quality materials or a builder cutting corners on important structural features. Your building is a long-term investment, so it’s important to balance your budget with quality construction from a trusted pole building contractor.
What Factors Drive the Final Price?
When you start budgeting for a new post frame building, it’s tempting to look for a simple price-per-square-foot number. While that can give you a rough idea, the final cost depends on a handful of key factors. Think of it like building a custom car; the base model has a price, but the engine you choose, the paint color, and the interior finishes are what truly define the final sticker price. The same goes for your building.
From the dimensions and layout to the specific materials you select, every choice influences the total investment. Understanding these variables will help you set a realistic budget and make informed decisions. You can even design your own structure online to see how different choices affect the overall concept before you even request a quote. Let’s walk through the main factors that will shape the cost of your project.
Size and Layout
It’s no surprise that the size of your building is the single biggest factor in its cost. A larger footprint requires more materials, more labor, and a bigger foundation, all of which drive up the price. But it’s not just about total square footage. The building’s layout also plays a significant role. A simple, rectangular shop will almost always be more cost-effective than a complex L-shaped or U-shaped barn with multiple wings. The more corners and rooflines you add, the more complex the engineering and construction become. Interior walls, lofts, and the number of framed openings for doors and windows also add to the final tally.
Your Choice of Materials
The materials you choose for your siding, roofing, windows, and doors have a major impact on your budget. Standard metal siding and roofing are often the most economical choices, while options like wood or specialty steel can increase the cost. The same goes for insulation, windows, and doors. Upgrading to higher-quality, more energy-efficient options will cost more upfront but can save you money on heating and cooling in the long run. Be cautious of any quote that seems too good to be true. An unusually low price might mean the builder is using lower-quality materials or cutting out important structural features, which could cost you more in repairs down the line.
Site Conditions and Local Codes
Your property itself can introduce costs you might not have considered. A flat, clear, and easily accessible site is the ideal scenario. If your land is sloped, rocky, or heavily wooded, you’ll need to budget for excavation, grading, and tree removal. Furthermore, building codes can vary significantly between counties in Oregon and Washington. Your local requirements for snow load, wind speed, and seismic activity will dictate specific engineering needs for your building’s frame and foundation. Working with an experienced local contractor who understands these regional nuances is key to ensuring your building is both safe and compliant, avoiding costly surprises during inspection.
Custom Features and Design Complexity
This is where you get to add personality and function to your building, but it’s also where costs can climb. Custom features like decorative wainscoting, cupolas, dormers, or a steep roof pitch will make your building more expensive than a standard design. Functional additions like lean-tos for equipment storage, large overhead doors, or an interior finish package also contribute to the final price. Each custom touch adds material and labor costs, so it’s important to prioritize what’s most important to you. You can experiment with different features to find a balance between the look you want and the budget you have.
Local Labor Rates
If you’re hiring a professional crew to construct your building, labor will be a significant part of your total cost. These rates can vary depending on your location within Oregon and Washington and the experience of the construction team. While hiring a professional builder costs more upfront than a DIY kit, it offers convenience and peace of mind. An experienced crew handles all the logistics, ensures the building is constructed to high-quality standards, and typically includes a warranty on their workmanship. This investment protects you from common building mistakes and ensures your structure will stand strong for decades.
Don’t Forget These Additional Costs
The price of the building kit or the main construction contract is a huge piece of the puzzle, but it’s not the whole picture. Several other expenses, often called “soft costs” or site-specific costs, can significantly impact your total budget. Planning for these from the beginning will save you from sticker shock later and ensure your project stays on track financially. As you start to design your building, keep these common additional costs in mind to create a more realistic and comprehensive budget for your project.
Preparing Your Site
This is the groundwork, literally. Before any construction can begin, your land needs to be ready. This involves clearing trees, grading the earth to create a level building pad, and ensuring there’s clear access for construction crews and equipment. The ideal spot is a flat, open area that’s easy to get to. If your site is on a slope, covered in trees, or requires a long driveway, your preparation costs will be higher. A professional can help you assess your site and identify potential challenges early on, which is a crucial first step in managing your budget.
Concrete and Flooring
Your building needs a floor, but it’s often not included in the base price of a building package. The most popular choice is a concrete slab, which provides a durable, smooth, and easy-to-clean surface perfect for workshops, garages, and commercial spaces. A standard 4-inch concrete floor can run about $10 to $15 per square foot, including labor. If you’re looking for a more budget-friendly option, especially for an agricultural building or barn, a compacted gravel floor can work well. You can always pour a concrete slab later on when your budget allows.
Permits and Engineered Plans
Getting all the necessary permits is a non-negotiable step for any construction project. The cost for permits can be a few hundred dollars for a simple project, but for larger or more complex commercial buildings, you may need special engineer-stamped drawings, which can cost several thousand dollars. Working with an experienced local builder is a huge advantage here, as they understand the specific building codes in Oregon and Washington and can manage the permitting process for you. This ensures everything is done correctly from the start.
Connecting Utilities
Your new building won’t be very useful without power, light, and water. The cost to connect utilities can vary dramatically depending on how far your building site is from existing service lines. You’ll need to budget for trenching and running electrical lines, plumbing for water and sewer or septic systems, and potentially natural gas lines. It’s a good idea to get quotes from local utility companies and electricians early in the planning process. One homeowner reported a quote of $11,000 just to run electricity, so this is an expense you definitely don’t want to overlook.
Driveways and Landscaping
Finally, think about how you’ll access your building and how the area around it will look. You’ll need a sturdy driveway that can handle vehicle traffic and the wet weather we often see in the Pacific Northwest. This could be a simple gravel path or a paved asphalt or concrete driveway. You should also budget for basic landscaping, which includes final grading around the foundation to ensure proper water drainage away from your new building. These finishing touches are essential for both the function and longevity of your investment.
DIY Kit or Professional Build: Which Is Right for You?
One of the biggest decisions you’ll make for your post frame project is whether to build it yourself or hire a professional crew. There’s no single right answer; the best path depends entirely on your budget, timeline, and comfort level with construction. Choosing a DIY kit can offer significant savings and a sense of accomplishment, while hiring a contractor provides expertise, convenience, and peace of mind.
At Locke Buildings, we’ve seen customers succeed with both approaches. We offer both complete building kits for the dedicated DIYer and full construction services for those who prefer a turnkey solution. Understanding the trade-offs of each option will help you make a confident choice for your project. Before you decide, it’s a great idea to explore different layouts and features to get a clearer picture of your dream building. You can experiment with different options using our free tool to design your building and see what fits your vision and budget.
The Appeal of a DIY Building Kit
The biggest draw for a DIY building kit is, without a doubt, the potential for cost savings. If you have the skills, tools, and time to manage the project yourself, you can cut out labor costs, which often make up a large portion of the total price. For example, some people have built smaller pole barns for a fraction of a professional quote by doing the work themselves or with help from friends. This hands-on approach gives you complete control over the schedule and the satisfaction of building your own structure from the ground up. It’s an excellent option if you’re an experienced builder or a dedicated hobbyist looking for a rewarding project.
Hidden Costs of a DIY Project
While a DIY kit can save you money on labor, it’s crucial to understand what’s not included in the initial price. The quote for a kit typically covers the building shell, but you’ll need to budget separately for several other major expenses. These often include site preparation (like excavation and grading), a concrete foundation, and connecting utilities such as electricity and water. These “hidden” costs can add up quickly. Be cautious of kits with unusually low prices, as this can sometimes be a red flag for lower-quality materials or an incomplete package. A thorough plan that accounts for every phase of construction is key to keeping your DIY project on budget.
The Benefits of Hiring a Pro
Hiring a professional builder might have a higher upfront cost, but it offers invaluable benefits in return. The biggest advantages are convenience, quality assurance, and expertise. A professional crew handles every aspect of the build, from securing permits to managing subcontractors, saving you an immense amount of time and stress. Reputable contractors also provide warranties for their work, giving you long-term peace of mind. If you aren’t an experienced builder or your project is large and complex, hiring a pro ensures your building is constructed safely, efficiently, and up to code. This is an investment in a smooth process and a high-quality, durable final product from a team that provides expert pole building construction.
How to Compare Contractor Quotes
When you decide to hire a professional, it’s important to compare your options carefully. A good first step is to get quotes from several different builders. However, don’t just look at the final number at the bottom of the page. A truly professional quote will be detailed, breaking down the costs for materials, labor, site work, and any other services included. Lay the quotes side-by-side and compare exactly what you’re getting for your money. Does one include permit fees while another doesn’t? Are the material specs (like lumber grade or metal gauge) the same? A thorough comparison ensures you’re choosing a partner based on value and transparency, not just the lowest price.
Is a Post Frame Building a Good Investment?
When you’re planning a new structure, the initial price is a big factor. But thinking like an investor means looking at the bigger picture: long-term durability, resale value, and how the building will serve you for years to come. A post-frame building isn’t just an expense; it’s an addition to your property and your lifestyle. Let’s look at how it stacks up as a long-term investment.
Thinking Long-Term: Durability and Value
Post-frame buildings have become a go-to choice for everything from barns to commercial shops for a reason. They offer a smart combination of structural strength and design flexibility that’s hard to beat. Because the frame carries the building’s weight, you can have wide-open interior spaces without needing a lot of interior support walls. This makes them incredibly versatile. A well-constructed building from an experienced team is a truly durable asset that will stand up to Oregon and Washington weather for decades, adding significant value to your property when it’s time to sell. It’s an investment in quality that pays off.
Cost Comparison: Post Frame vs. Other Construction Types
When you compare costs, it’s important to look at the whole picture. While a traditional stick-frame building requires a continuous foundation, a post-frame building uses sturdy, laminated posts set deep in the ground, which can save time and money on foundation work. You might also see comparisons to all-steel buildings. While steel has its place, modern post-frame construction offers excellent durability and is often easier to insulate and finish on the interior. The term “pole barn” might make you think of a simple agricultural structure, but today’s post-frame buildings are sophisticated, engineered systems built for longevity and performance.
Common Budgeting Mistakes to Avoid
One of the biggest myths out there is that post-frame buildings are cheaper because they’re lower quality. That simply isn’t true. The cost savings come from an efficient construction method that requires less site preparation and a faster build time, not from using subpar materials. A major mistake is choosing a contractor based on price alone. Always get detailed quotes from a few builders and compare exactly what’s included. A low bid might mean lower-grade lumber or leave out essential features. To avoid surprises, it helps to have a clear vision. You can start designing your building with our online tool to get a better handle on your needs before you even ask for a quote.
Start Designing Your Building
Now for the fun part: bringing your vision to life. This is where you move from spreadsheets and estimates to creating a building that fits your property and your needs. The final cost of a post frame building can vary quite a bit, and the design stage is where you have the most control over the price tag. Every choice, from the size of the footprint to the style of the doors, will influence your final quote.
The best way to understand these trade-offs is to see them for yourself. You can experiment with different options using our free tool to design your building online. This lets you play with layouts, add features, and change colors to get a feel for what’s possible. It’s a no-pressure way to explore how different elements come together and get a preliminary idea of the cost before you even pick up the phone.
As you design, think about your priorities. For example, a simple 30×40 shop will have a different price than one with multiple overhead doors, a full insulation package, and decorative wainscoting. Make a list of your “must-haves” versus your “nice-to-haves.” You might need a specific ceiling height for an RV or lift, but you could save money by opting for a standard man door instead of a custom one.
Also, consider where you can contribute your own labor. If you’re comfortable with site work or have experience with interior finishing, you can handle those tasks yourself to lower the overall project cost. When you have a design you’re happy with, you can submit it to our team at Locke Buildings. We’ll use your design to create a detailed, accurate quote that breaks down the costs, ensuring there are no surprises along the way.
Frequently Asked Questions
Are “pole barns” and “post-frame buildings” the same thing? Yes, for the most part. “Pole barn” is the traditional term that often brings to mind a simple agricultural building. “Post-frame construction” is the modern, engineered term for the building method. While all pole barns use a post-frame method, not all post-frame buildings are simple barns. Today’s structures can be anything from complex horse arenas and commercial shops to beautiful homes, all using this strong and efficient building style.
How long does it take to build a post-frame building? The timeline really depends on the project’s complexity and whether you hire a crew or build it yourself. After you finalize the design and get your permits, site preparation can take a week or two. A professional crew can often erect the main structure of a standard-sized building in just a few days. Finishing the interior, pouring concrete, and connecting utilities will add more time. A full project, from breaking ground to final inspection, typically takes several weeks to a few months.
Can I really save money with a DIY kit? You can, but it’s important to look at the whole picture. The main savings from a DIY kit come from eliminating professional labor costs. If you have the construction experience, tools, and time, this can be a significant amount. However, remember that the kit price usually just covers the building shell. You will still need to pay for site work, the foundation, utility connections, and any interior finishing, so be sure to budget for those items to get a true sense of your total cost.
Why can’t I get a simple price-per-square-foot estimate? A simple square-foot price can be misleading because it doesn’t account for the specific choices that make your building unique. The final cost is shaped by many variables, including your site conditions, the quality of materials you select (like siding and windows), and any custom features you add, such as lean-tos or cupolas. A detailed quote based on a specific design is the only way to get an accurate number that reflects exactly what you want.
Do I need a building permit for my new structure? Almost certainly, yes. Most counties in Oregon and Washington require building permits for new structures, especially for anything more than a small shed. The permit process ensures your building is designed to meet local codes for safety, snow loads, and wind resistance. An experienced local contractor can manage this process for you, which is a huge benefit as they are familiar with the specific requirements in your area and can help you avoid costly delays.